Just a short and quick blogpost. I got an issue with my alphabetically sort. This was because my field was tokenized and of type text in Solr. So I had to make the field Untokenized and returnType string. Fixed!
With Sitecore you can pretty easy sort by Ascending or Descending with LINQ to Sitecore Just write an OrderBy or OrderByDescending with your field like so:
switch (direction)
{
  case SearchOrderDirection.Ascending:
    return queryable.OrderBy(i => i.Title);
  case SearchOrderDirection.Descending:
  default:
    return queryable.OrderByDescending(i => i.Title);
}
REMINDER: The field should be UNTOKENIZED and returnType string.
Sitecore released the new version, 10.2 recently and I wanted to make a quick summary of some of the features that stood out to me. For full Release Notes please check Sitecores doc here: 10.2 Release Notes
Decrepcated
Update Center is going away.
Support for Azure Search has been removed. They are going back to Solr after moving over to Azure Search in Version 10.0. Solr has been there through all 10.x but now their fully relying their internal indexes on Solr.
New features
EXM DDS role now supports containers. For fast deployment of a Dedicated Dispatch Server.
Solr version 8.8.2 is now the recommended version.
MVC components are now supported in Experience Edge. This is so projects can gradually go towards Headless and not have to throw away their existing projects.
Sitecore Identity Server 6.0.0 now runs on .Net Core 3.1. A big security update.
Use xConnect CLI to purge interactions you don’t need. Clear up space.
There is a new “Content Explorer” in Horizon which is a search and filter based way of finding items in Sitecore. This looks promising for future Headless endeavours.
Horizon now fully integrated with SXA. SXA now has Bootstrap 5 support, upgrades to Scriban templates and lots more.
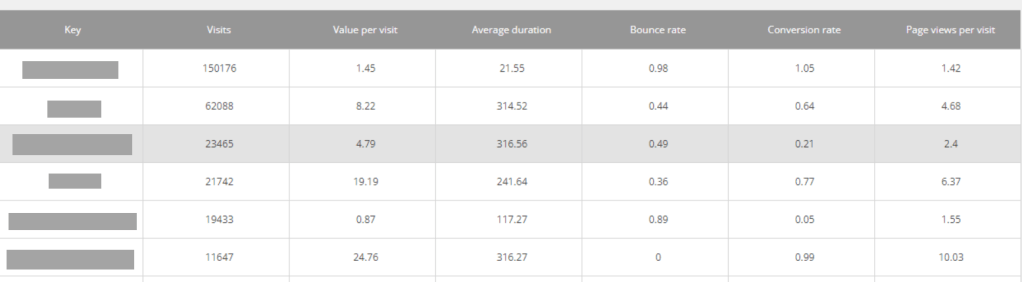
In Sitecore Experience Analytics you can see graphs and tables with data of visitor information such as pages they most navigate to, goal conversions etc.
By default these tables have no sorting set on a specific column. This in turn leads to intense scrolling through the result.
A sorted table. Learn how below
If you want to sort the tables by for example Visits in descending order, i’ll show you how. Same idea if you want to switch Visits for Page Views, Conversion Rate etc.
Log into Sitecore and go to Desktop from the Dashboard.
Switch to Core database
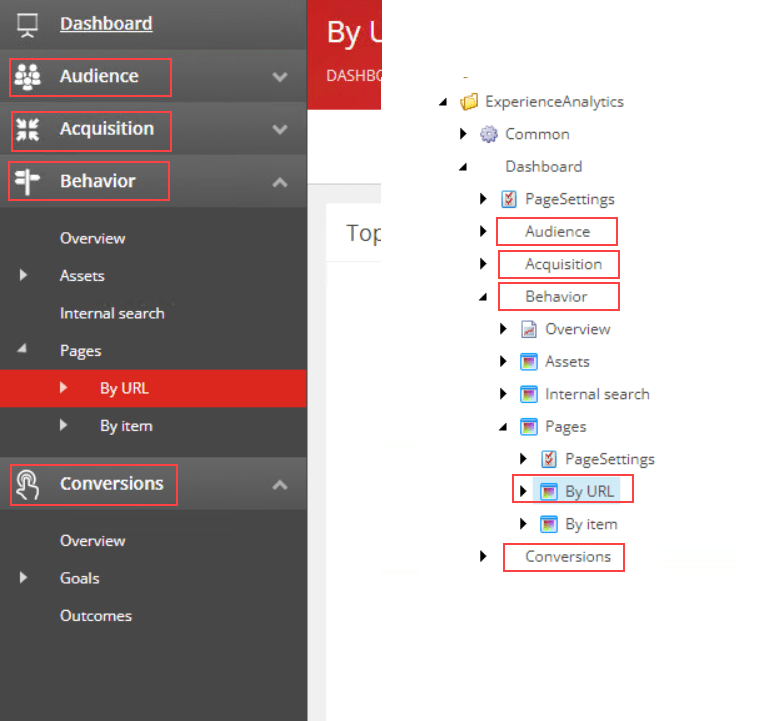
Open Content Editor and navigate to /sitecore/client/Applications/ExperienceAnalytics/Dashboard.
From here you need to find the tables you want to fix the sorting. As you can see in the image below, the tree in Content Editor matches the order in Experience Analytics.
5. Now open the coresponding nodes PageSettings and click the ListControl Parameters. Find the fields KeysSortByMetric (the column) and KeySortDirection.
Save and refresh your Experience Analytics window and the table should now be sorted.
Link to Sitecore documentation for Dimensions and Metrics and what the they mean: Click
SFE a.k.a Sitecore Forms Extension was pretty much mandatory for our Forms in Sitecore 9.1.1. It gave us the functionality which we didn’t get out of the box, such as file upload that can be sent as an attachment in mail and some other Sitecore Forms field types like Html Field & Recaptha.
You also get a new Submit Action that sends email via EXM dispatch.
When we submitted the form I got this error in the logs, even though the form was accepted:
An item with the same key has already been added
This was sort of a silent error. The form was submitted and you recieved a thank you message on the page. But no email was sent.
Ultimately this was because there was two fields in the Form that had the same name. There is no validation of this in the Form itself so if you don’t know about it beforehand you could end up with this error.
Just make sure you use unique names on all the fields.
So I was looking for a way to add an ordered or unordered list to a text in the Rich Text Editor in Sitecore 8.2 and I couldn’t find it in the Rich Text Editor (RTE). This is because the default RTE doesn’t show all functions (see image below).
The image above shows the default toolbar for the RTE. If you want to add more buttons to this, like ‘insert ordered list’, you will have to some customization in the core db. Nothing big. I’ll show you how!
Two choices.
First, fastest. Add a path in your template for the field type like so:
You can choose from Html Editor Profiles:
Rich Text Default
Rich Text Full
Rich Text IDE
Rich Text Medium
Rich Text Mail
I can’t think of a situation where this isn’t enough for your clients.
But for those that like to experiment there is a second choice, more customizable.
Start by switching to your CORE db and go to Content Editor.
Go to /sitecore/system/Settings/Html Editor Profiles. Lets say you duplicate the Rich Text Default item and rename it, in this case, to “Rich Text Custom”.
You want to add new items under /sitecore/system/Settings/Html Editor Profiles/Rich Text Custom/Toolbar 1.
Insert new _Html Editor button. In the field ‘Click’ you enter “InsertOrderedList”. (I don’t know what all the functions are, but if you want, you can check into the other profiles like “RTE Full” what to put in the ‘Click’ for your specific button.
Now you can add “/path/Rich Text Custom” to the source field in your template.
The experience editor is a wonderful tool that helps the authors to create content fast and effective.
Though, sometimes you stumble across a scenario where you want a certain type of function available to your authors directly in the experience editor, but that function isn’t something that exists out of the box.
This, would be one scenario you could make your own Custom button in the Experience editor. There are two types of custom buttons. There is one for the ribbon (I will make a post about this in the future) and one for the Field editor (this is the one i’ll be going over now).
First, you will switch to your CORE database. Navigate to Custom Experience Buttons (sitecore/content/Applications/WebEdit/Custom Experience Buttons).
See Item path. Remember this is on the Core db.
Now create an item in this folder(or subfolder), based on the template: “Field Editor Button” (/System/WebEdit/Field Editor Button).
The Field Editor Button has 4 default fields you are to fill in:
Header: Showed in the Experience editor option for the rendering. Icon: Choose an icon to be seen on the field editor ribbon Fields: This is the tricky part. You must choose the fields you want to show when you click this button. If more than one field you separate them by a pipe. These fields must be in your item template or the dialog will be empty. Think like, what the rendering is supposed to present. Tooltip: The text when hovering over the button
Now switch back to the Master database and find your sublayout or rendering. Under Editor Options section you find an Experience Editor Buttons field. Add your custom button and you will now find your button when clicking the rendering in Experience editor.
With/Or this occurring when trying to publish site:
Publish to ‘web’|#Exception:System.Reflection.TargetInvocationException: Exception has been thrown by the target of an invocation. —> System.AggregateException: One or more exceptions occurred while processing the subscribers to the ‘item:saved’ event.
The reason for me was during an upgrade from Sitecore 7.2 to 8.2 and an upgrade from WFFM 2.4 to 8.2, I got this when trying to run a “publish site” and when trying to “Rebuild Link Database”.
What took me some time to figure out was that it was caused by the WFFM Module. Apparently the example forms created in “/sitecore/system/Modules/Web Forms for Marketers/Sample forms”, had tracking events that didn’t have ids binded to them.
So first make sure you can see standard fields:
Next step:
Have your broken item opened and find the section “Advanced” with its field “Tracking”
If you also take show “Raw values” you can see that there’s an event with no id.
To fix this. Either remove it from raw values or by clicking “Goals” -> “Ok” then “Attributes” -> “Ok”.
When you start building up a site in Sitecore and you place out renderings from the experience editor it can go really fast from having a single rendering in your add component window to having tons.
Placeholder settings are a great way to restrict what renderings are allowed in a specific placeholder. So even if you have many page types with the same placeholders in them you can specify a template-specific placeholder setting.
Let’s say you have 4 types of pages. They all have a placeholder that contains a rendering of columns. And we want this column rendering available on all those page types.
The purple border is a page type. It contains a rendering that holds two placeholders. They are named in this context, RightContent and LeftContent.
To restrain the authors from having the option to add all renderings that are available in the global placeholder settings we want to make it template-specific(or pagetype-specific).
We achieve this by adding a new placeholder setting.
The crucial part about this is you need to empty the field Placeholder Key(by default at creation this field will have the value of the item’s name)
In the field below you will set the Allowed Controls to specify what renderings are available for the template-specific placeholder.
Your last step should be on the standard values for the template. Go to Layout Details window and Edit. Add a new placeholder setting:
Find your new placeholder setting in the treelist and fill in the “Placeholder Key” field with your placeholder.
Now when you go to the experience editor and add a new component. Only those renderings you set in Allowed Controls should show up for that specific template.