But before I installed the package from the Known Issue, I wanted to make sure my custom code was solid and that I wasn’t making any errors there myself. Spoiler, it was, so take a look in your custom code before (if any).
My issue was that I misunderstood the process of how contacts are retrieved with the xConnect API works. I thought I could just get a contact by some Facet, like an email, and then I would get that contact with all it’s Facets and values.
In my case I wanted to set the “Personal” Facet if it was null and then save it. But I got the contact without the ExpandOptions{PersonalInformation.DefaultFacetKey… which meant that the Facet “Personal” was always null. So when I submitted it, it threw an error because I was trying to add a Facet that already existed on the contact. With the updated ExpandOptions like below, I was now getting the correct Facets on the contact and it worked like a charm.
var identifier = new IdentifiedContactReference(Constants.EmailSource, email);
var contact = context.Get(identifier, new ExpandOptions(PersonalInformation.DefaultFacetKey, EmailAddressList.DefaultFacetKey));

if (contact.GetFacet<PersonalInformation>(PersonalInformation.DefaultFacetKey) == null)
{
    PersonalInformation personalInfoFacet = new PersonalInformation() {FirstName = firstname, LastName = lastname};
    context.SetFacet(existingContact, PersonalInformation.DefaultFacetKey, personalInfoFacet);
}

context.Submit();
Hope this helps bring some clarity as it did for me! 🙂
The ActionFilterAttribute class allows you to add custom behavior to a controller action method before or after it is executed. You can do this by overriding one or more of the methods provided by the class to implement your own custom logic that is executed either before or after the action method is called. This can be useful for a wide range of purposes, such as authentication and authorization, logging, or caching.
Example
For example, you could create a custom ActionFilterAttribute that authorize by Sitecore role on action method’s execution before or after it is called, like this:
using Sitecore.Security.Accounts;

public class SitecoreRoleAttribute : ActionFilterAttribute
{
    private readonly Role _role;
    public SitecoreRoleAttribute(Role role)
    {
       _role = role;
    }

    public override void OnActionExecuting(ActionExecutingContext filterContext)
    {
        if(Sitecore.Context.User.IsInRole(role))
           base.OnActionExecuting(filterContext);

        filterContext.Result = new RedirectResult("/");
    }

    public override void OnActionExecuted(ActionExecutedContext filterContext)
    {
        //same principle as above method
    }
}
In this example we create a custom action filter attribute called SitecoreRoleAttribute that inherits from ActionFilterAttribute. We override the OnActionExecuting and OnActionExecuted methods to execute code before or after executing the actionmethod is called. You could easily add some conditions in the methods to decide if the action should even be run.
To use this custom attribute, we can simply apply it to the action method we want to log like this:
[SitecoreRole(ACustomRole)]
public ActionResult MyActionMethod()
{
    ...
}
“ACustomRole” above must be of the correct Type and you would’ve probably already have access to it in the constructor.
Now, whenever the MyActionMethod is called, the SitecoreRoleAttributeaction filter will check the conditions before and after it is called.
OpenAI’s DALL·E API allows us to generate AI images based on a textual descripton. In this post I’ll show how we can use the API to create an image and store it in Sitecore.
To use the API you must sign up for an API key on openai.com. Copy that API key and use it in your code. Then we can make a request to the API with a description of the image you want to generate.
With the Free trial usage you get $18 worth of credits to use the API. Generating one image is only a few cents. So it should be enough for a POC or just testing it out.
Using the HttpClient, we’ll send a POST request to the API endpoint with a JSON payload containing the description. Parse the JSON response to get the URL of the generated image, then use memorystream to save it in the media library.
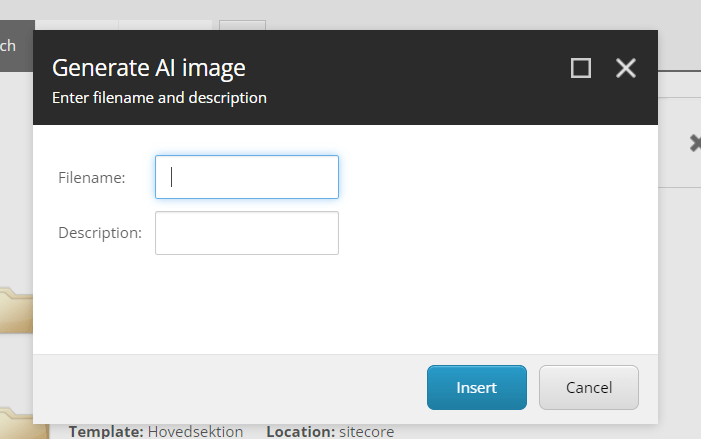
With the CodeBeside in above XML I can catch the OnOk event which will generate the image from the API. From there I can grab the input texts from my dialog window. That code looks like this:
public class GenerateImage : Sitecore.Web.UI.Pages.DialogForm
  {
    protected override void OnOK(object sender, EventArgs e)
    {
      Sitecore.Web.UI.HtmlControls.Button senderB = sender as Sitecore.Web.UI.HtmlControls.Button;
      string apiKey = "<Your_API_key>";
      string apiEndpoint = "https://api.openai.com/v1/images/generations";

      var filename = senderB.Page.Request.Form.Get("Filename");
      var description = senderB.Page.Request.Form.Get("Description");

      HttpClient client = new HttpClient();
      client.DefaultRequestHeaders.Authorization =
        new System.Net.Http.Headers.AuthenticationHeaderValue("Bearer", apiKey);

      string jsonPayload = JsonConvert.SerializeObject(new
      {
        prompt = description,
        n = 1, //how many images to generate
        size = "512x512"
      });

      StringContent content = new StringContent(jsonPayload, Encoding.UTF8, "application/json");
      HttpResponseMessage response = client.PostAsync(apiEndpoint, content).Result;

      if (response.IsSuccessStatusCode)
      {
        string jsonResponse = response.Content.ReadAsStringAsync().Result;
        dynamic result = JsonConvert.DeserializeObject(jsonResponse);

        // Get the generated image URL
        string imageUrl = result.data[0].url;

        // Download the image
        using (var imageResponse = new HttpClient().GetAsync(imageUrl).Result)
        {
          if (imageResponse.IsSuccessStatusCode)
          {
            using (var stream = new MemoryStream())
            {
              imageResponse.Content.CopyToAsync(stream).Wait();
              stream.Seek(0, SeekOrigin.Begin);

              var mediaCreator = new MediaCreator();
              var options = new MediaCreatorOptions
              {
                Versioned = false,
                IncludeExtensionInItemName = false,
                Database = Factory.GetDatabase("master"),
                Destination = "/sitecore/media library/AI-generated-images/"
              };

              using (new SecurityDisabler())
                mediaCreator.CreateFromStream(stream, $"{filename}.png", options);
            }
          }
        }
      }
    }
  }
We we’re trying to log the clients IP when using some of our API methods and they all returned the same IP.
So we used Request.UserHostAddress. Which obviously was returning the servers IP address all the time.
So how can we get the client IP?
Well by reading how the application Gateway works [1] we can see that it inserts six additional HTTP/s headers.The one i’m interested in is “x-forwarded-for”.
If you’re interested you can also log this in the IIS by adding a custom field to the IIS site log. Check resource below [2].
Then use the following code to get the IP. If you’re not going through a proxy or Load balancer the X-Forwaded-For will be empty and therefore we return Remote-Addr instead.
 public static string GetIp()
    {
      var ip = String.IsNullOrWhiteSpace(HttpContext.Current.Request.ServerVariables["HTTP_X_FORWARDED_FOR"])
        ? HttpContext.Current.Request.ServerVariables["REMOTE_ADDR"]
        : HttpContext.Current.Request.ServerVariables["HTTP_X_FORWARDED_FOR"];

      if (ip == null)
        return string.Empty;

      if (ip.Contains(","))
      {
        ip = ip.Split(',').First().Trim();
      }
      return ip;
    }
Alt texts are more important than people might think. They can make a huge difference in SEO scoring, placing you higher up in the search results like Google or Bing. Your alt-texts should be more than just “bird”, if it’s an image of a bird. Because it also gives value to those with any visual impairments for instance. So for example “A green hummingbird hovering next to a flower” gives more value than just “bird”.
But for me personally, it’s just as “hard” to write alt texts as it is to choose an icon in Sitecore for my components 😉 So to make life easier I thought I’d show an implementation of how to generate alt texts that give value using Microsoft Computer Vision. We’ll then generate the alt text to our image in Sitecore as an editor.
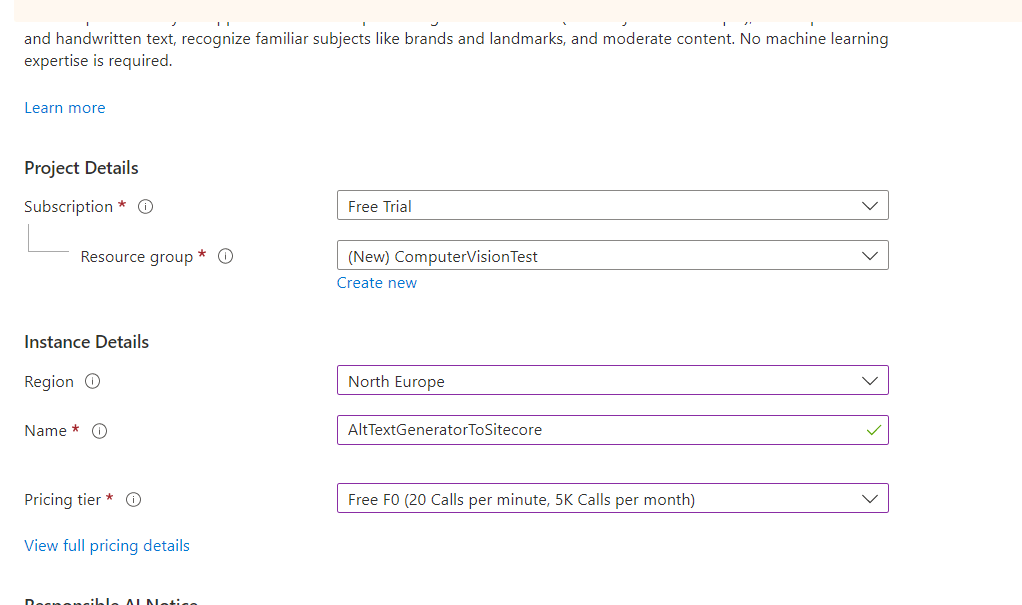
1. Prepare your Azure Computer Vision
First you must setup a Computer Vision in your Azure account. You’ll need the keys from that to get the data in code.
Locate Computer Vision and press “Create computer vision”
Sample setup of computer vision.
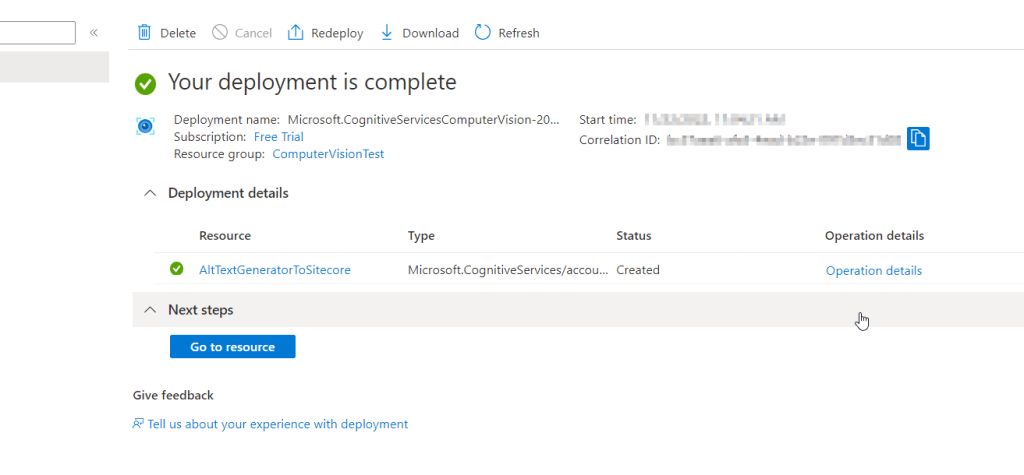
After it deploys, click on the resource link or in this case “AltTextGeneratorToSitecore”. You will need the key and endpoint from the resource you create to connect your application to the Computer Vision service. You’ll paste your key and endpoint into the code later.
2. Nuget reference
Either create a new project or fit the code in an existing project.
First, you need to reference the Microsoft.Azure.CognitiveServices.Vision.ComputerVision nuget package to your code by using the Nuget Package Manager or IDE
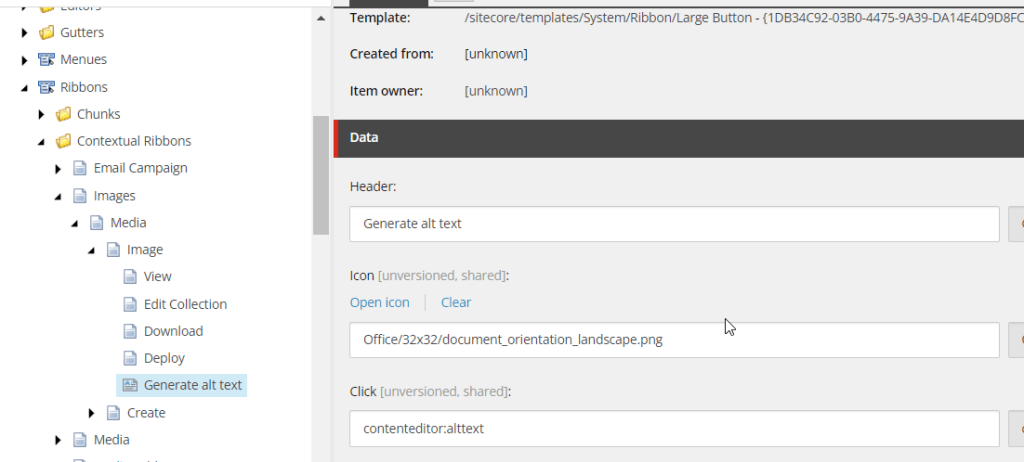
In Sitecore, switch to Core database and navigate to /sitecore/content/Applications/Content Editor/Ribbons/Contextual Ribbons/Images/Media and create a new Large Button.
It should look something like this
Now when you go to the media library and select an image you can autogenerate an alt text by pressing the new custom button we made.
This is my example image, I will now generate an alt text to it
Voilà! Works like a charm.
You could use other Features than just Description from the Image Analysis. Read more in sources below.
You could also implement some conditions on the confidence score if you think it will generate bad results.
Would love to hear if you have any ideas how this idea could be improved or extended!
I wanted a rendering to spit out different HTML based on environment and I wanted to share one way to do this by using environment transformation configs and sitecore settings.
Here I would have a config for each environment with a different value for example:
EnvironmentSetting.Dev.config
EnvironmentSetting.Test.config
EnvironmentSetting.Production.config
Now I can get the environment value from this config in code and use it as a condition in an IF statement or Switch Case or whatever you prefer in my code like this:
var environment = Sitecore.Configuration.Settings.GetSetting("Environment", "");

if(environment == "Dev")...

switch(environment)
{
  case "Dev":
    <something>
    break;
   ...
Let me know in the comments how you would use this functionality. Happy coding!
This is a continuation of Part 1 where I go over how to setup influxdb to monitor Solr. If you haven’t read it and are looking for installation guides for influx, check out part 1 here
In this PART 2 I want to setup some basic statistics for when visitors hit a 404 or a 500 page and showcase the influxDB C# client. We’ll see how we can present the data in InfluxDB at the end. To try and cut down this post a bit I’ll make some assumptions: That you can setup your own pipelines and processors to start the execution of your code at the correct place.
The influxDB C# client only supports .NET Core so you can setup a separate API service that your Sitecore application can use to Write and Get the data.
I’ll show how we can write data to influxDB through code.
We’ll look at getting data from influxDB through code.
1. Write data to InfluxDB
Here we can write some data to our influxDB bucket by code, keeping it simple:
using InfluxDB.Client;
using InfluxDB.Client.Api.Domain;
using InfluxDB.Client.Core;

...

const string token = "<TOKEN>";
const string bucket = "errorbucket";
const string org = "myOrg";

var client = InfluxDBClientFactory.Create("http://localhost:8086", token);

var 500error = new ErrorPage { Type = "500", Hit = 1, Time = DateTime.UtcNow };
var 404error = new ErrorPage { Type = "404", Hit = 1, Time = DateTime.UtcNow };

using (var writeApi = client.GetWriteApi())
{
   if(errorCause == 500)
      writeApi.WriteMeasurement(500error, WritePrecision.Ns, bucket, org);

   if(errorCause == 404)
      writeApi.WriteMeasurement(404error, WritePrecision.Ns, bucket, org);
}

[Measurement("error_page")]
public class ErrorPage
{
    [Column("type", IsTag = true)] public string Type { get; set; }
    [Column("hit")] public int? Hit { get; set; }
    [Column(IsTimestamp = true)] public DateTime Time { get; set; }
}
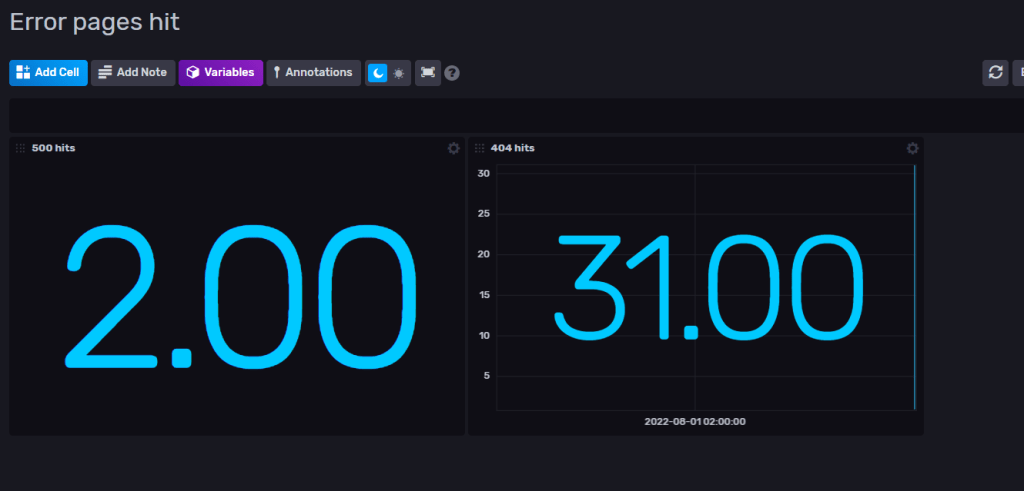
Now we got some data in InfluxDB that we can show in a dashboard ( see Part 1 on how to setup dashboard)
Sample data
2. Get – Query data
A simple method to get the hit count for 404 pages. This will simply return 31 if we go by the data from above. Change the “type” to 500 to get the count for that one etc.
Now you can write and query data in C# with InfluxDB. You can for example create your own graph to present inside Sitecore or use the dashboard in InfluxDB.
Thanks for reading and hope you get some usage with InfluxDB. I’m still learning and I see a lot of fun stuff ahead with this tool.
I need to get items from a big bucket. For best performance you should get the items through Sitecore ContentSearch.
Here I have some example code how to get a selection of items from a bucket. Let’s say I want to get items that has a specific Tag on a field, which in this case is a string type field. (You can of course change the queryable to whatever you like)
List<Item> ResultsItems = new List<Item>();
IIndexable index = new SitecoreIndexableItem(bucketItem);

using (var context = ContentSearchManager.GetIndex(index).CreateSearchContext())
{
   var results =
     context.GetQueryable<T>().Where(x => x.TagFieldName.Equals("TagName"))).GetResults();

   foreach (var result in results)
   {
     Item item = result.Document.GetItem();
     if(item !=null)
     {
       ResultsItems.Add(item);
     }
   }
}
Now ResultsItems are filled with the item context of all the children of the bucket.
Note: I’m showing the code for demonstration purpose. Beware of potentially calling a GetItem() on potential thousands of items. I would also recommend selecting the fields you are after with .Select(i => new { i.FieldA, i.FieldB}) (read more here) so that the query gets smaller.
Now i’ve gotten the result down to 4k instead of 140k just by the the last part where we check if categories has anything with $filter=Product/Categories/any()
I needed to replace swedish characters from string without removing the character for itemname.
With Sitecore you can use ItemUtil.ProposeValidItemName() but it removes the invalid characters. I have a text like “Flöde” and I want it to be “Flode” and not “Flde” like Sitecores ItemUtil does.
The ItemUtil.ProposeValidItemName will give you a valid item name for Sitecore. The string output would still contain possible invalid special characters that you don’t allow in the Sitecore config setting ItemNameValidation regex.
Is this your new site? Log in to activate admin features and dismiss this message