Using Microsoft Computer Vision to generate alt text to your images in Sitecore

Alt texts are more important than people might think. They can make a huge difference in SEO scoring, placing you higher up in the search results like Google or Bing. Your alt-texts should be more than just “bird”, if it’s an image of a bird. Because it also gives value to those with any visual impairments for instance. So for example “A green hummingbird hovering next to a flower” gives more value than just “bird”.

But for me personally, it’s just as “hard” to write alt texts as it is to choose an icon in Sitecore for my components 😉
So to make life easier I thought I’d show an implementation of how to generate alt texts that give value using Microsoft Computer Vision. We’ll then generate the alt text to our image in Sitecore as an editor.

1. Prepare your Azure Computer Vision

First you must setup a Computer Vision in your Azure account. You’ll need the keys from that to get the data in code. 

Microsoft computer vision dashboard

Locate Computer Vision and press “Create computer vision”

Sample setup of Microsoft computer vision

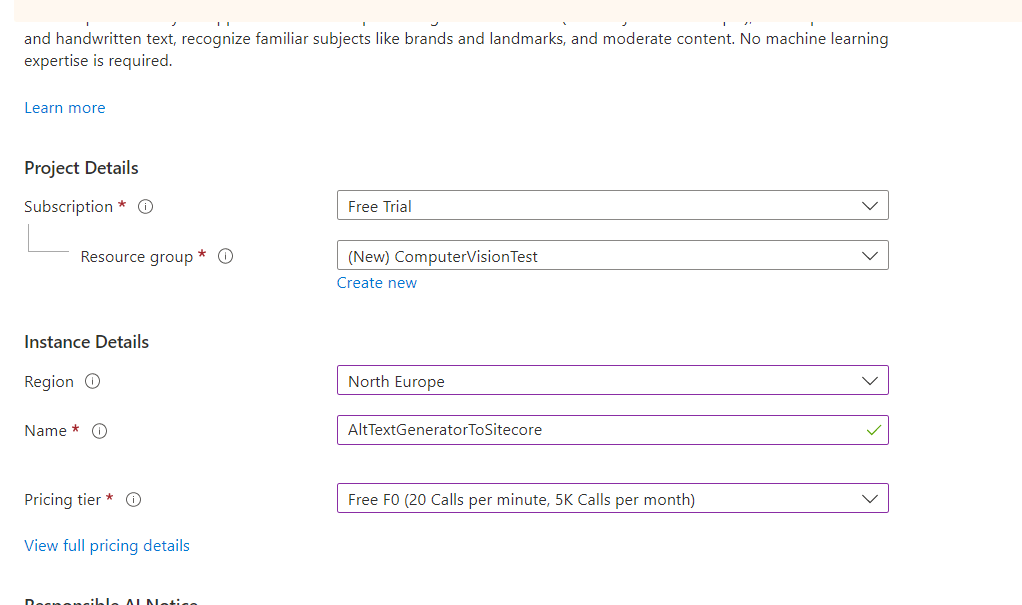
Sample setup of computer vision.

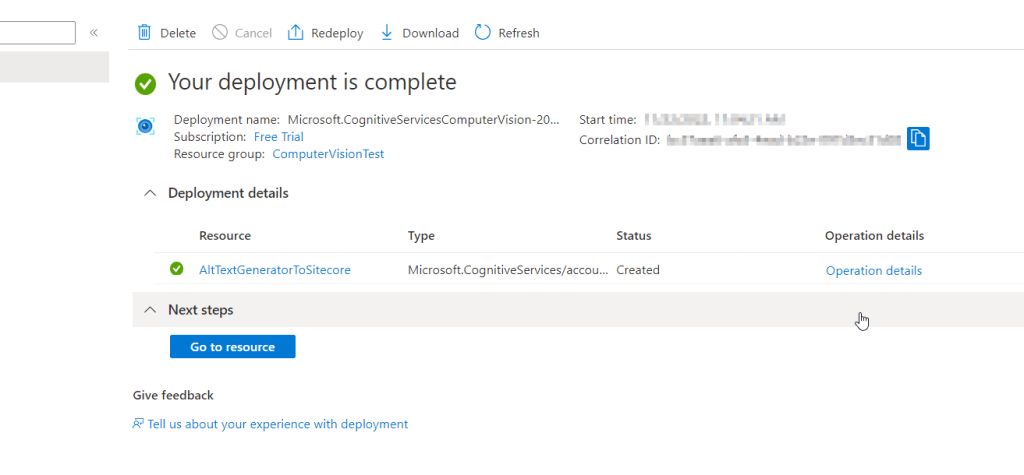
After it deploys, click on the resource link or in this case “AltTextGeneratorToSitecore”.
You will need the key and endpoint from the resource you create to connect your application to the Computer Vision service. You’ll paste your key and endpoint into the code later.

2. Nuget reference

Either create a new project or fit the code in an existing project.

First, you need to reference the Microsoft.Azure.CognitiveServices.Vision.ComputerVision nuget package to your code by using the Nuget Package Manager or IDE

NuGet\Install-Package Microsoft.Azure.CognitiveServices.Vision.ComputerVision -Version 7.0.1

3. Code

Get the Key and Endpoint for the code below. You can find your key and endpoint in the resource’s key and endpoint page, under resource management.

public class AltTextGenerator : Command
  {
    static string subscriptionKey = "<Your_key>";
    static string endpoint = "<Your_endpoint>";
    public override void Execute(CommandContext context)
    {
      ComputerVisionClient client = Authenticate(endpoint, subscriptionKey);

      var item = context.Items[0];

      Sitecore.Data.Items.Item sampleMedia = new Sitecore.Data.Items.MediaItem(item);
      string imageUrl = Sitecore.StringUtil.EnsurePrefix('/', MediaManager.GetMediaUrl(sampleMedia, MediaUrlBuilderOptions.GetShellOptions()));

      imageUrl = "<hostname>" + imageUrl;
      byte[] imageByte;
      using (WebClient webClient = new WebClient())
      {
        imageByte = webClient.DownloadData(imageUrl);
      }

      var altText = AnalyzeImageUrl(client, imageByte).Result;

      if (string.IsNullOrEmpty(altText))
      {
        Sitecore.Context.ClientPage.ClientResponse.Alert("No alt text could be generated for this image");
        return;
      }

      using (new Sitecore.SecurityModel.SecurityDisabler())
      {
        item.Editing.BeginEdit();
        try
        {
          item["Alt"] = altText;
          item.Editing.EndEdit();
        }
        catch (Exception)
        {
          item.Editing.CancelEdit();
        }
      }
    }

    public static ComputerVisionClient Authenticate(string endpoint, string key)
    {
      ComputerVisionClient client =
        new ComputerVisionClient(new ApiKeyServiceClientCredentials(key))
        { Endpoint = endpoint };
      return client;
    }

    public static Task<string> AnalyzeImageUrl(ComputerVisionClient client, byte[] imageByte)
    {
      List<VisualFeatureTypes?> features = new List<VisualFeatureTypes?>()
      {
        VisualFeatureTypes.Description
      };

      string altText = string.Empty;
      using (Stream analyzeImageStream = new MemoryStream(imageByte))
      {
        var result = client.AnalyzeImageInStreamAsync(analyzeImageStream, visualFeatures: features).Result;
        analyzeImageStream.Close();
        if (result.Description?.Captions != null)
        {
          var caption = result.Description.Captions.FirstOrDefault();
          altText = caption?.Text;
        }
      }
      return Task.FromResult(altText);
    }

    public override CommandState QueryState(CommandContext context)
    {
      return context.Items.Length != 1 ? CommandState.Hidden : base.QueryState(context);
    }
  }

4. Create Command item in Sitecore

We must create a config for our command button in Content Editor.

<configuration  xmlns:patch="http://www.sitecore.net/xmlconfig/">
  <sitecore>
    <commands>
      <command name="contenteditor:alttext" type="MyProject.AltTextGenerator, MyProject"/>
    </commands>
  </sitecore>
</configuration>

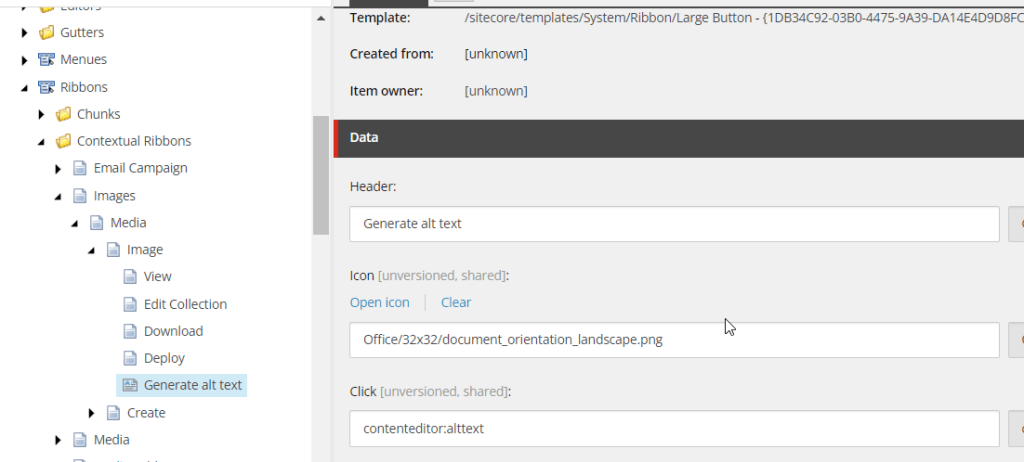
In Sitecore, switch to Core database and navigate to /sitecore/content/Applications/Content Editor/Ribbons/Contextual Ribbons/Images/Media and create a new Large Button.

It should look something like this

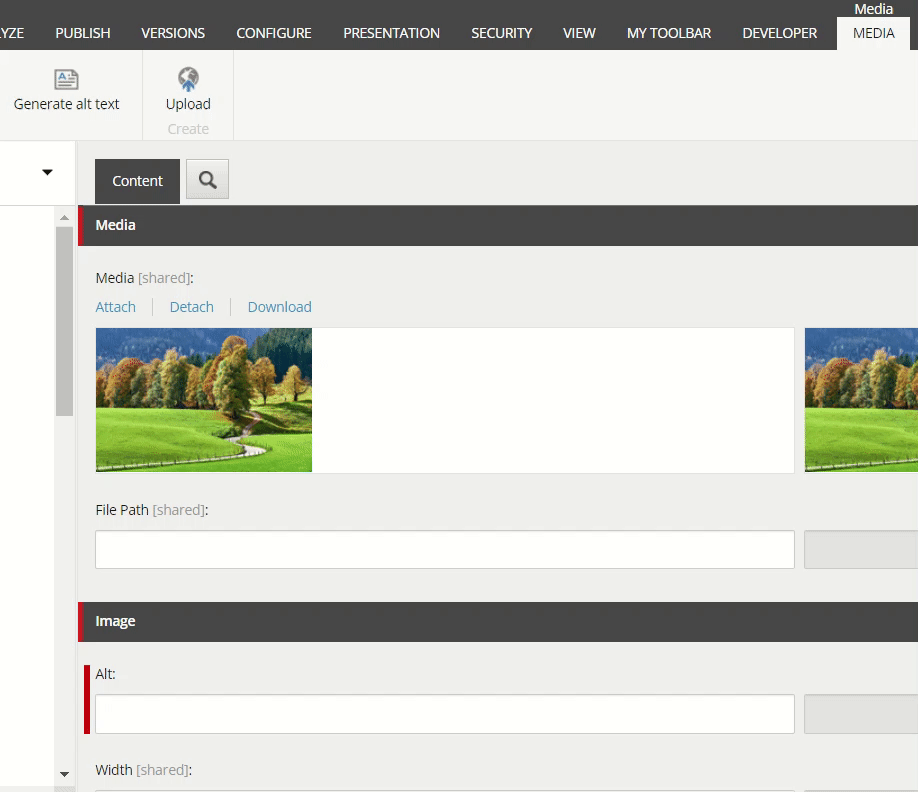
Now when you go to the media library and select an image you can autogenerate an alt text by pressing the new custom button we made.

This is my example image, I will now generate an alt text to it

trees


Voilà! Works like a charm.

You could use other Features than just Description from the Image Analysis.
Read more in sources below.

You could also implement some conditions on the confidence score if you think it will generate bad results.

Would love to hear if you have any ideas how this idea could be improved or extended!

Sources

https://learn.microsoft.com/en-us/azure/cognitive-services/computer-vision/quickstarts-sdk/image-analysis-client-library?pivots=programming-language-csharp&tabs=visual-studio%2C3-2

https://portal.vision.cognitive.azure.com/demo/image-captioning

https://github.com/Azure-Samples/cognitive-services-quickstart-code/blob/master/dotnet/ComputerVision/ComputerVisionQuickstart.cs

Custom database, custom index and ContentSearch

Lets go over how we can setup a custom database with a custom index then query it with Sitecore ContentSearch. You could also skip step 1 if you’re getting your data from somewhere else that’s not stored in Sitecore as items.

1. Create database

If you’re using SQL open Sql Server Management Studio and add a new database. In this case I’ll create it next to my Sitecore databases. Setup the tables how you want them. For demonstration purpose I’ll just setup a basic customer table. Here’s an image for reference to the code later on.

2. Create Solr core

At your Solr installation folder, go to <pathToSolr>\server\solr\ and duplicate the core directory for sitecore_master_index and rename to desired indexname, for instance:

  • companyName_custom_index

Go into the newly created folder and delete everything except the conf folder.

Next open up your Solr admin and add a new core by putting in your new foldername in previous step. Should look something like this.

3. Create Custom Index configuration

Now we need to create the index configuration for the core to connect with your Sitecore instance.

  1. Create a new .config file in your solution and add this sample configuration
<configuration xmlns:patch="http://www.sitecore.net/xmlconfig/" xmlns:role="http://www.sitecore.net/xmlconfig/role/" xmlns:search="http://www.sitecore.net/xmlconfig/search/">
    <sitecore>
        <contentSearch search:require="solr">
         <configuration type="Sitecore.ContentSearch.ContentSearchConfiguration, Sitecore.ContentSearch">
                <indexes hint="list:AddIndex">
                    <index id="scempty102_custom_index" type="Sitecore.ContentSearch.SolrProvider.SolrSearchIndex, Sitecore.ContentSearch.SolrProvider">
                        <param desc="name">$(id)</param>
                        <param desc="core">$(id)</param>
                        <param desc="propertyStore" ref="contentSearch/indexConfigurations/databasePropertyStore" param1="$(id)" />
                        <configuration ref="contentSearch/indexConfigurations/defaultSolrIndexConfiguration">
                        </configuration>
                        <locations hint="list:AddCrawler">
                            <crawler type="MyProject.Foundation.Indexing.Crawlers.MyCrawler, MyProject.Foundation.Indexing">
                            </crawler>
                        </locations>
                    </index>
                </indexes>
            </configuration>
        </contentSearch>
    </sitecore>
</configuration>

Create your Indexable class

namespace MyProject.Foundation.Indexing.Indexable
{
  public class IndexableCustomerField : IIndexableDataField
  {
    private readonly Customer _customer;
    private readonly PropertyInfo _propertyInfo;

    public IndexableCustomerField(Customer customer, PropertyInfo fieldInfo)
    {
      _customer = customer;
      _propertyInfo = fieldInfo;
    }

    public string Name
    {
      get { return _propertyInfo.Name; }
    }

    public string TypeKey => string.Empty;
    public Type FieldType => _propertyInfo.PropertyType;
    public object Value => _propertyInfo.GetValue(_customer);
    public object Id => _propertyInfo.Name.ToLower();
  }

  public class Customer
  {
    public int Id { get; set; }
    public string Name { get; set; }
    public int Age { get; set; }
    public string Email { get; set; }
  }

  //indexable class
  public class IndexableCustomer : IIndexable
  {
    private Customer _customer;

    public IndexableCustomer(Customer customer)
    {
      _customer = customer;
    }

    public void LoadAllFields()
    {
      Fields = _customer.GetType()
        .GetProperties(BindingFlags.Public
                       | BindingFlags.Instance
                       | BindingFlags.IgnoreCase)
        .Select(fi => new IndexableCustomerField(_customer, fi));
    }

    public IIndexableDataField GetFieldById(object fieldId)
    {
      return Fields.FirstOrDefault(x => x.Id.Equals(fieldId));
    }

    public IIndexableDataField GetFieldByName(string fieldName)
    {
      return Fields.FirstOrDefault(x => x.Name.Equals(fieldName));
    }

    public IIndexableId Id => new IndexableId<string>(_customer.Id.ToString());
    public IIndexableUniqueId UniqueId => new IndexableUniqueId<IIndexableId>(Id);
    public string DataSource => "Customer";
    public string AbsolutePath => "";
    public CultureInfo Culture => CultureInfo.CurrentCulture;
    public IEnumerable<IIndexableDataField> Fields { get; private set; }
  }

}

Create your Crawler class

This is just an example using a simple data provider with System.Data.SqlClient. Use whatever method you prefer. You could use an external API and index that data if it’s a viable way for your solution. That is up to you to figure out.

namespace MyProject.Foundation.Indexing.Crawlers
{
  public class MyCrawler: FlatDataCrawler<IndexableCustomer>
  {
    protected override IndexableCustomer GetIndexableAndCheckDeletes(IIndexableUniqueId indexableUniqueId)
    {
      return null;
    }

    protected override IndexableCustomer GetIndexable(IIndexableUniqueId indexableUniqueId)
    {
      return null;
    }

    protected override bool IndexUpdateNeedDelete(IndexableCustomer indexable)
    {
      return false;
    }

    protected override IEnumerable<IIndexableUniqueId> GetIndexablesToUpdateOnDelete(
      IIndexableUniqueId indexableUniqueId)
    {
      return null;
    }

    //If you get data from external api you could also save it to disk 
    //in a json file then return that list instead depending on the size.
    protected override IEnumerable<IndexableCustomer> GetItemsToIndex()
    {
      var customersToIndex = new List<IndexableCustomer>();

      string connectionString = "Data Source=(local);Initial Catalog=custom_Customer;User ID=<id>;Password=<password>";
      
       //Here i'm just using a simple Sql connection to showcase with some data. 
      //You would not really do this in a real case.
      using (SqlConnection connection = new SqlConnection(connectionString))
      {
        connection.Open();

        SqlCommand command = connection.CreateCommand();
        command.CommandText = "SELECT * FROM Customer_table";
        command.CommandTimeout = 15;
        command.CommandType = CommandType.Text;

        using (SqlDataReader reader = command.ExecuteReader())
        {
          while (reader.Read())
          {
            var customer = new Customer();

            customer.Id = reader.GetInt32(reader.GetOrdinal("Id"));
            customer.Name = reader.GetString(reader.GetOrdinal("Name"));
            customer.Age = reader.GetInt32(reader.GetOrdinal("Age"));
            customer.Email = reader.GetString(reader.GetOrdinal("Email"));

            customersToIndex.Add(new IndexableCustomer(customer));
          }
        }
        connection.Close();
      }
      return customersToIndex;
    }
  }
}

However you wish to execute this code is up to you. You could setup a schedule task that runs the code and add your data to the index. You’ll find your way and with real data you’ll probably have a more complex code.

4. Query Custom index

To query the custom index you need to extend the SearchResultItem with your own properties, for example

public class ExtendedSearchResultItem : SearchResultItem
  {
    [IndexField("name")]
    public string CustomerName { get; set; }
    [IndexField("age")]
    public int CustomerAge { get; set; }
    [IndexField("email")]
    public string CustomerEmail { get; set; }
  }

Then you just search against the index by creating a searchcontext that match your search result type.

public class SearchClass
  {
    public IEnumerable<ExtendedSearchResultItem> Search()
    {
      var searchContext = ContentSearchManager.GetIndex("scempty102_custom_index").CreateSearchContext();
      IQueryable<ExtendedSearchResultItem> queryable = searchContext.GetQueryable<ExtendedSearchResultItem>();

      queryable.Where(x => x.CustomerAge > 30); //insert your own predicate here.
      var searchResults = queryable.GetResults();
      return searchResults.Hits.Select(i => i.Document);
    }
  }

Publish-dates in Sitecore without itemextensions

I’ve read everywhere that you cannot get “first publish” and “last publish-date” from Sitecore out of the box and must write an extension for this. While true, I also believe you can use something else. Let me explain.

In my case I wanted to get “last publish-date” on an Article pagetype.
This page is indexed to the Sitecore_web_index when published.
And when being indexed Sitecore.ContentSearch sets __smallupdateddate field.

We can get this field in code from the ContentSearch API from the web_index and, voilà, we have the “last publish-date“.

In Sitecore.ContentSearch.SearchTypes.SearchResultItem we have the two properties

After your search just get the Updated property from your searchResult

result.Updated.ToString("yyyy-MM-dd", CultureInfo.CurrentCulture);

//output example
//2022-11-03


If an item is created and has not been published, it only exists in the master database.
You then edit the page and it might go through some iterations within your organization before approved workflow then publish.
It has now gone +4 days since you created it in master db.
Now if you publish the page/item it will now get a CreatedDate field in the Web database with the date at the publish.
This field will never change. So there you have your “first publish-date“.


This might not catch all scenarios but at least some. Hopefully you get use of it.