Installing Sitecore publishing service 6.0

I’m going to show you how to install Sitecore Publishing Service version 6.0 as the .NET Core runtime option.

1. Download all the essential packages & prerequisites.

  1. Start by downloading the package “Publishing Service .NET Core host” here.
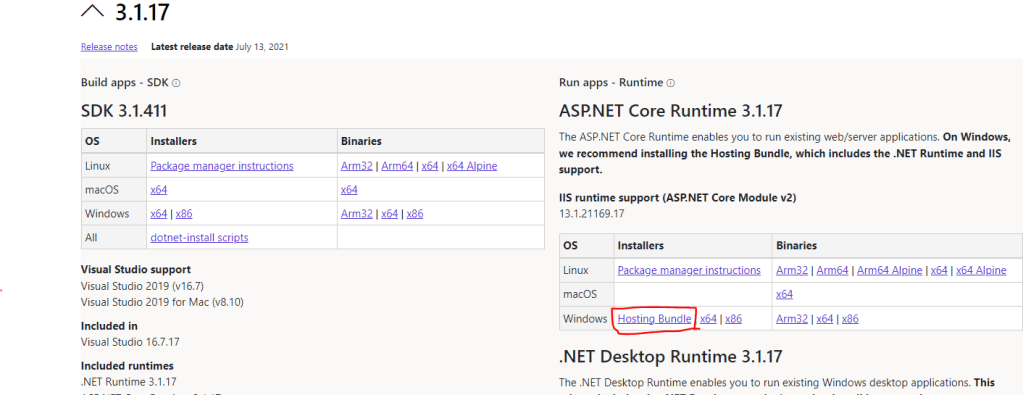
  2. Download and install ASP.NET Core Runtime 3.1.17 Hosting bundle here. Make sure it’s the hosting bundle (see pic below)
Download hosting bundle

2. Install Publishing Service

  1. Extract the content of the package you downloaded in step 1 “Publishing Service .NET Core host” to desired location on disk. Preferably name it according to the site you will use it on.
  2. Copy in licensefile. In the root of your extracted folder create a new folder named “sitecoreruntime” and place your licensefile in it.
  3. Copy .dat files (If on Sitecore 10.1 and higher do this step. Otherwise skip to next step)

    – Create empty folders in publishing service root “<root>\items” and “<root>\items\sitecore“.
    – Go to your Sitecore CM Website and open the items folder (<website>\App_Data\items) and copy the master and web folders.
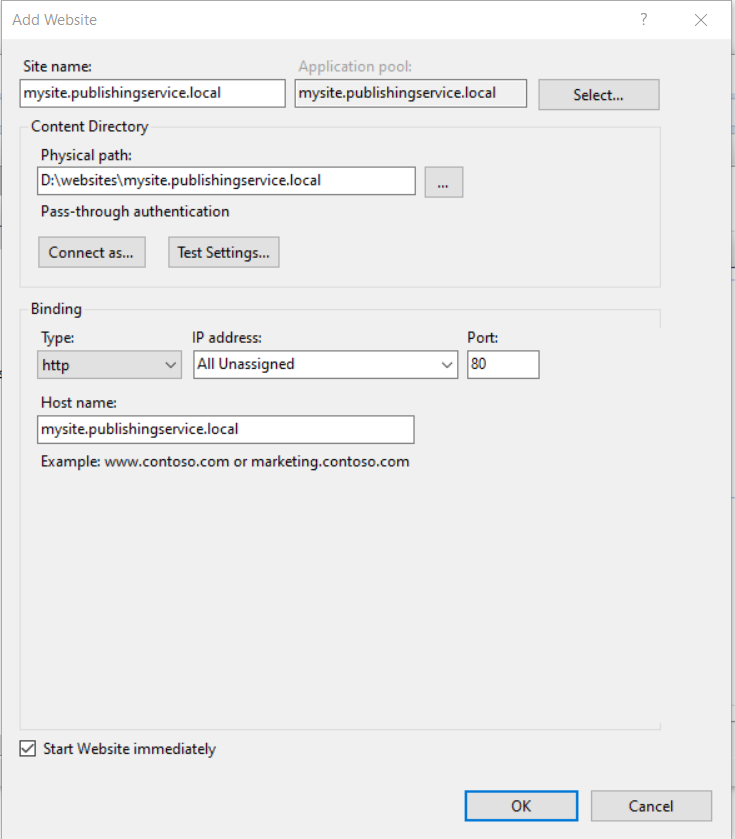
    – Paste the folders at <root>\items\sitecore.
  4. Create IIS website for Publishing service.

    – Add new website in IIS with same hostname as your publishing service root name.

  5. Setup app pool
    – set .NET CLR Version = Select No Managed Code
    – set Idle Time-out (minutes) = 0

3. Configure connectionstrings

  1. Open your command prompt and go to your publishing service root and set the core, master and web connectionstrings with the following command.
    You should run this 3 times, one for each database (replace the <database> with core, master & web).
    Replace *** to match your database connection and a User ID that has WRITE access.
    • .\Sitecore.Framework.Publishing.Host configuration setconnectionstring <database> Data Source=***;Initial Catalog=***;Integrated Security=False;User ID=***;Password=***;MultipleActiveResultSets=True;ConnectRetryCount=15;ConnectRetryInterval=1
  2. This creates a file under <root>\sitecoreruntime\Production\config named sc.publishing.xml.
    You can look inside it to confirm your connectionstrings for each database.

4. Upgrade database schema

Now it’s time to upgrade the database schema with the connectionstrings from step 3. As I wrote, you need write access on the user you put in the User ID. In command prompt go to your root of the publishing service. Execute following

.\Sitecore.Framework.Publishing.Host.exe schema upgrade --force

5. Check status

Go to your publishing service website in a browser http://<publishingservice&gt;/api/publishing/operations/status
If you see {“status”: 0 } you publishing service is up and running correctly.

6. Install the module

Download the module that match your Sitecore version here then install it in Sitecore with the installation wizard. https://dev.sitecore.net/Downloads/Sitecore_Publishing_Service_Module.aspx

7. Add sitecore setting in config file

Last step is to add the following setting in an appropriate config or create a new one.

<configuration xmlns:patch="http://www.sitecore.net/xmlconfig/"&gt;
	<sitecore>
		<settings>
            <!-- The HTTP endpoint for the service -->
            <setting name="PublishingService.UrlRoot" value="http://{Your Publishing Service Website URL Here}"></setting>
		</settings>
	</sitecore>
</configuration>

8. Done

Enter Sitecore and see the new interface and confirm that the publish works.

You can still patch the Sitecore.Task.PublishAgent agent to make publishing service run automatically in an interval. Check more here on scheduling https://joaoneto.blog/publishing-service-scheduled-publishing/

Thanks for reading and hope this help your installation proccess!

Resources

I had almost finished writing this post when I saw this similar and great post by Vivek. There is also a troubleshoot section at the bottom. Please check it out https://learnwithmemes.wordpress.com/2022/09/02/sitecore-publishing-service-feature-installation-guide/

Also another great post by Vincent explaining more about Publishing Service https://vincent-lui.medium.com/sitecore-publishing-service-the-good-the-bad-and-the-ugly-74a9c17c9e16

Get Sitecore environment in code

settings cogwheels

I wanted a rendering to spit out different HTML based on environment and I wanted to share one way to do this by using environment transformation configs and sitecore settings.

<configuration xmlns:xdt="http://schemas.microsoft.com/XML-Document-Transform">
   <sitecore>
        <settings>
            <setting name="Environment" value="Dev" 
    xdt:Transform="Replace" xdt:Locator="Match(name)" />
        </settings>
    </sitecore>
</configuration>

Here I would have a config for each environment with a different value for example:

  • EnvironmentSetting.Dev.config
  • EnvironmentSetting.Test.config
  • EnvironmentSetting.Production.config

Now I can get the environment value from this config in code and use it as a condition in an IF statement or Switch Case or whatever you prefer in my code like this:

var environment = Sitecore.Configuration.Settings.GetSetting("Environment", "");

if(environment == "Dev")...

switch(environment)
{ 
  case "Dev":
    <something>
    break;
   ... 

Let me know in the comments how you would use this functionality. Happy coding!

How to personalize content in Sitecore 9.3

I want to make a short post with the easy peasy version how to setup personalization in Sitecore 9.3. I will post links and resources at the bottom of the post for those who want to read the in depth guides and posts out there how it all works.
I will return with a second part for personalization with more advanced custom rules.

1.

Go to where you want to personalize in Experience Editor and press the personalization button

2.

Press the Add button to add a personalization rule.

There are a lot of predefined rules you can use, you can also set up custom rules and conditions (check for part 2).

Now you’ll get your new rule and you can edit the conditions by pressing “Edit rule”.

In this case I’ll set a condition that if it’s a certain month I want to show another text. So lets do that by selecting it in the list and then pressing the yellow text “month” to set what the value should be.

3.

Now we set what content should be shown instead by selecting another datasource for the same rendering by press “…”. Create one if you haven’t already and then select it. You can choose whether it will Show or Hide depending on the condition.

4.

Now you can select between the new condition and the default to see what the difference will be. In this simple case I’ve just set a new text value. If the condition of my first rule is met that specified content will show.

Default content:

Personalized content:

Resources:

Custom personalization: https://pushpaganan.home.blog/2020/01/06/sitecore-personalization-using-custom-personalization-rule/

https://ankitjoshi2409.wordpress.com/tag/personalization/

Sitecore & Solr “connection lost”

Search was not working and when I went to the Solr admin page it said “Connection lost”. The exact reason for why this happened in the first place i’m still investigating. But to fix the error first was to reset the Solr instance and recycle the App pool of the site.
You can do this by command line or from services window and locate your Solr service, right click -> restart.

Select the service and right-click -> restart

After this I confirmed my Solr was spinning correctly by visiting the admin page again, but it still didn’t work. I looked up the indexing manager in Sitecore configuration from the dashboard. This showed empty. No indexes.

Still confused, I found this post on StackExchange with the below answer:

  • Make sure your Sitecore configured properly for SOLR within \App_Config\Sitecore\ContentSearch
  • Check your connectionstrings for SOLR is configured properly or not
  • Access SOLR admin (with browser, make sure it’s https) to check whether it’s on or not
  • If it’s on, check again if your configured index matches with SOLR Core Admin
  • If everything’s ok, can try to recycle app pool for your site and wait a few minutes Check again from the control panel

The last point worked for me, I recycled the app pool and things started working properly again.

Hopefully this helps if you get similar problems.