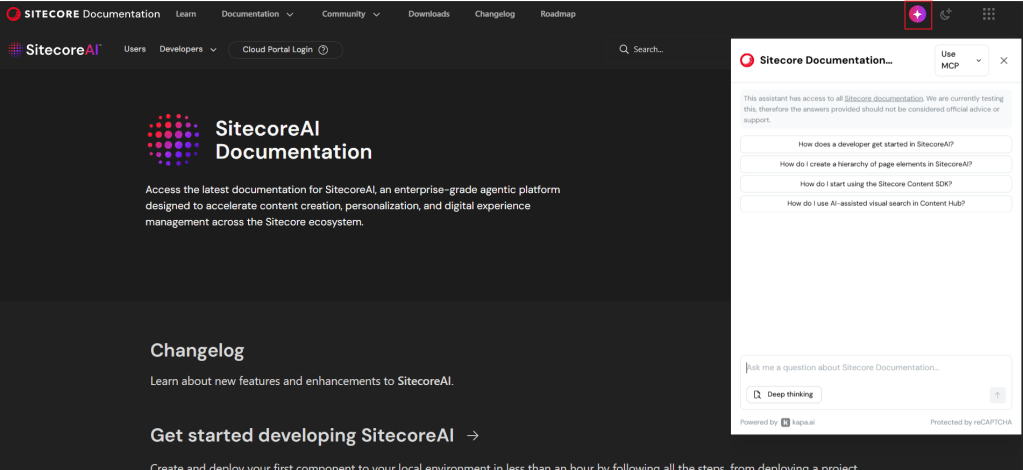
Did you know Sitecore Docs has a new AI feature that you can talk with a LLM chat that has been trained on the Sitecore documentation?
Just go to https://doc.sitecore.com/ and press the Icon in the header, marked in the picture, and you can start asking it questions.
Sitecores documentation has greatly improved the last years, not only in quality, but also in quantity. Sometimes it can be hard to find the right place to look at. And with this AI chat tool you can find answers fast!
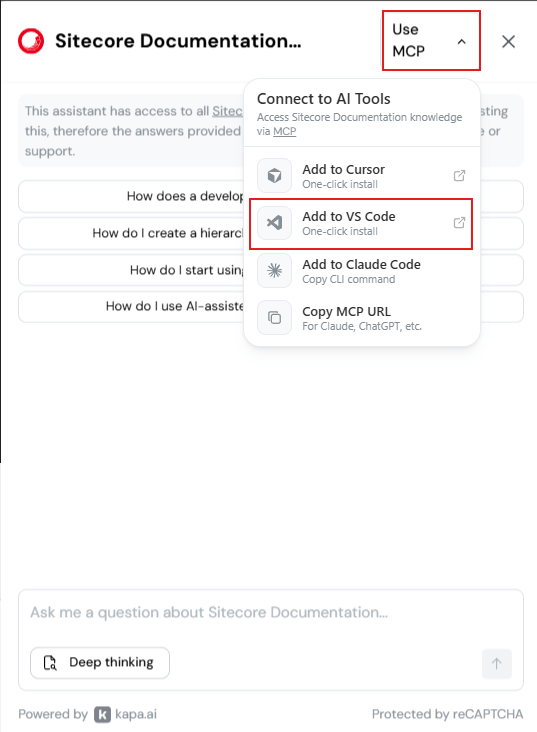
There is also an MCP server you can connect to. To add the MCP to your VS Code you can do following, or Cursor etc:
You can now also use the MCP in context with your code repository to get even more context for your question.
A short post but it gives huge impact, and fast!
NOTE from Sitecore: “This assistant has access to all Sitecore documentation. We are currently testing this, therefore the answers provided should not be considered official advice or support.”
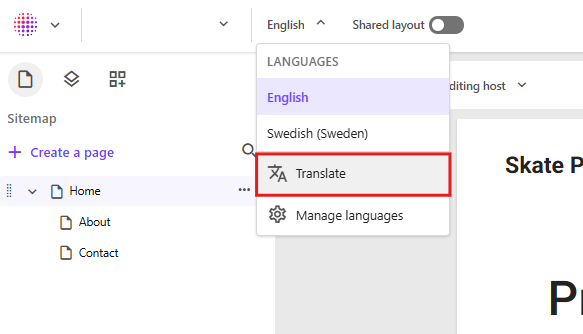
Translate a page or even translate an entire site from one language to another is a powerful yet simple to use tool in SitecoreAI.
Lets break it down.
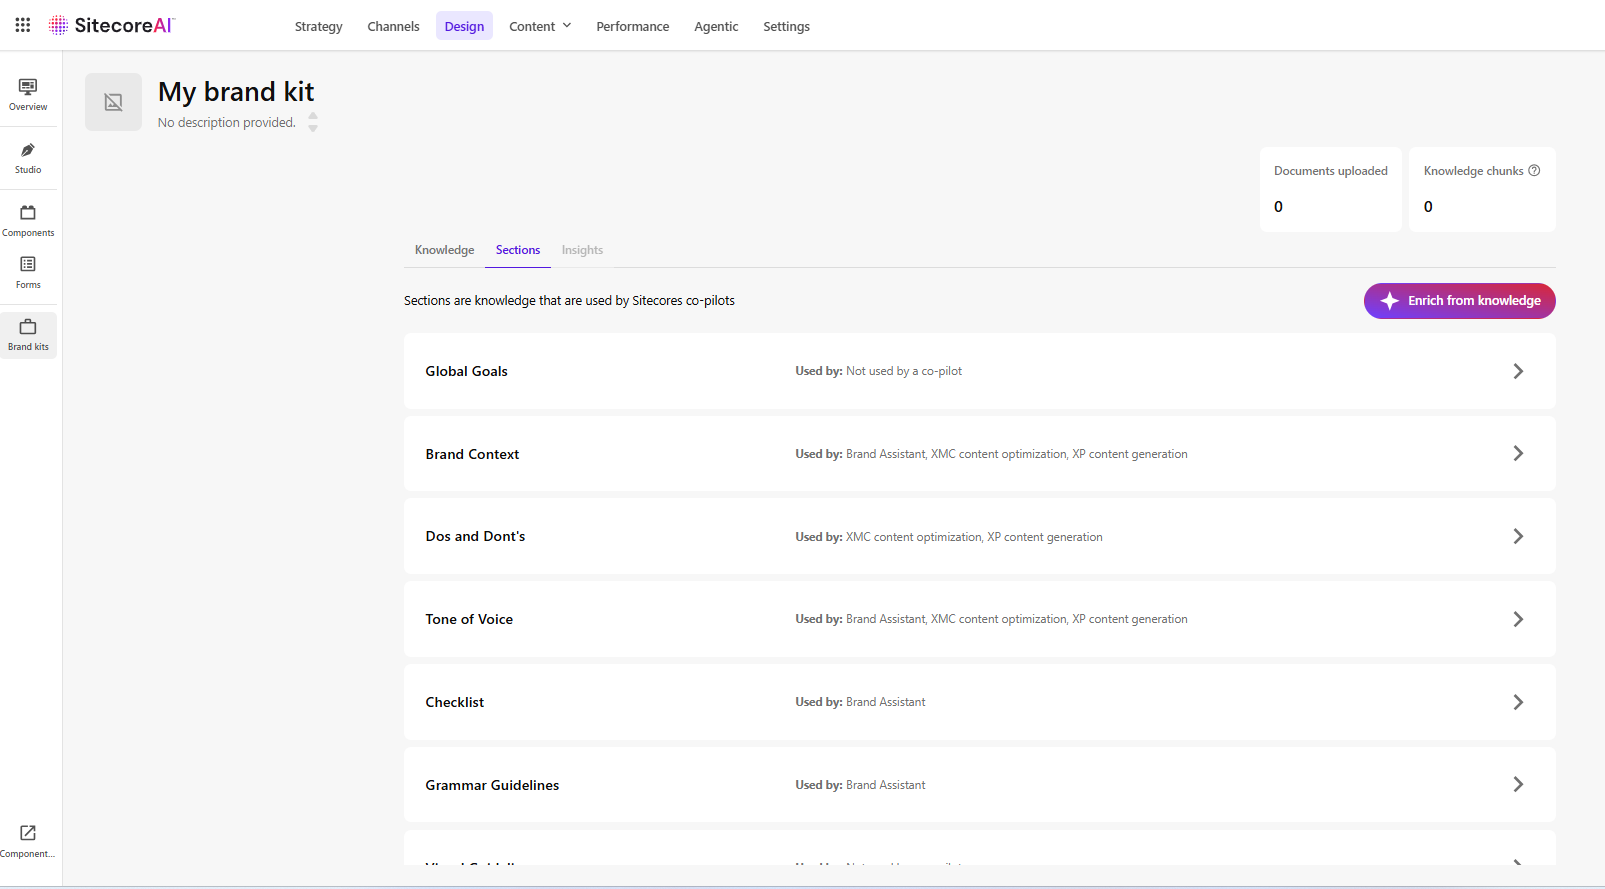
First lets talk about Brand Kits
Brand Kits allow marketing or communication teams to configure how AI should generate content within Sitecore.
By creating Brand Kits, organizations can define instructions and brand guidelines that AI features in SitecoreAI will follow. When editors then use AI functionality they can select a Brand Kit. Brand kits provide:
A centralized location for brand instructions
Reusable configuration
Consistent tone and messaging in your content
By default, administrators can see all brand kits, but they have the power to grant users access as needed to specific brand kits. This is very important and good feature!
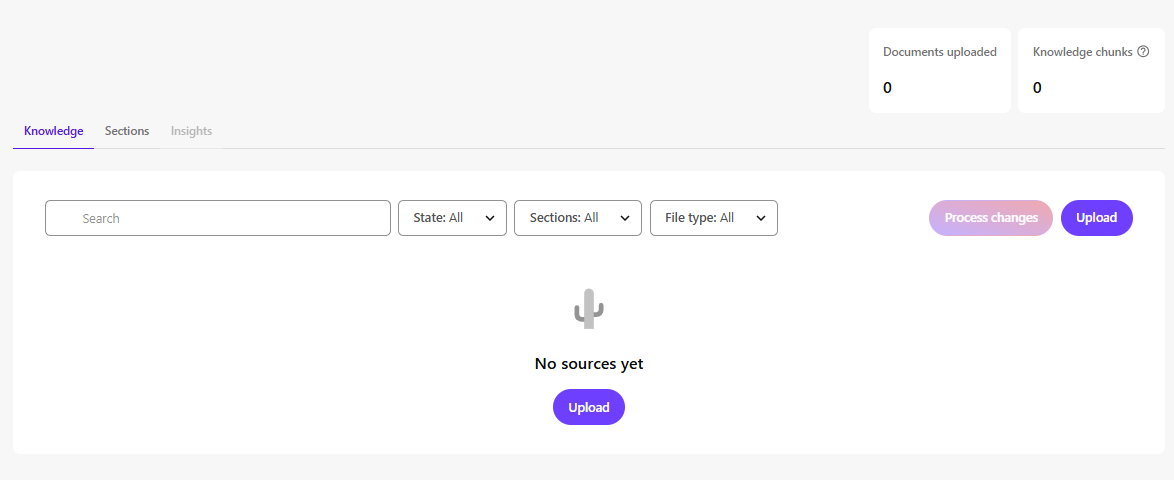
Knowledge
Within a Brand Kit, the Knowledge tab allows you to upload documents that help build your brand knowledge base. Basically if you upload documents here SitecoreAI will populate the otherwise empty sections on the Brand Kit based on those documents.
Examples of supported documents:
Brand books
Visual guidelines
Style guides
Graphic manuals
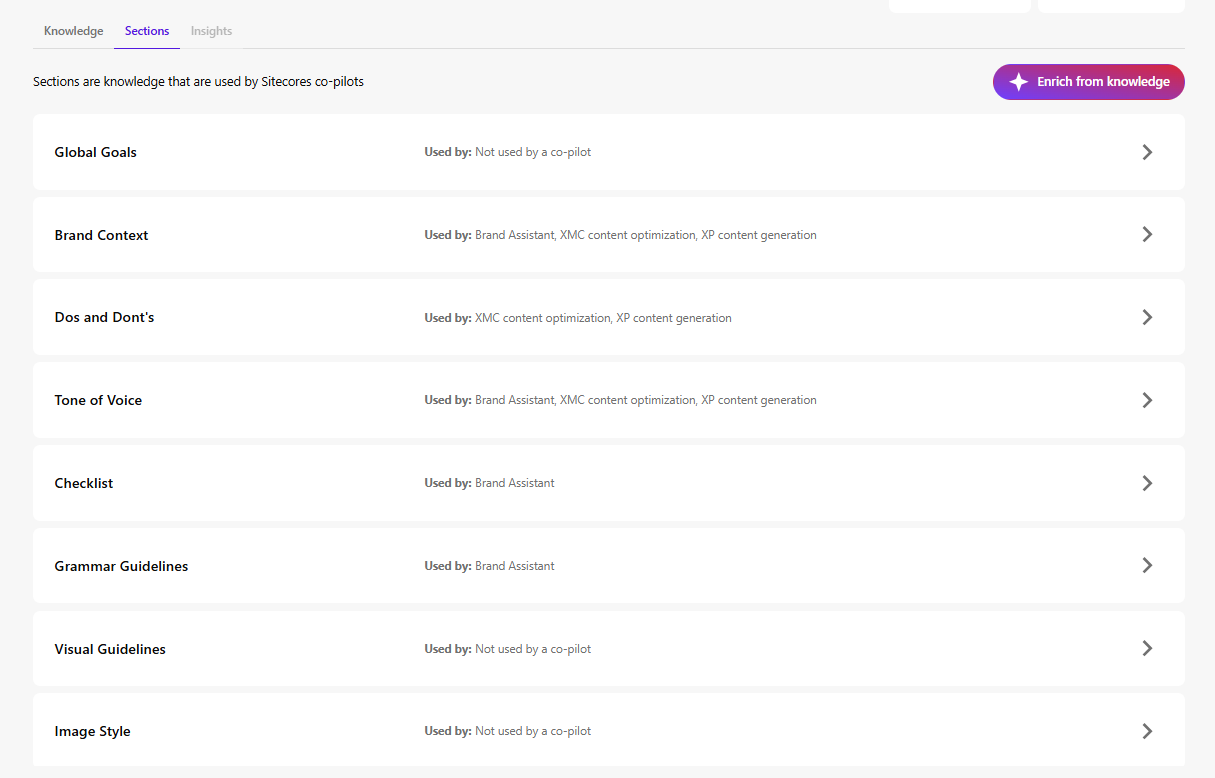
Sections
In the tab Sections, you can setup the configuration of the kit.
Sections can be populated using the uploaded Knowledge documents (via the button in the top-right corner). However, you might want to look over and edit these if needed. It provides a strong starting point, but manual refinement is typically required.
Examples of sections include:
Brand Context – Describes your brand’s purpose and positioning
Do’s and Don’ts – Guidelines ensuring AI-generated content aligns with tone and values (e.g., formal, academic, relaxed)
Tone of Voice – Attributes such as friendliness or confidence that define brand personality
You can setup multiple Brand Kits and use them for different goals, like campaigns, audience etc.
Brand Kits are not required to use translation features, but they can significantly improve consistency and quality.
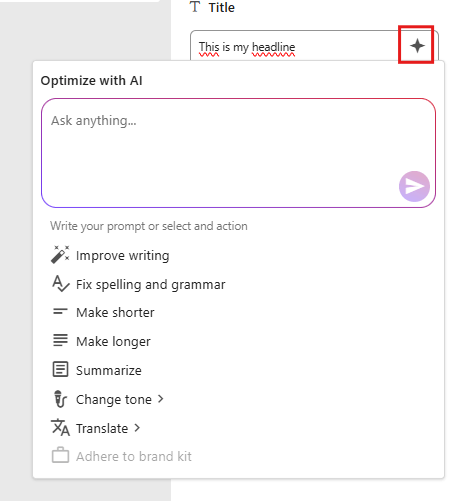
Inside Page Builder, several built-in AI tools support Brand Kits. Like this image below, you can select a field you want to edit, click the “Optimize with AI”-button in red. Here you can use the prompt, translate, or adhere to a brand kit.
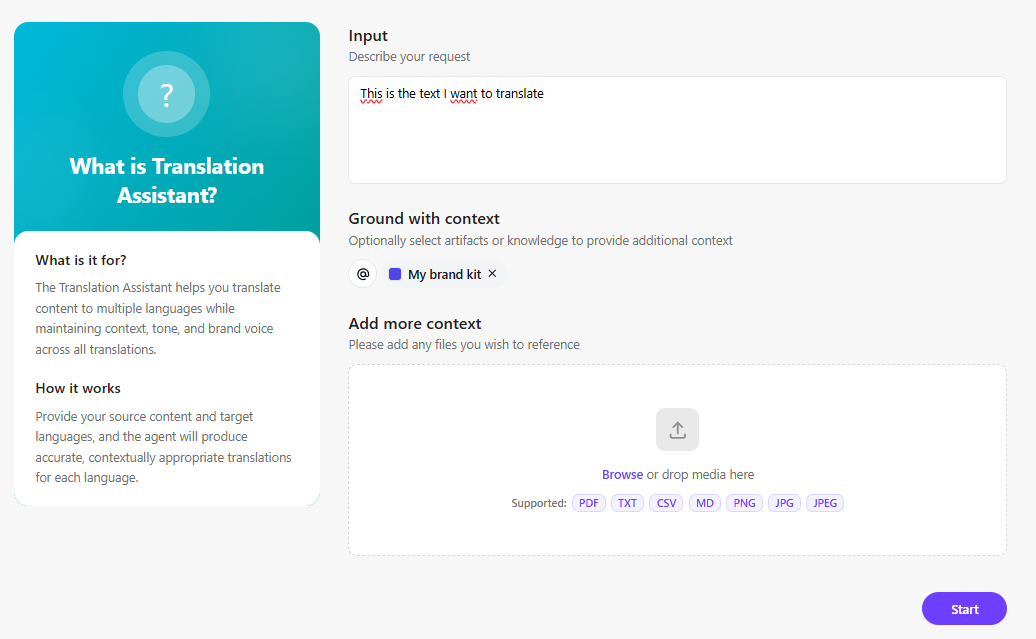
Agentic Studio – Translation assistant
The Agentic Studio is a centralized place for AI agents, which helps to automize work for you. There’s a ton of out-of-the-box agents from Sitecore, and one of them is the Translator, which allows you to translate content to multiple languages at the same time while keeping the Brand context.
This is the first interface of the Translation Assistant. You have your input, then you can add context; in this case, I’ve added my Brand Kit as context to get the tone of voice, etc., that I’m interested in. You could also add more context to the translation if you wish.
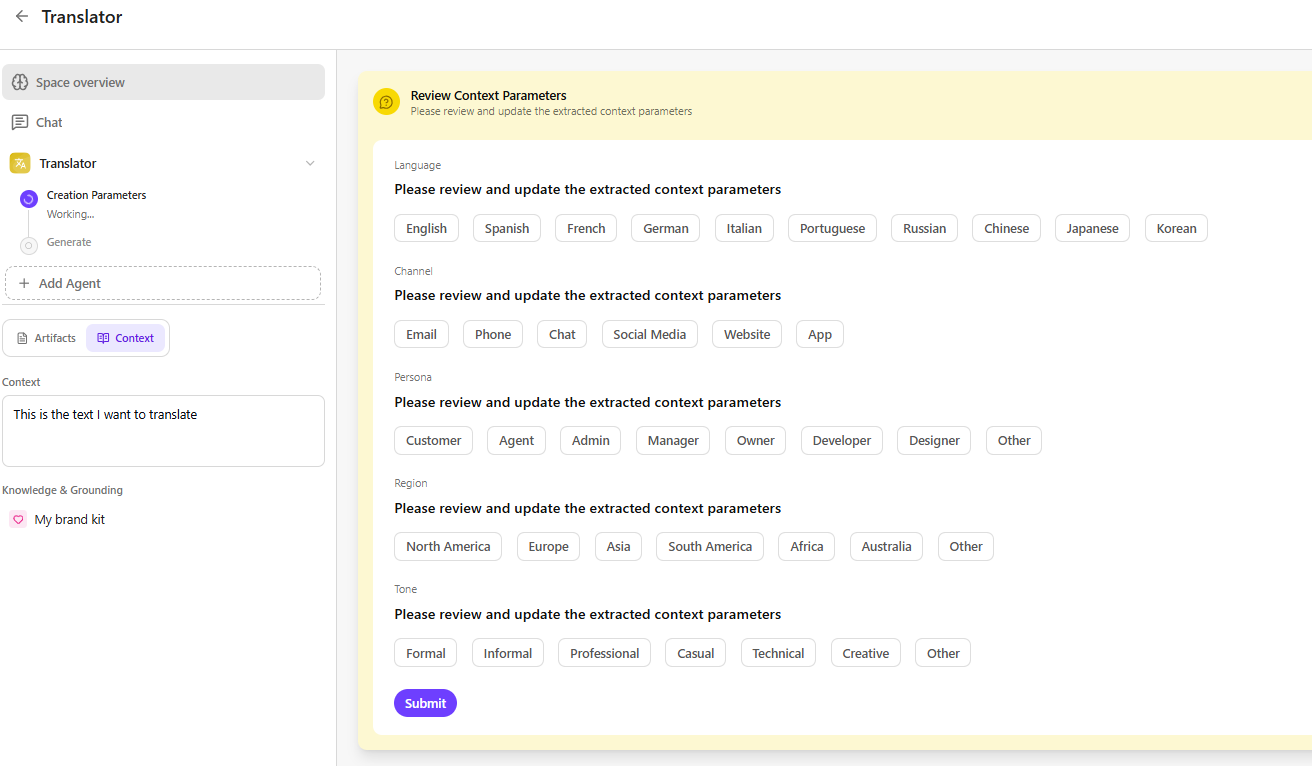
Then we get this window. Here we can set the desired parameters for this translation job. Like selecting which languages, persona, tone etc. Then the artifacts are created for each translation for you to use.
Page translation
This is maybe the highlight of this blogpost. This functionality does not require Brand Kits.
For example, you can navigate to a page that has been created and setup content in English. In the language dropdown at the top of Page Builder, select Translate.
A dialog will appear allowing you to choose one of the available site languages. The system will then traverse all references and related items in Sitecore for that page and generate, for example, a Swedish version. All text content will be translated, display names on items will receive a Swedish version, and image alt texts will also be translated if an alt text exists.
The following field types are translated:
Single-line text
Multi-line text
Rich text
General Link (link title, link text)
General Link with Search (link title, link text)
Image (alt text)
Shared fields are skipped. These are template fields marked as SHARED, since they are identical across all language versions.
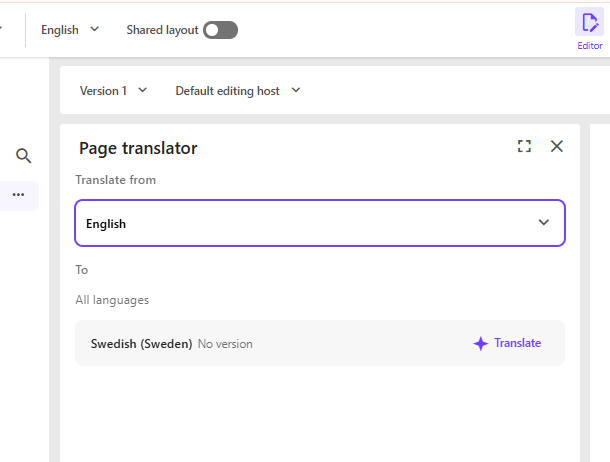
Choose source language and then click Translate on the desired language. Note that your language only pops up here if it’s configurated for the site.
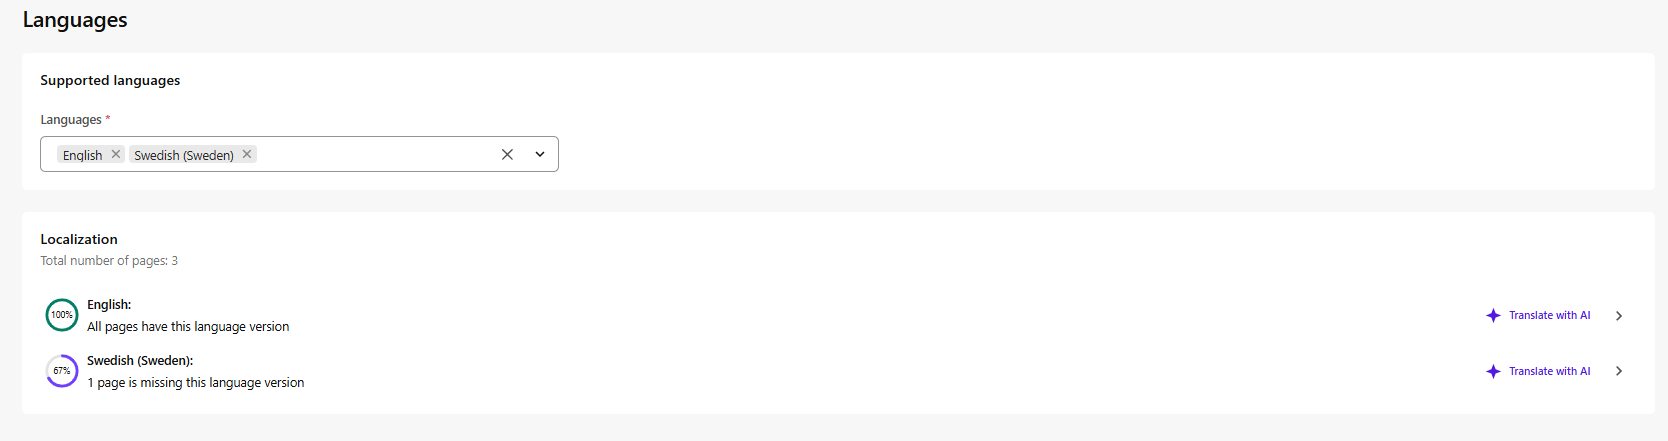
Site translation
If you instead go to manage languages from page builder you will get to this language page, here you have the button “Translate with AI” which does the same as the page translation but for the entire site. Very powerfull stuff!
The full site translation functionality is available for admins or Sitecore Client Site Managing roles.
That’s what I wanted to go over with Sitecore AI translation and some info on the Brand kits also if you’re interested in that. Hope this helps!
A/B/n testing is a powerful tool used to understand which content engages your visitors the most. I’ll explain the concepts, share insights on how to get started, and what to consider when working with SitecoreAI’s A/B/n testing.
What is A/B/n testing and why is it important?
A/B/n testing is about comparing different versions of a webpage or a content element to see which version performs best. By formulating a clear hypothesis, for example, that a new color or text of a CTA button will increase page views by 10%, you can make data-driven decisions that improve user experience and conversion rates.
What is the difference between A/B testing and A/B/n testing?
The main difference between A/B testing and A/B/n testing is the number of versions, so-called variants, being tested.
A/B testing compares two variants, while A/B/n testing evaluates multiple variants simultaneously. An A/B test is a simple comparison between two options and tests a specific change to determine which performs better. An A/B/n test evaluates several design options, layouts, or headlines at the same time and provides a faster overview of which of many ideas works best.
What distinguishes SitecoreAI from traditional A/B testing tools?
SitecoreAI differs from traditional A/B testing tools in that it is tightly integrated with the entire Sitecore ecosystem and can use artificial intelligence to optimize tests. This includes:
Faster insights: SitecoreAI helps analyze results in real time and can identify winning variants faster than manual testing. With SitecoreAI, you can compare up to six variants.
Automation: You can configure rules to automatically direct all traffic to winning variants once results are statistically significant, reducing manual work.
Integration with Sitecore: Because the testing tool is built into the platform, you can easily connect A/B/n testing to other Sitecore features, such as forms and content management, without needing external tools.
Effective default goals: SitecoreAI comes with predefined goals (e.g., page views, form submissions, bounce rate) that make it easy for marketers to get started quickly without advanced statistical knowledge.
In short, SitecoreAI makes it possible to combine A/B/n testing with AI-driven insights in a way that is difficult to achieve with standalone testing tools. It saves time, delivers more accurate results, and simplifies optimization of the entire website.
How A/B/n testing works in SitecoreAI
First, you develop a hypothesis for your test. For example, reducing the number of fields in a form may increase form submissions by 10% compared to the current version.
Based on your hypothesis, you define the test goals. SitecoreAI includes predefined standard goals:
Increase page views
Increase form submissions
Reduce bounce rate
Reduce exit rate
You then create a control variant (Variant A) and a test variant (Variant B) and split traffic between them, either 50/50 or using another distribution you decide. As mentioned, you can create up to six variants.
You determine how long the test should run, but Sitecore recommends running it for at least one week to ensure statistically significant results.
SitecoreAI then provides insights into which variant performed best, or whether there is no difference (a null result). You can configure the system so that the winning variant automatically receives all traffic, or if results are inconclusive, that the test is extended or traffic is reverted to the original variant.
What you can test
Anything you can change on a page or in a form can be tested. Examples include:
Content: Images, CTA copy, headlines, and components
Sitecore forms: Number of fields, button placement
Design and layout
Tips for effective testing
Change as few variables as possible at a time. This makes results clearer and easier to interpret.
Prioritize areas of the page with the greatest impact, such as hero banners or purchase buttons.
Run tests regularly to account for changes in visitor behavior over time.
Set a confidence score (e.g., 95%) to determine when a winning variant should receive all traffic.
Note that A/B/n testing does not work simultaneously with personalization. Because personalization shows different content to different users, it can conflict with the purpose of the test. If you want to run an A/B/n test on a personalized page, the solution is to temporarily pause personalization while the test is running.
I know I did, and after 15 years, I even picked up and old hobby of mine: Warhammer 40k
I spent months researching which faction to start with. Read up on their strengths, what would be most fun to paint etc. It required a lot of thought, because I wanted to invest in the right army for me and what I thought was important.
At some point I thought, just for fun: “I wonder if there are any similarities between this and Sitecore AI?”
So here’s the comparison.
1. Choosing a faction – Choosing a system
Before investing in a faction or a system you evaluate its strengths and weaknesses. The complexity, flexibility, long-term viability, limitations etc.
Is this the right choice for what I find important? These are things we look for when choosing our technical platforms. This is also why platforms like Sitecore work so well: they reward teams who know what they want to achieve.
2. Design and paint -> Web design and experience
Painting is a huge part of Warhammer, just like design and user experience, both for editors working in the system and the final experience where visitors interact.
For instance, a well executed design doesn’t necessarily mean it fits its purpose.
You can paint something amazing, but still in a way that clashes with the established theme or identity of the faction. The same applies to web design: just because something looks good doesn’t mean it serves its intended purpose. Design without intent is decoration.
3. Assembling the models -> Building the solution
Assembly mistakes are hard to undo, on both sides. Poor structure has implications further down the line.
It takes time to build something good and long lasting, and shouldn’t be rushed. Yes, implementations move faster today with all available tools and AI, but they don’t eliminate the need for a solid foundation. Speed should not come at the cost of structure.
4. Strategy in use – Strategy in reality
Strategy sets direction. It’s how you use your army/platform that matters most.
With SitecoreAI there are endless possibilities, therefore a good strategy is key. As a Warhammer beginner, I lean on experienced players. With Sitecore, you can do the same by working with experienced partners. And in today’s landscape, adaptation is just as important as having a plan.
Warhammer reminds me that good outcomes are rarely accidental.
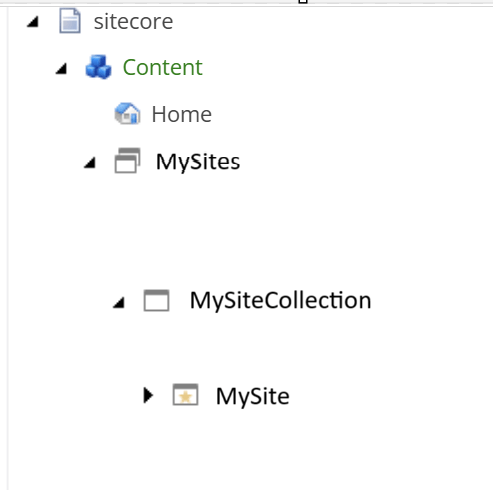
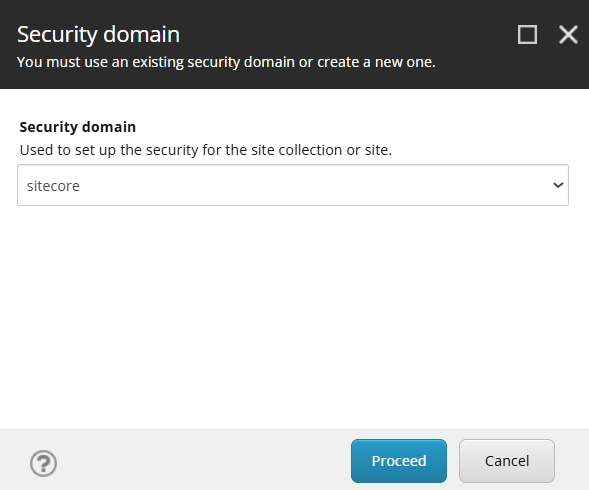
If you have multiple sites under a Site Collection and want to manage access per site or across the entire collection, it’s best to create custom roles. This gives you flexibility, for example, some editors can be Authors for the whole Site Collection, while others only have access to a specific Site.
If you only have one site or don’t need granular access, you can use the default Site Collection roles and Site roles in Sitecore. In that case, simply run the Setup Security script on your Site Collection and then on the Site.
Recommended Role Structure
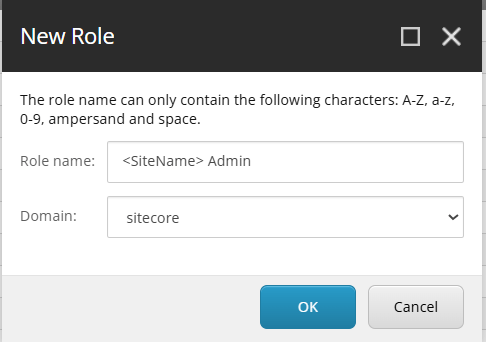
Create custom roles before running Setup Security. Preferably create 4 roles per Site Collection and 4 per Site. Use the Sitecore domain.
Site Collection Roles:
sitecore/MySiteCollection Admin
sitecore/MySiteCollection Author
sitecore/MySiteCollection Designer
sitecore/MySiteCollection Member

Site Roles:
sitecore/MySite Admin
sitecore/MySite Admin
sitecore/MySite Admin
sitecore/MySite Admin
Create your new custom roles for a new Site by creating 4 new roles. Create new roles in the Sitecore domain. Follow this pattern:
For the headless Site Collection, you create 4 new roles for that Site Collection aswell.
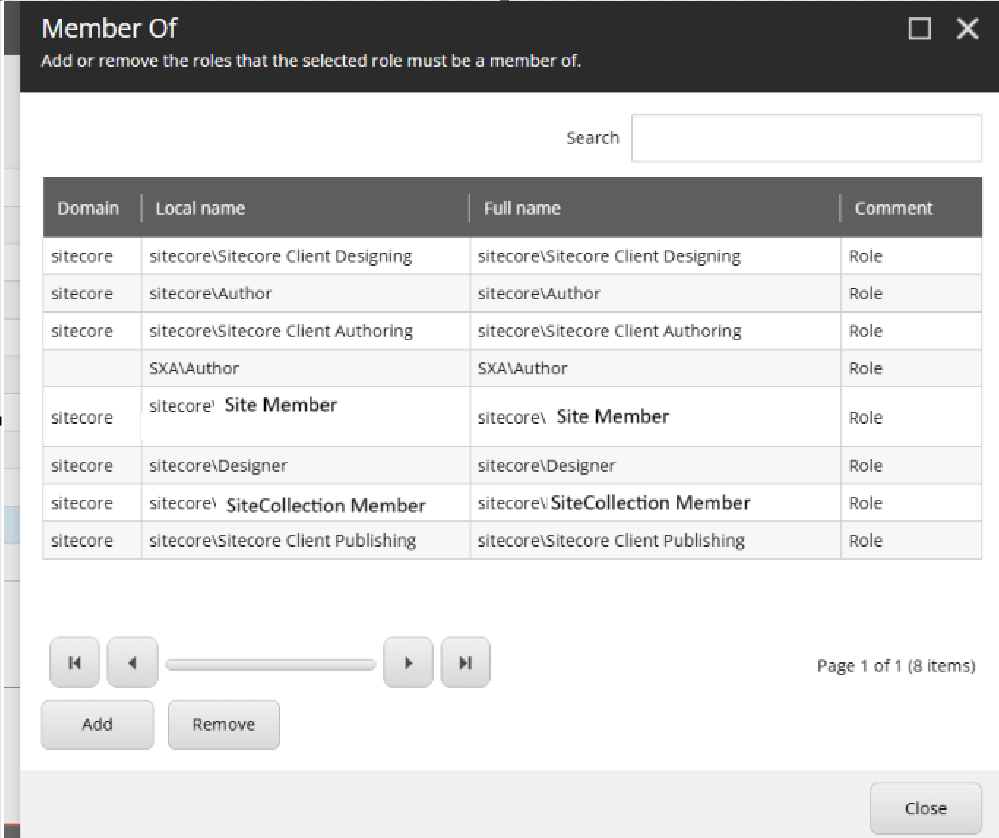
Role Membership Setup
In Role Manager, select the <Site> Author role, then click Member Of. Make it a member of:
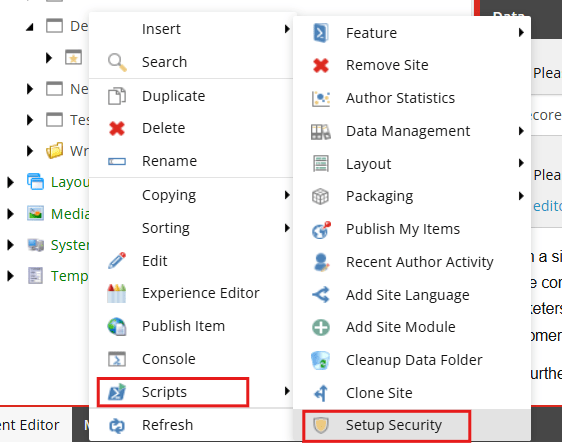
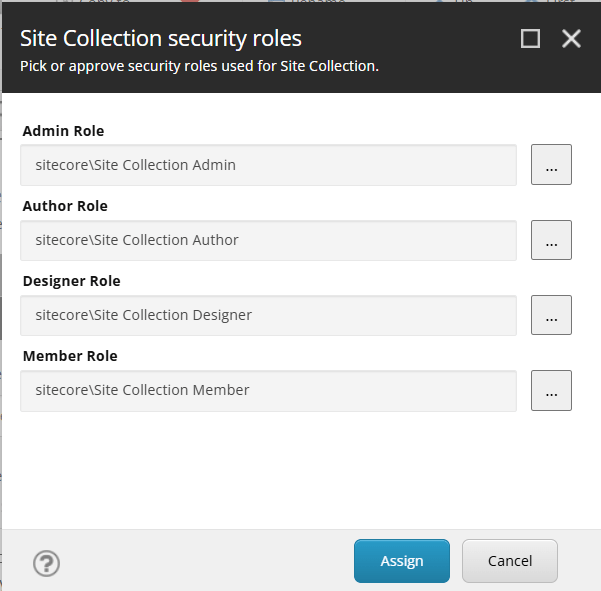
In Content Editor, right-click your Site Collection and run Scripts > Setup Security.
2. Choose sitecore as domain
3. In the dialog, link the 4 custom roles to the appropriate fields before clicking Assign.
4. Then repeat for the Site.
You can now assign users to your new Author role and they should be ready for editing your site. Don’t forget to setup Workflows to make the editor experience as expected in Page builder!
Notes
If you only have 1 site or don’t see a reason to split the roles up in any way, there are default Site Collection roles and Site roles predefined in Sitecore that you could use instead and just run the Setup Security script on your Site Collection and Site. But for granular access rights I recommend setting up site specific roles.
OpenAI’s DALL·E API allows us to generate AI images based on a textual descripton. In this post I’ll show how we can use the API to create an image and store it in Sitecore.
To use the API you must sign up for an API key on openai.com. Copy that API key and use it in your code. Then we can make a request to the API with a description of the image you want to generate.
With the Free trial usage you get $18 worth of credits to use the API. Generating one image is only a few cents. So it should be enough for a POC or just testing it out.
Using the HttpClient, we’ll send a POST request to the API endpoint with a JSON payload containing the description. Parse the JSON response to get the URL of the generated image, then use memorystream to save it in the media library.
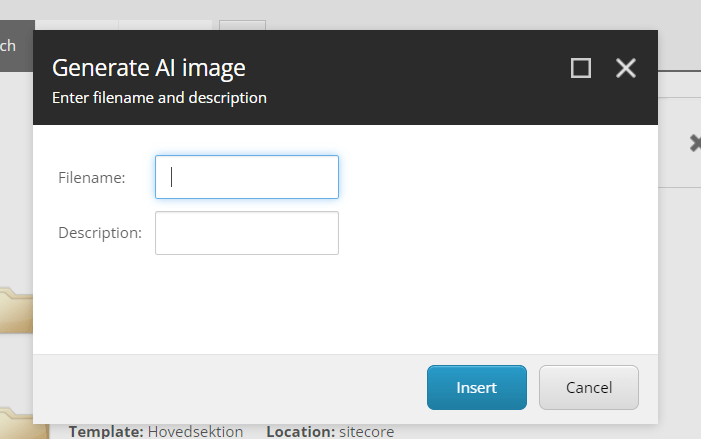
With the CodeBeside in above XML I can catch the OnOk event which will generate the image from the API. From there I can grab the input texts from my dialog window. That code looks like this:
public class GenerateImage : Sitecore.Web.UI.Pages.DialogForm
  {
    protected override void OnOK(object sender, EventArgs e)
    {
      Sitecore.Web.UI.HtmlControls.Button senderB = sender as Sitecore.Web.UI.HtmlControls.Button;
      string apiKey = "<Your_API_key>";
      string apiEndpoint = "https://api.openai.com/v1/images/generations";

      var filename = senderB.Page.Request.Form.Get("Filename");
      var description = senderB.Page.Request.Form.Get("Description");

      HttpClient client = new HttpClient();
      client.DefaultRequestHeaders.Authorization =
        new System.Net.Http.Headers.AuthenticationHeaderValue("Bearer", apiKey);

      string jsonPayload = JsonConvert.SerializeObject(new
      {
        prompt = description,
        n = 1, //how many images to generate
        size = "512x512"
      });

      StringContent content = new StringContent(jsonPayload, Encoding.UTF8, "application/json");
      HttpResponseMessage response = client.PostAsync(apiEndpoint, content).Result;

      if (response.IsSuccessStatusCode)
      {
        string jsonResponse = response.Content.ReadAsStringAsync().Result;
        dynamic result = JsonConvert.DeserializeObject(jsonResponse);

        // Get the generated image URL
        string imageUrl = result.data[0].url;

        // Download the image
        using (var imageResponse = new HttpClient().GetAsync(imageUrl).Result)
        {
          if (imageResponse.IsSuccessStatusCode)
          {
            using (var stream = new MemoryStream())
            {
              imageResponse.Content.CopyToAsync(stream).Wait();
              stream.Seek(0, SeekOrigin.Begin);

              var mediaCreator = new MediaCreator();
              var options = new MediaCreatorOptions
              {
                Versioned = false,
                IncludeExtensionInItemName = false,
                Database = Factory.GetDatabase("master"),
                Destination = "/sitecore/media library/AI-generated-images/"
              };

              using (new SecurityDisabler())
                mediaCreator.CreateFromStream(stream, $"{filename}.png", options);
            }
          }
        }
      }
    }
  }
Alt texts are more important than people might think. They can make a huge difference in SEO scoring, placing you higher up in the search results like Google or Bing. Your alt-texts should be more than just “bird”, if it’s an image of a bird. Because it also gives value to those with any visual impairments for instance. So for example “A green hummingbird hovering next to a flower” gives more value than just “bird”.
But for me personally, it’s just as “hard” to write alt texts as it is to choose an icon in Sitecore for my components 😉 So to make life easier I thought I’d show an implementation of how to generate alt texts that give value using Microsoft Computer Vision. We’ll then generate the alt text to our image in Sitecore as an editor.
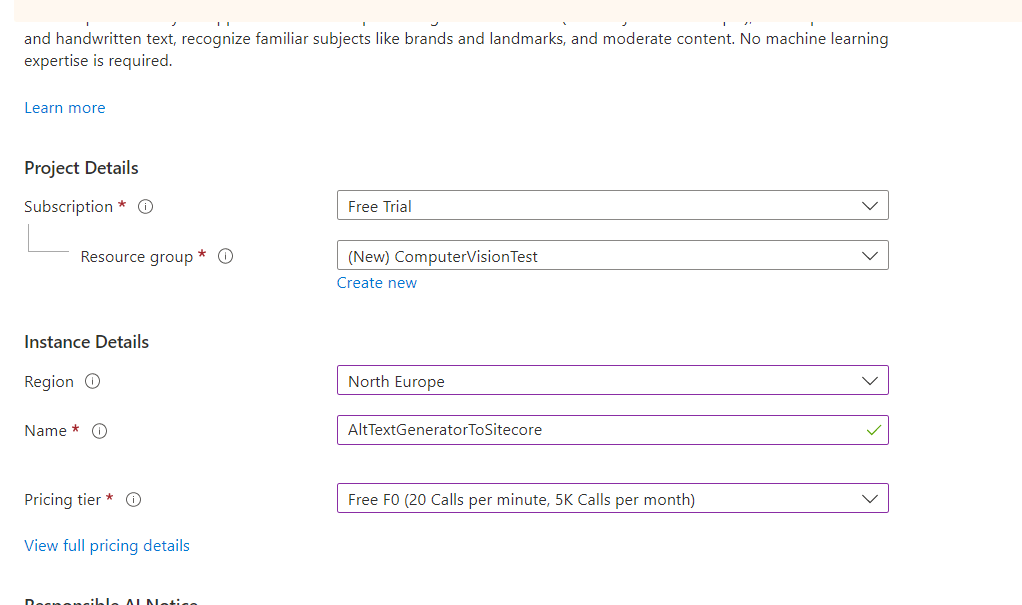
1. Prepare your Azure Computer Vision
First you must setup a Computer Vision in your Azure account. You’ll need the keys from that to get the data in code.
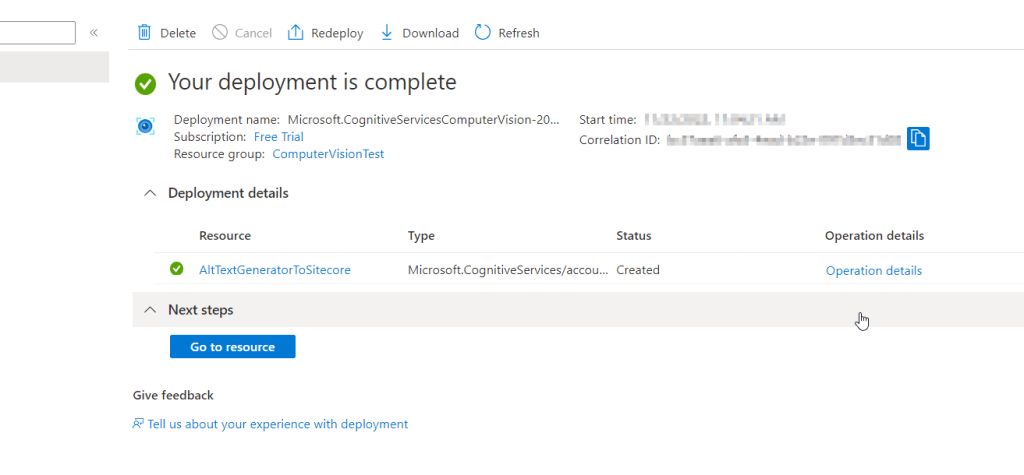
Locate Computer Vision and press “Create computer vision”
Sample setup of computer vision.
After it deploys, click on the resource link or in this case “AltTextGeneratorToSitecore”. You will need the key and endpoint from the resource you create to connect your application to the Computer Vision service. You’ll paste your key and endpoint into the code later.
2. Nuget reference
Either create a new project or fit the code in an existing project.
First, you need to reference the Microsoft.Azure.CognitiveServices.Vision.ComputerVision nuget package to your code by using the Nuget Package Manager or IDE
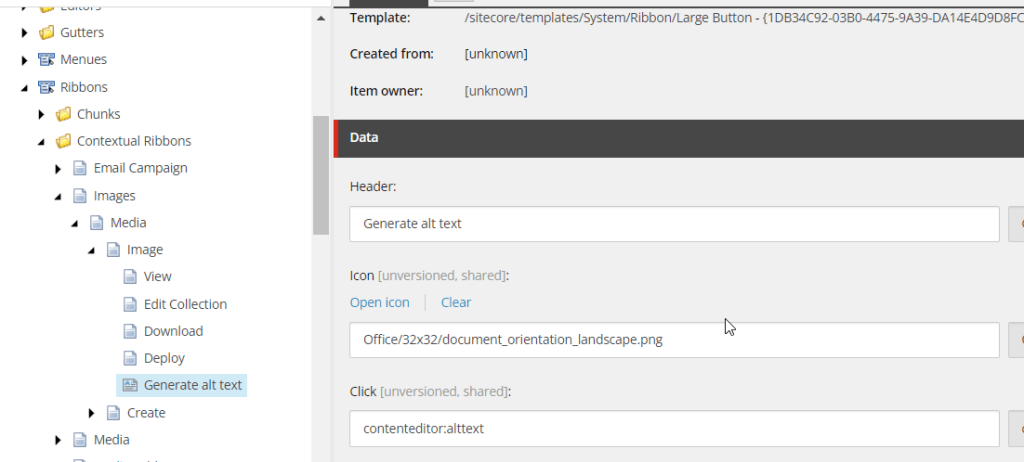
In Sitecore, switch to Core database and navigate to /sitecore/content/Applications/Content Editor/Ribbons/Contextual Ribbons/Images/Media and create a new Large Button.
It should look something like this
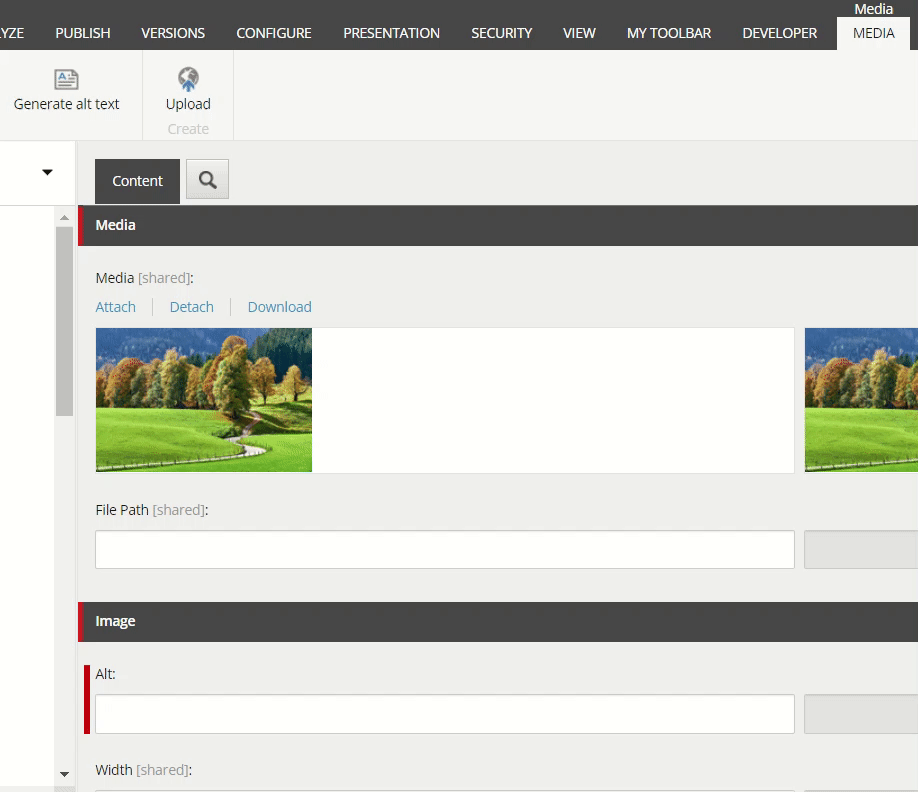
Now when you go to the media library and select an image you can autogenerate an alt text by pressing the new custom button we made.
This is my example image, I will now generate an alt text to it
Voilà! Works like a charm.
You could use other Features than just Description from the Image Analysis. Read more in sources below.
You could also implement some conditions on the confidence score if you think it will generate bad results.
Would love to hear if you have any ideas how this idea could be improved or extended!