The problem: All I could see in the log file was that error message “sitecore shutting down – initialization error“. This didn’t tell me much of where the issue was coming from except when Sitecore is spinning up.
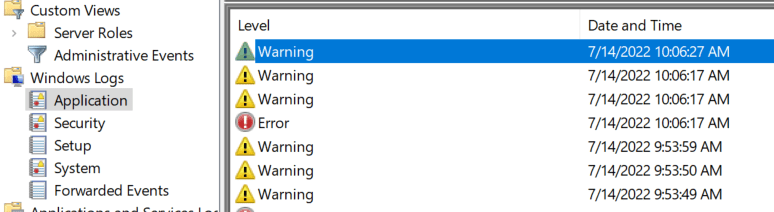
So I took a look in the Event viewer to check out any logs there. Open “Event Viewer” by clicking the “Start” button. Click “Control Panel” > “System and Security” > “Administrative Tools”, and then double-click “Event Viewer”.
Go to Windows Logs -> Application and you’ll see the latest log inputs at the top.
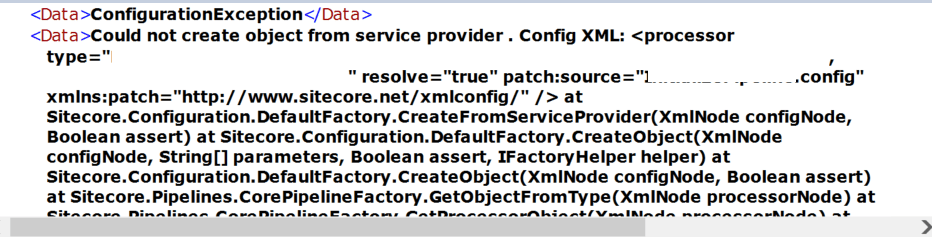
Click it and read the details. There I saw my problem.
It was a config file that was hooking into the initialize pipeline and had a faulty dependency. Whops. Fix that and bada boom, Sitecore starts to spin up again.
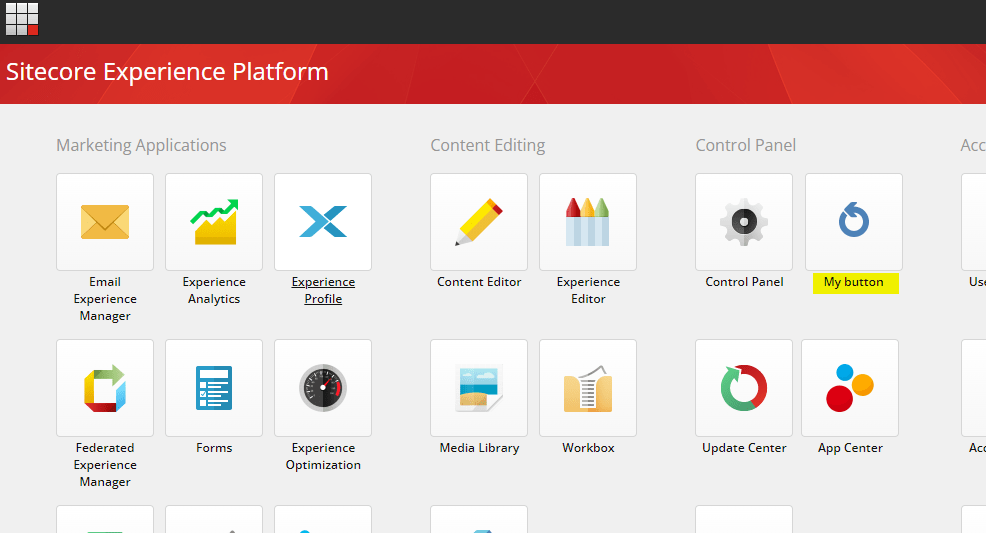
A neat way to execute or show some custom functionalities is to create a custom button for the Sitecore Dashboard/Launchpad (whatever you call it, I say Dashboard). This is very simple and you can easily make the button either for example
a) open an aspx b) show custom views c) make an API request to one of your controller actions
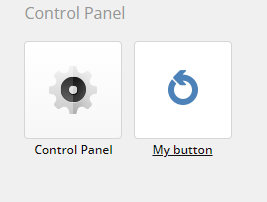
Here i’ve added “My button” to the Control Panel section
Step 1
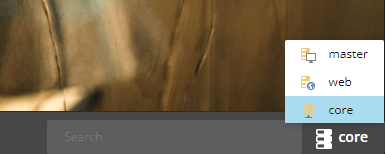
Switch to Core database by going to the Desktop view and in the lower right corner switch database. (Or enter the querystring &sc_content=core) Then enter the Content Editor
Step 2
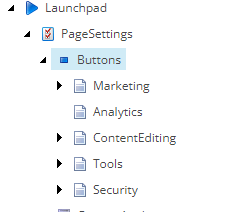
Locate /sitecore/client/Applications/Launchpad/PageSettings/Buttons and you will find the sections corresponding to the Dashboard/Launchpad
Step 3
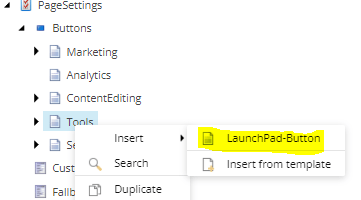
Choose what section you want to put your button in and right-click the item (Tools = Control Panel) and add a new Launchpad-button
Step 4
Fill in the button as you want. Text: The text for the button on the Dashboard/Launchpad Icon: Icon for the button Link: You can link directly to a Sitecore Item or a controller action within the sitecore api as i’ve done. (or your own api) OpenNewTab: Clicking the button opens it in a new tab. OpenIframe: Clicking the buttons opens an iframe. PathResolver: Namespace and dll name
That’s it. It should now show up on the Dashboard/Launchpad
I needed to replace swedish characters from string without removing the character for itemname.
With Sitecore you can use ItemUtil.ProposeValidItemName() but it removes the invalid characters. I have a text like “Flöde” and I want it to be “Flode” and not “Flde” like Sitecores ItemUtil does.
The ItemUtil.ProposeValidItemName will give you a valid item name for Sitecore. The string output would still contain possible invalid special characters that you don’t allow in the Sitecore config setting ItemNameValidation regex.
Performance is key. We have all know this. Customers has very high expectations on fast solutions. And this is where caching is king.
There are many caching soultions out there today, like Reddis cache. You can also build your own layer if you’d like. Or you can use Sitecores.
Sitecore has their own caching framework that is used for Sitecore to get data faster. This can also be used for custom caches. So you can cache something simple as a string or even anonymous objects.
There are two types of cache you can use for customcaching.
Sitecore.Caching.CustomCache<string> and Sitecore.Caching.Generics.Cache<T>. One takes a string and one takes an object type.
Sample code
   var mycache = new Sitecore.Caching.Cache("test cache", 1024);
   mycache.Add("key", "data");

   var myType = new Type {Id = 1, Name = "Test"};
   mycache.Add("type", myType);

   //Get the value based on key
   var value = mycache.GetValue("type");
Just a short and quick blogpost. I got an issue with my alphabetically sort. This was because my field was tokenized and of type text in Solr. So I had to make the field Untokenized and returnType string. Fixed!
With Sitecore you can pretty easy sort by Ascending or Descending with LINQ to Sitecore Just write an OrderBy or OrderByDescending with your field like so:
switch (direction)
{
  case SearchOrderDirection.Ascending:
    return queryable.OrderBy(i => i.Title);
  case SearchOrderDirection.Descending:
  default:
    return queryable.OrderByDescending(i => i.Title);
}
REMINDER: The field should be UNTOKENIZED and returnType string.
Sitecore released the new version, 10.2 recently and I wanted to make a quick summary of some of the features that stood out to me. For full Release Notes please check Sitecores doc here: 10.2 Release Notes
Decrepcated
Update Center is going away.
Support for Azure Search has been removed. They are going back to Solr after moving over to Azure Search in Version 10.0. Solr has been there through all 10.x but now their fully relying their internal indexes on Solr.
New features
EXM DDS role now supports containers. For fast deployment of a Dedicated Dispatch Server.
Solr version 8.8.2 is now the recommended version.
MVC components are now supported in Experience Edge. This is so projects can gradually go towards Headless and not have to throw away their existing projects.
Sitecore Identity Server 6.0.0 now runs on .Net Core 3.1. A big security update.
Use xConnect CLI to purge interactions you don’t need. Clear up space.
There is a new “Content Explorer” in Horizon which is a search and filter based way of finding items in Sitecore. This looks promising for future Headless endeavours.
Horizon now fully integrated with SXA. SXA now has Bootstrap 5 support, upgrades to Scriban templates and lots more.
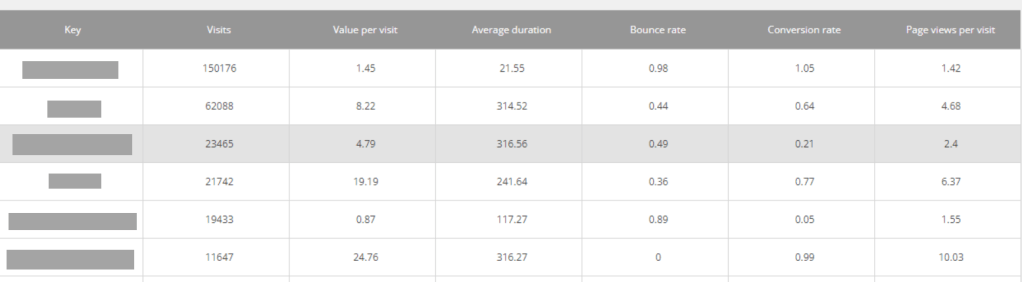
In Sitecore Experience Analytics you can see graphs and tables with data of visitor information such as pages they most navigate to, goal conversions etc.
By default these tables have no sorting set on a specific column. This in turn leads to intense scrolling through the result.
A sorted table. Learn how below
If you want to sort the tables by for example Visits in descending order, i’ll show you how. Same idea if you want to switch Visits for Page Views, Conversion Rate etc.
Log into Sitecore and go to Desktop from the Dashboard.
Switch to Core database
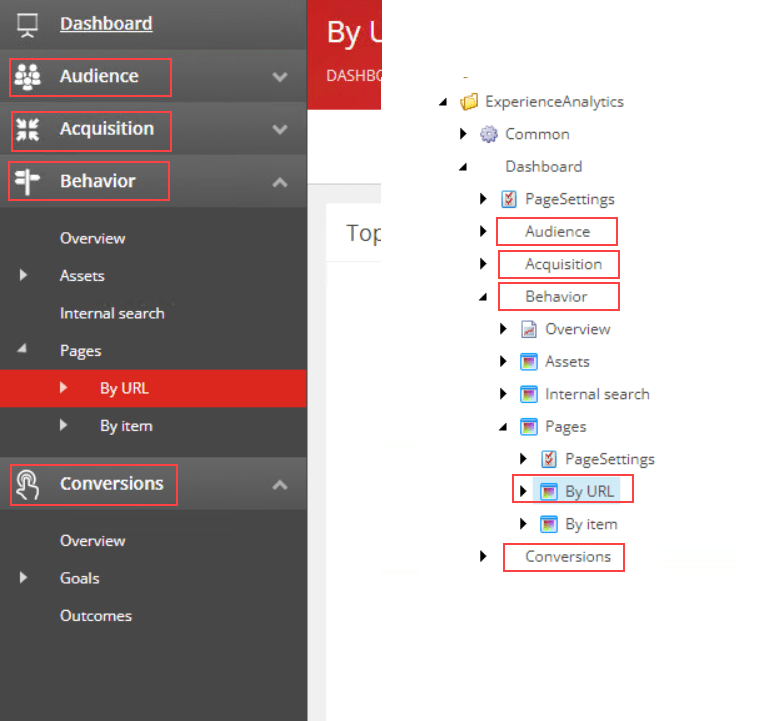
Open Content Editor and navigate to /sitecore/client/Applications/ExperienceAnalytics/Dashboard.
From here you need to find the tables you want to fix the sorting. As you can see in the image below, the tree in Content Editor matches the order in Experience Analytics.
5. Now open the coresponding nodes PageSettings and click the ListControl Parameters. Find the fields KeysSortByMetric (the column) and KeySortDirection.
Save and refresh your Experience Analytics window and the table should now be sorted.
Link to Sitecore documentation for Dimensions and Metrics and what the they mean: Click
SFE a.k.a Sitecore Forms Extension was pretty much mandatory for our Forms in Sitecore 9.1.1. It gave us the functionality which we didn’t get out of the box, such as file upload that can be sent as an attachment in mail and some other Sitecore Forms field types like Html Field & Recaptha.
You also get a new Submit Action that sends email via EXM dispatch.
When we submitted the form I got this error in the logs, even though the form was accepted:
An item with the same key has already been added
This was sort of a silent error. The form was submitted and you recieved a thank you message on the page. But no email was sent.
Ultimately this was because there was two fields in the Form that had the same name. There is no validation of this in the Form itself so if you don’t know about it beforehand you could end up with this error.
Just make sure you use unique names on all the fields.
So I was looking for a way to add an ordered or unordered list to a text in the Rich Text Editor in Sitecore 8.2 and I couldn’t find it in the Rich Text Editor (RTE). This is because the default RTE doesn’t show all functions (see image below).
The image above shows the default toolbar for the RTE. If you want to add more buttons to this, like ‘insert ordered list’, you will have to some customization in the core db. Nothing big. I’ll show you how!
Two choices.
First, fastest. Add a path in your template for the field type like so:
You can choose from Html Editor Profiles:
Rich Text Default
Rich Text Full
Rich Text IDE
Rich Text Medium
Rich Text Mail
I can’t think of a situation where this isn’t enough for your clients.
But for those that like to experiment there is a second choice, more customizable.
Start by switching to your CORE db and go to Content Editor.
Go to /sitecore/system/Settings/Html Editor Profiles. Lets say you duplicate the Rich Text Default item and rename it, in this case, to “Rich Text Custom”.
You want to add new items under /sitecore/system/Settings/Html Editor Profiles/Rich Text Custom/Toolbar 1.
Insert new _Html Editor button. In the field ‘Click’ you enter “InsertOrderedList”. (I don’t know what all the functions are, but if you want, you can check into the other profiles like “RTE Full” what to put in the ‘Click’ for your specific button.
Now you can add “/path/Rich Text Custom” to the source field in your template.
Thanks for reading and happy Sitecoring!
Is this your new site? Log in to activate admin features and dismiss this message