We’re running a vercel site with Sitecore 10.3 and JSS. I was getting errors about CORS origin like this:
Access to XMLHttpRequest at ‘https://{host}/sitecore/api/jss/track/event?sc_apikey={key}’ from origin ‘https://{host}’ has been blocked by CORS policy: Response to preflight request doesn’t pass access control check: It does not have HTTP ok status
Finally I found that the error was thrown because Sitecore.JSS.TrackerServiceEnabled is disabled by default. By setting it to true with a patch config the error disappeared.
Webhooks are user-defined HTTP callbacks that enable real-time communication and interaction between OrderCloud and external systems or services. They help automate processes, validate and synchronize data, enhancing the efficiency and responsiveness of e-commerce operations.
There are two types of webhooks in OrderCloud. Pre-hook and Post-hook.
Pre-hook will happen before OrderCloud execute the endpoint given and Post-hook will execute after the given endpoint. Webhooks in Ordercloud only works with write API endpoints (POST, PUT, PATCH, DELETE).
Webhooks in Sitecore OrderCloud can be used for many different purposes like:
Inventory management: Webhooks can be used to automatically adjust inventory levels in external systems when an order is placed or updated. This ensures accurate inventory tracking and helps prevent stock discrepancies.
Validation: Pre-hook webhooks can be used to validate incoming requests, such as payment information or customer details, before processing an order. You can also use it to validate shipping addresses using external address validation services or other checkout information before an order is created.
Data synchronization and third-party integrations: If you need to update or send data to your CRM, ERP or other platforms you can also use webhooks to send that data.
Automation: Webhooks can be used to automate various e-commerce processes, such as generating invoices, updating shipping statuses, or sending marketing emails based on user behavior.
Webhooks in Sitecore OrderCloud play a crucial role in making your e-commerce solution a success by improving the efficiency and experience.
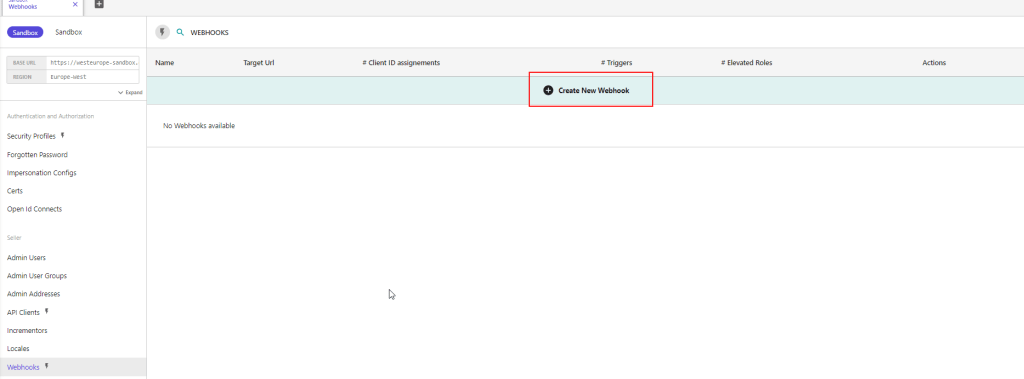
But let’s take a look anyway. Go into portal.ordercloud.io, API console and select your marketplace.
Go to Webhooks and create a new Webhook
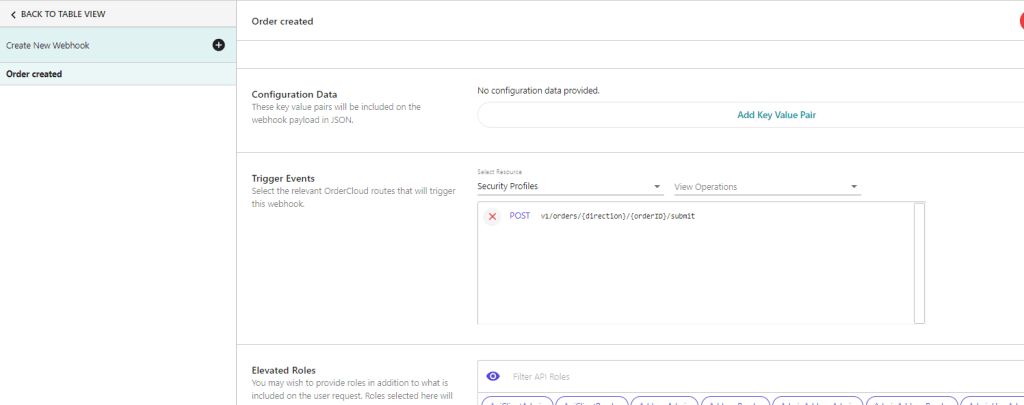
In the new interface setup a name, secret, payload url, etc.
Select the trigger events you want to trigger the webhook. For example when a order is submitted and you want to send data to another system. You can set the order submit as a trigger event. And check the pre-hook if you want it to execute something before OrderCloud.
Message Senders
Message Senders are a feature designed to deliver event-driven notifications to users based on activities such as order submission, shipment, password resets, and more.
In comparison with Webhooks, which are also event-driven, Message Senders are more suitable for notification tasks because they automatically retrieve all the relevant information and send a web request for each message that should be sent. This simplifies the process compared to the steps you’d have to take with webhooks, which involve writing code for several more steps.
OrderCloud provides different types of Message Senders, each corresponding to a different commerce activity. Users must be active to receive messages, meaning not only that their personal accounts are active but also that the buyer or supplier organization they belong to is active.
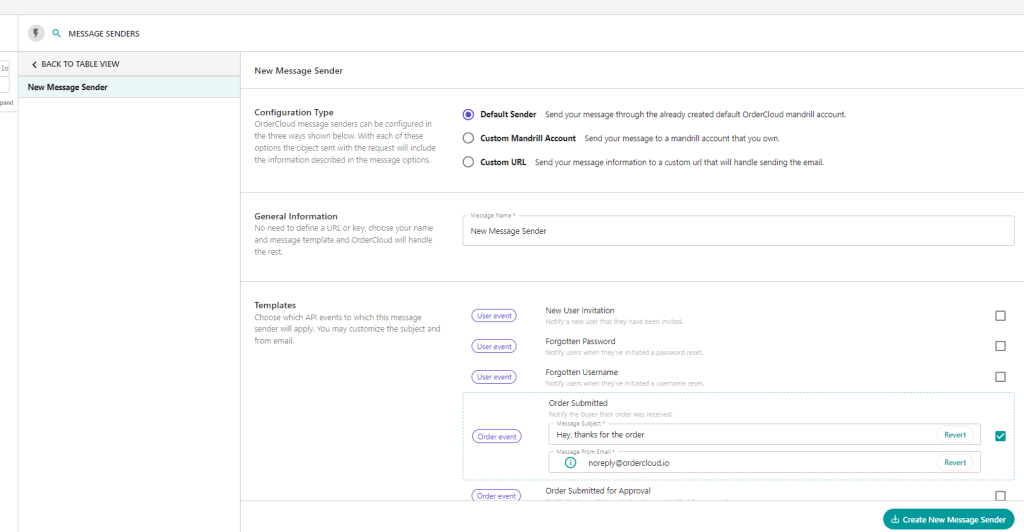
There are three different configuration options for Message Senders: Default Sender, Custom Mandrill Account, and Custom URL. Each option provides a different level of control:
Default Sender: The easiest, no-code option. Uses OrderCloud’s Mandrill account and templates, providing minimal control over the email templates or the data sent.
Custom Mandrill Account: A low-code option that allows you to provide your own custom email templates. The actual sending of emails is still handled by OrderCloud.
Custom URL: The most flexible option that requires more work. You provide OrderCloud with the URL to your publicly available endpoint, which will receive the event payload and is responsible for formatting and sending the notification.
The system also provides a list of variables (Mandrill Variables) that you can use in your custom email templates if you’re using the Mandrill/Mailchimp integration.
Facets are used with the ContentSearch API to enable filtering and grouping of search results based on specific fields or properties. Facets help users to narrow down search results based on their preferences or criteria. Here’s a guide on how to use facets with ContentSearch in Sitecore
Define the facet field in your search index configuration:
First, ensure that the field you want to use as a facet is included in your search index configuration. For example, if you want to use the “Manufacturer” field as a facet, you should have it defined in your search index configuration.
Create a model class for your search result items:
Create a model class that inherits from SearchResultItem and includes the properties you want to use as facets. I would recommend putting the IndexField name in a constant file to reuse everywhere in your solution. Because if it’s every changed you only need to change on 1 place and it won’t break the code. For example:
public class CustomSearchResultItem : SearchResultItem
{
    [IndexField("manufacturer")] //Or use a constant in your foundation project
    public string Manufacturer{ get; set; }
}
Perform a faceted search:
To perform a faceted search, use the .FacetOn() method in your search query. This method tells the search provider to calculate the count of items for each unique value in the specified field.
Here’s an example of performing a faceted search on the “manufacturer” field:
using (var context = ContentSearchManager.GetIndex("sitecore_web_index").CreateSearchContext())
{
    // Create the base search query
    IQueryable<CustomSearchResultItem> query = context.GetQueryable<CustomSearchResultItem>()
        .Where(item => item.TemplateName == "YourTemplateName");

    // Add the facet to the query
    query = query.FacetOn(item => item.Manufacturer);

    // Execute the search and get the facets
    var searchResults = query.GetResults();
    var manufacturerFacetResults = searchResults.Facets.Categories.FirstOrDefault(x => x.Name == "manufacturer");
}
Process the facet results:
In the example above, the manufacturerFacetResults variable contains the facet results for the “manufacturer” field. You can now process these results to display the facet options to the users or apply further filtering based on user input.
Here’s an example of processing the facet results and displaying them as a list of options:
if (manufacturerFacetResults != null)
{
    foreach (var facetValue in manufacturerFacetResults.Values)
    {
        string manufacturer = facetValue.Name;
        int count = facetValue.AggregateCount;
    }
}
Apply facet filters to the search query:
Based on user input, you can apply facet filters to the search query to narrow down the search results. For example, if a user selects a specific manufacturer from the facet options, you can add a filter to the search query:
I began my Sitecore journey in 2016, never imagining the depth of engagement and connection I would find within a professional community. Today, I am honored to stand among my peers with my first MVP title, deeply grateful for the support and rich collaboration that defines our community.
Over the years, I’ve witnessed Sitecore evolve, expanding its product suite to groundbreaking solutions that are shaping the future of digital innovation. The growth of Sitecore’s offerings has mirrored my own journey of professional development, continually inspiring me to explore, innovate, and contribute.
Receiving the MVP title is not just a recognition of my contributions; it’s a powerful reminder of the strength found in collaboration and the endless possibilities that lie ahead. With Sitecore and this incredible community, I’ve never felt more confident in our collective path forward. Together, we are not just adapting to the digital future—we are creating it.
Is this your new site? Log in to activate admin features and dismiss this message