In the world of e-commerce, effectively sorting and filtering products is essential for creating a seamless shopping experience. One powerful tool for achieving this is ‘facets’. Facets provide a way to categorize and filter products based on their characteristics, such as color, size, brand, etc.
OrderCloud supports the use of facets through its extended properties, XP, feature. In this post, we will take a look at setting up facets in OrderCloud and how to use them to fetch and filter products.
Setup Facets in OrderCloud
Let’s start with setting up facets for our products. We will use OrderCloud’s extended properties, to create our facets.
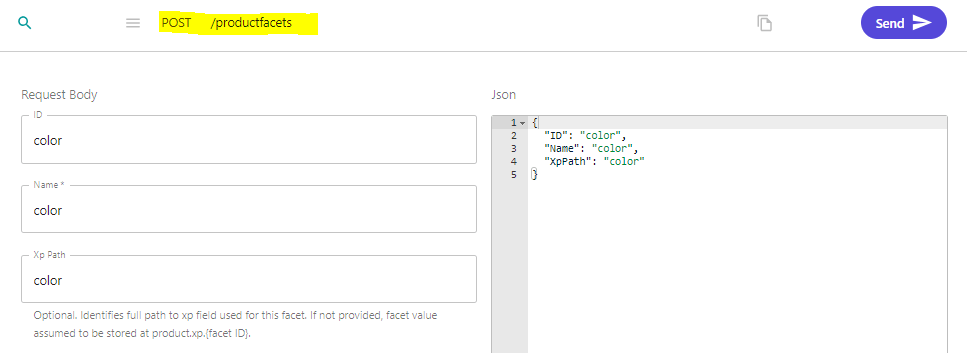
Creating Product Facets: To add a facet to a product, you need to send a POST request to the /productfacets endpoint. Here’s an example of how to do this for a “color” facet. I will setup one for “size” aswell
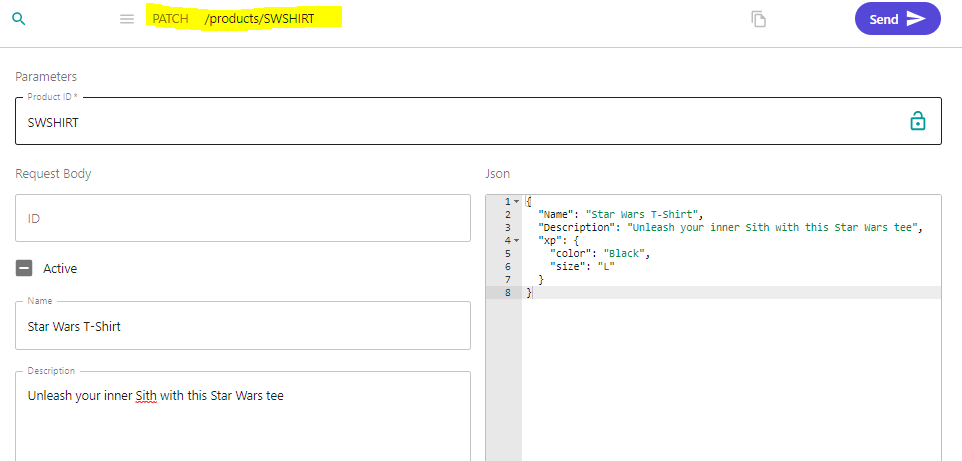
2. Adding Facet Values to a Product: After setting up the facets, we can add the value to our product using the XP feature. In our product data, we include an XP object with our desired fields:
This product now has a color facet with the value “Black” and a size facet with the value “L”.
Fetching Products and Viewing Facets
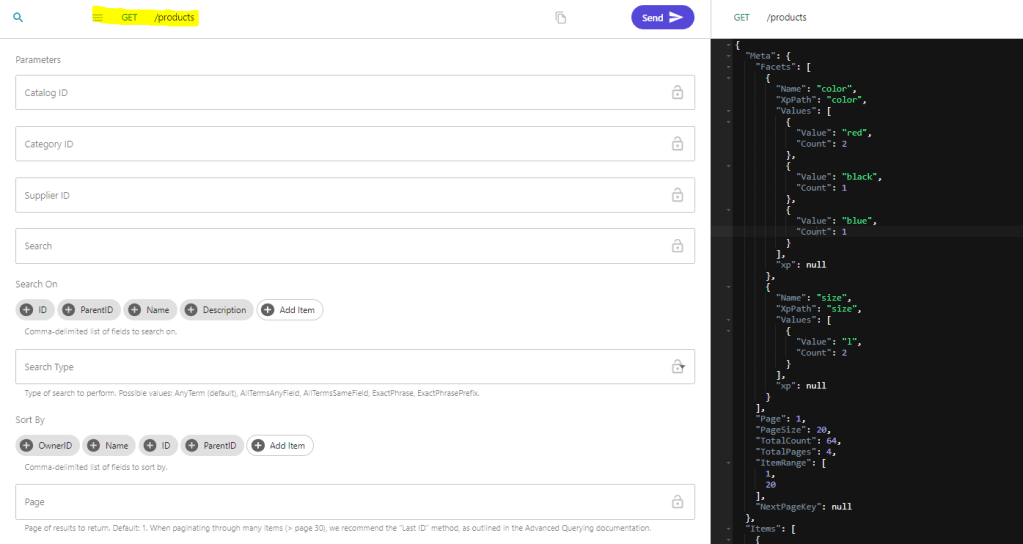
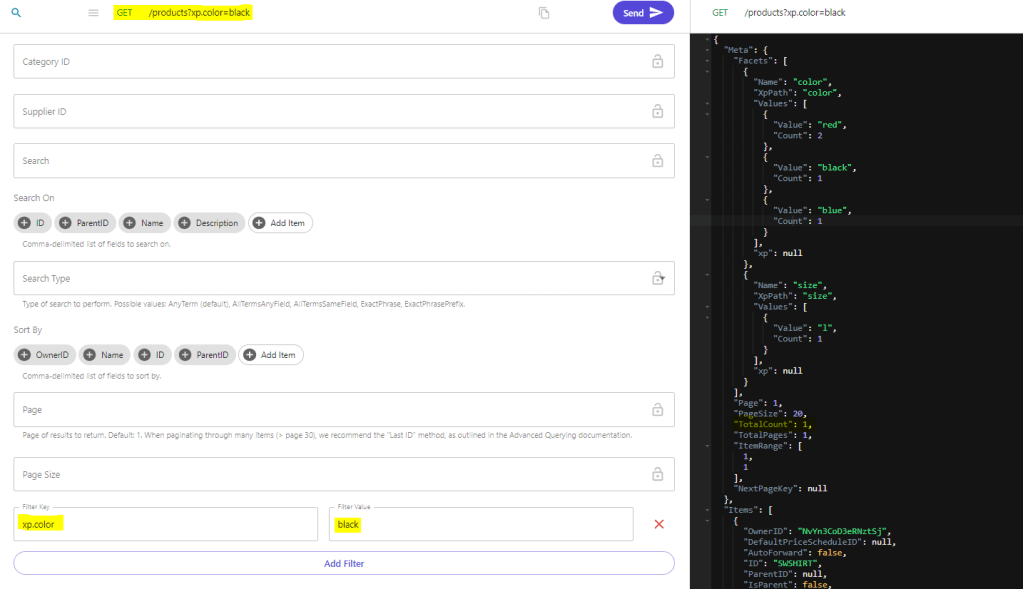
With our facets set up, we can get our products and view the facets in the response. When we get all products, any XP fields that match product facets are returned in the API response. We can do this using the following GET request:
In the response, we will see a “Facets” field in the “Meta” object. This provides a list of all unique facet values and their counts. I had some other products already with facets, but now it added a facet for color black with count 1 and added one size L.
Querying Products by Facet
OrderCloud’s API provides the ability to filter products based on these facets. For example, if we wanted to fetch all products with the color “Black”, we could add a filter parameter to our GET request /products?xp.color=black
This will return all products with the color “Black” in the XP field.
Now you know how to use product facets in Sitecore OrderCloud. Thanks for reading and follow me on social media to get notifications on more Sitecore related blog posts!
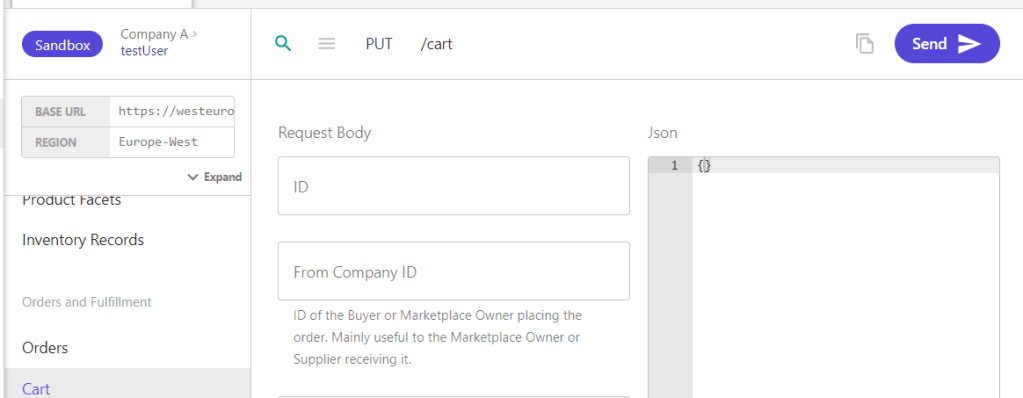
Let’s say you have a product that is flammable and/or toxic that you’re selling on your website. In most countries, these types of products need to be handled with certain safety measures during shipping to secure the safety of the transporter, product, and the environment. This would generally result in an extra fee on the shipping cost.
So, when I add a product that fall under this category to my basket, how can I present this fee to the customer and keep track of it in Sitecore OrderCloud?
I will present two options based on your specific case. Some options are better than others, depending on your user case.
Let’s take a look!
Option 1: Product representing the fee
In this option, we will create a new product called “Dangerous goodsfee” and add a price schedule to that product. On this product, we will also create an XP field called “xp.DisabledControls” and set it to true. This is essential because the product would appear like a normal line item in the basket without some form of validation, making it possible to be placed elsewhere in the cart view. (P.S. don’t forget to use the logic for the XP field in your order confirmation email too. It could be confusing if the fee product looks like normal products in the email.)
We don’t want buyers to add/update/delete this lineItem themselves so we set the XP field for custom validation. Since this is generic, we can also use it for other products.
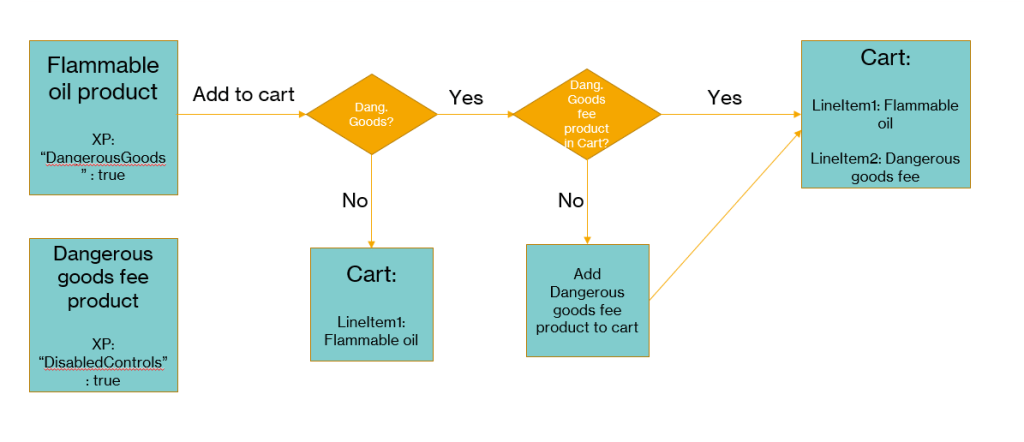
On all products that should have a “Dangerous goods fee” applied to them, those products will be given a XP field called “xp.DangerousGoods” set to true
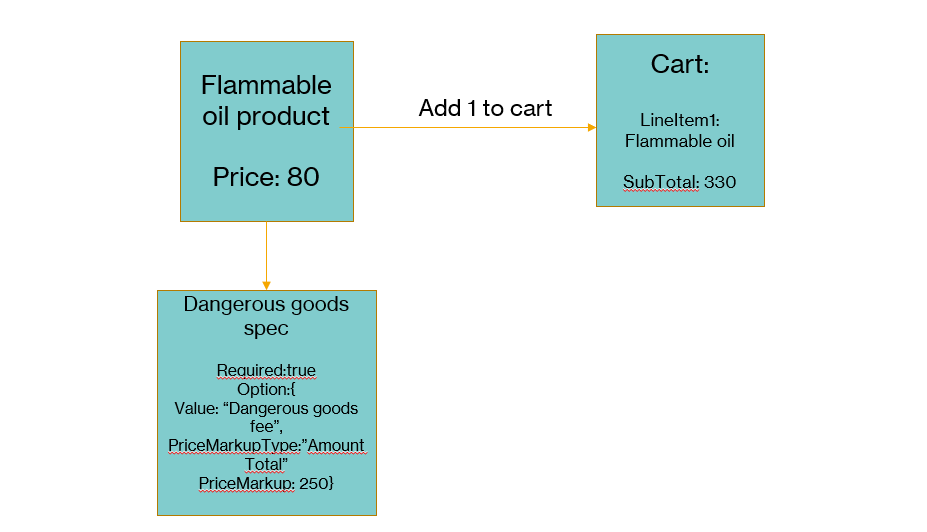
Following the above flowchart we can follow the “add to cart” flow. On our buyer app we will check the product for the XP field “DangerousGoods“. If it’s not true we just add the item to cart as normal. If it’s true we check the current cart if it already contains the product “Dangerous goods fee” or not.
If it does, just add the product we’re trying to add. If it doesn’t contain the “Dangerous goods fee” product, we add that to the cart also.
This option will make it possible to only add 1 unique fee per cart. As you will see in the next option we can add a fee per unique item.
Guide
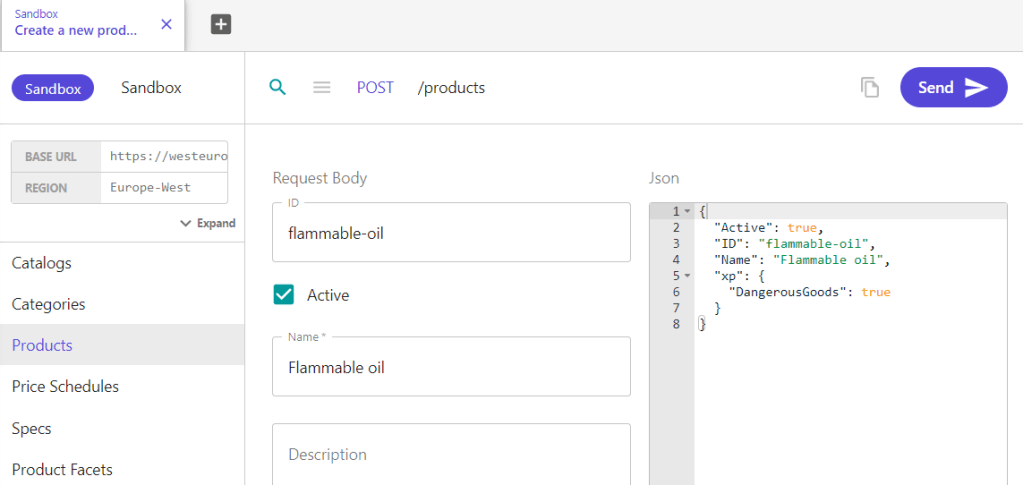
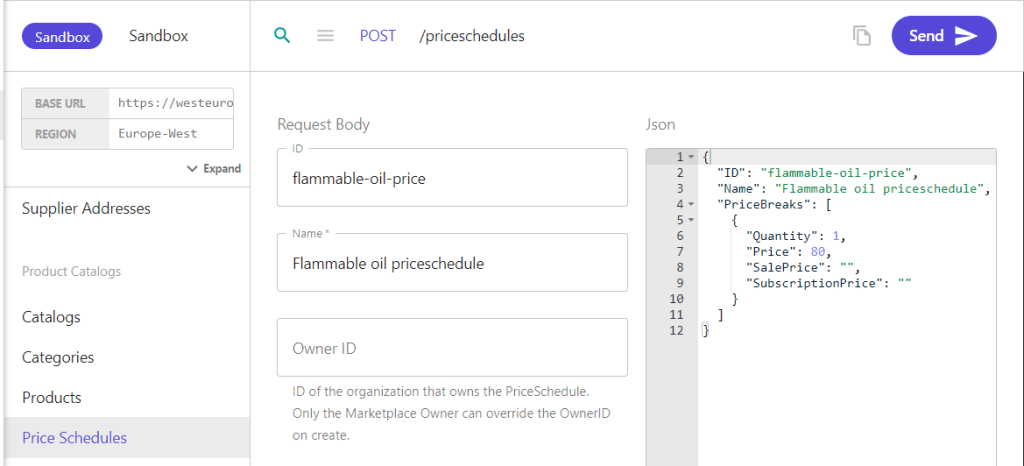
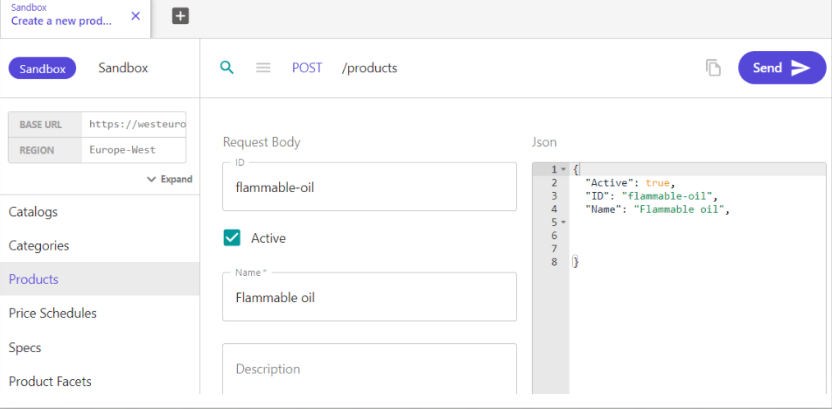
1. Create a new product or update an existing one that is the one that the buyer is adding to their cart, in this case the “Flammable oil”, that has the XP field “Dangerous Goods” : true
2. Create and/or assign a priceschedule to your product.
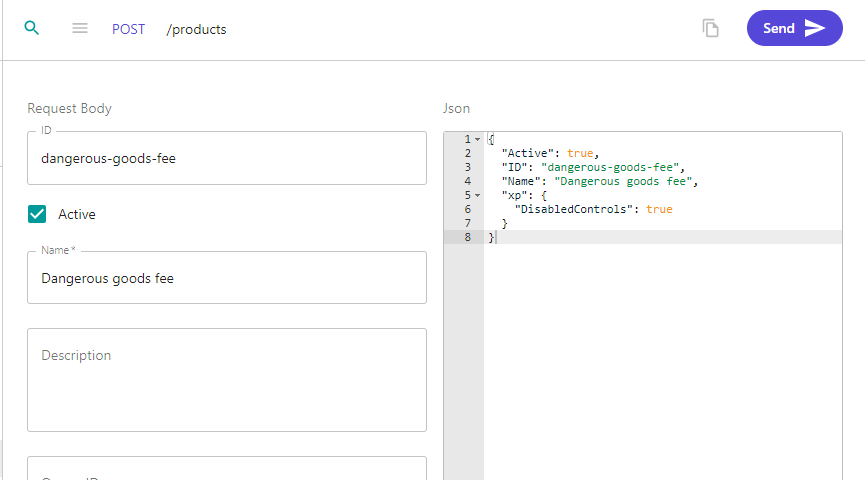
3. Create a new product to represent the dangerous goods fee. Add a XP field “DisabledControls” : true
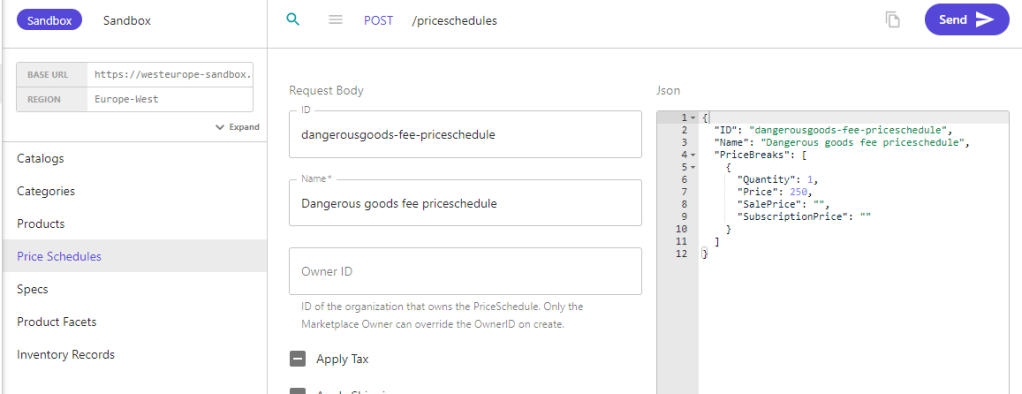
4. Create a priceschedule then assign it to your fee product.
In your storefront, create custom code that when a buyer user adds, update or delete a lineitem from your cart, you must check if it has the XP field “Dangerous goods” = true. You must have the product ID saved somewhere for your Dangerous goods fee-product. Maybe in your Sitecore CM for instance, or whatever you find fitting?
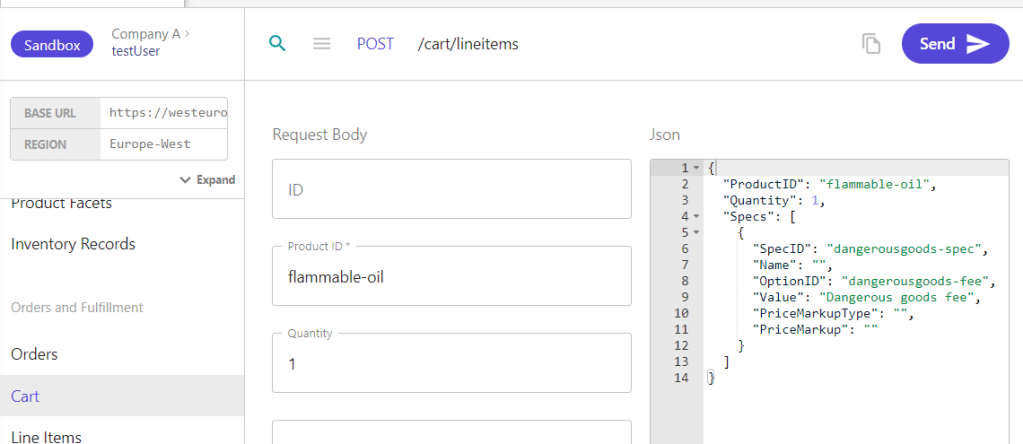
This option will add a fee per unique product in the cart. This will be a required spec option with a single option that always tags along with the product. On the setup of the spec we can set if it should multiply per quantity on the product and the price markup for that spec option.
Hiding some rows but this is the response from OrderCloud when adding the product through POST /cart/lineitems.
We can see that the LineSubTotal is 330, which is the 80 from the product and 250 from the spec.
The thing with this option is that if you add another product that has the same spec that too will add the fee. If you’re happy with adding a fee to each unique lineItem in your cart, this is a great way of achieving that.
If you only want 1 fee per cart, you’re better off with option 1.
Guide
1. Create your product
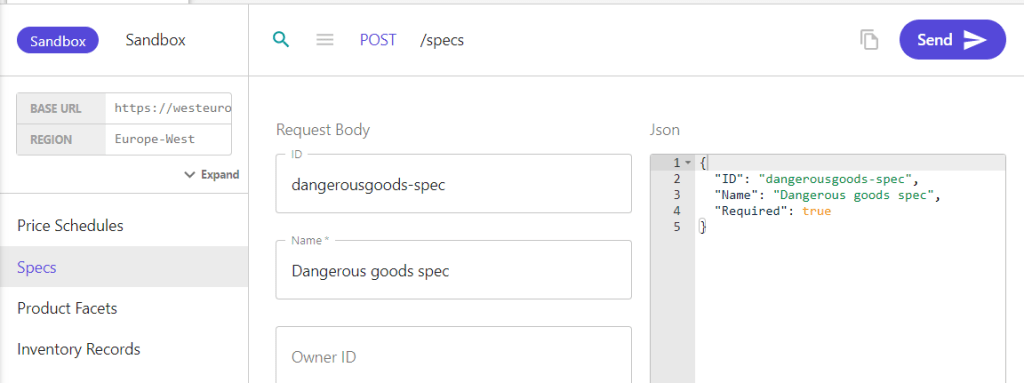
2. Create a new spec with fields like image below. It should be required.
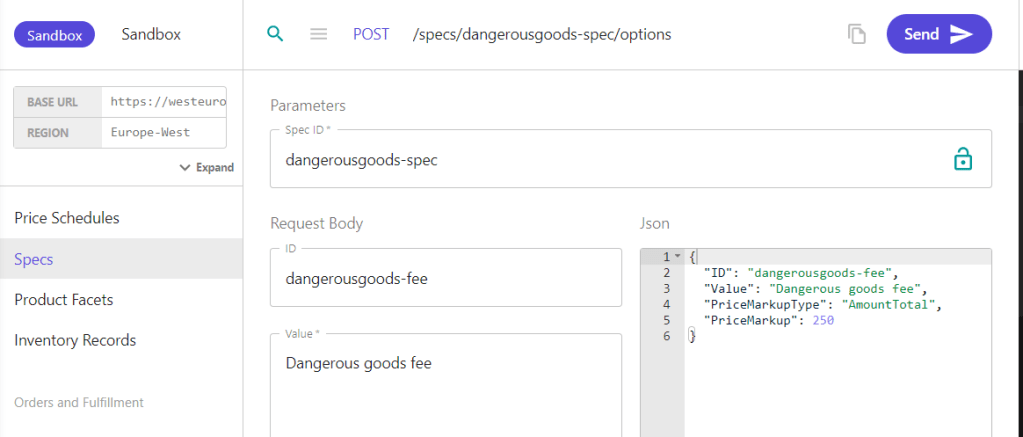
3. Create a spec option with the spec ID from previous step. PriceMarkupType is set to Amount Total, if you want it to add up per quantity then you need to set Amount Per Quantity:
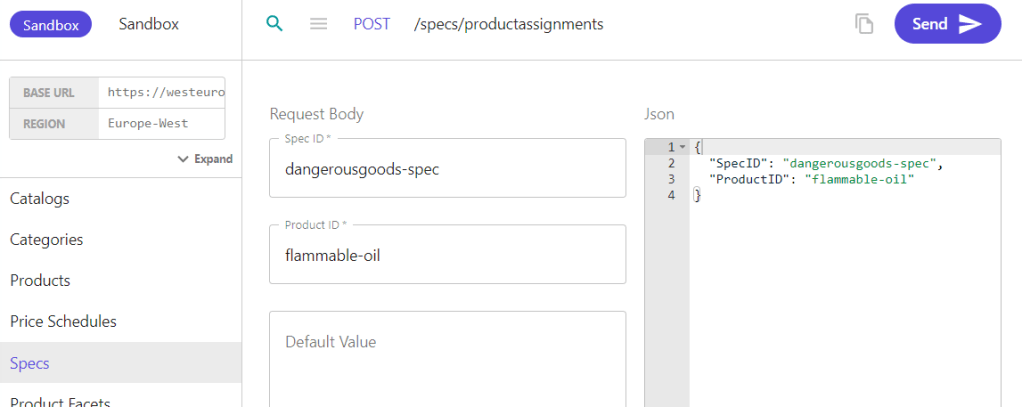
4. Assign the spec to the product from POST /specs/productassignments
5. Create a cart with a buyer user context that has the right access to view the product.
6. Add the Flammable oil product to the cart with POST /cart/lineitems (Create a new cart line item) Note the specID, optionID and value. Since we already setup the PriceMarkupType and PriceMarkup on the specoption we can leave them blank and let OrderCloud resolve them for us.
That’s it. Now if you get the cart you’ll see that the LineSubTotal will be 330 because we add the 80 + 250.
In this post, we’ll discuss defining your buyer-customers companies and how you can provide certain companies with better pricing on products.
A common scenario would be having anonymous or standard customers who receive the standard pricing for a product. Then, you have a logged-in buyer-user assigned to a company, which you define as a “large-volume” customer, for whom you want to offer better pricing on your products, like a 10% discount, etc.
The most common way to set up “companies” in Sitecore OrderCloud is to make them as individual Buyers. This is so that you can set elevated roles on the buyer if needed.
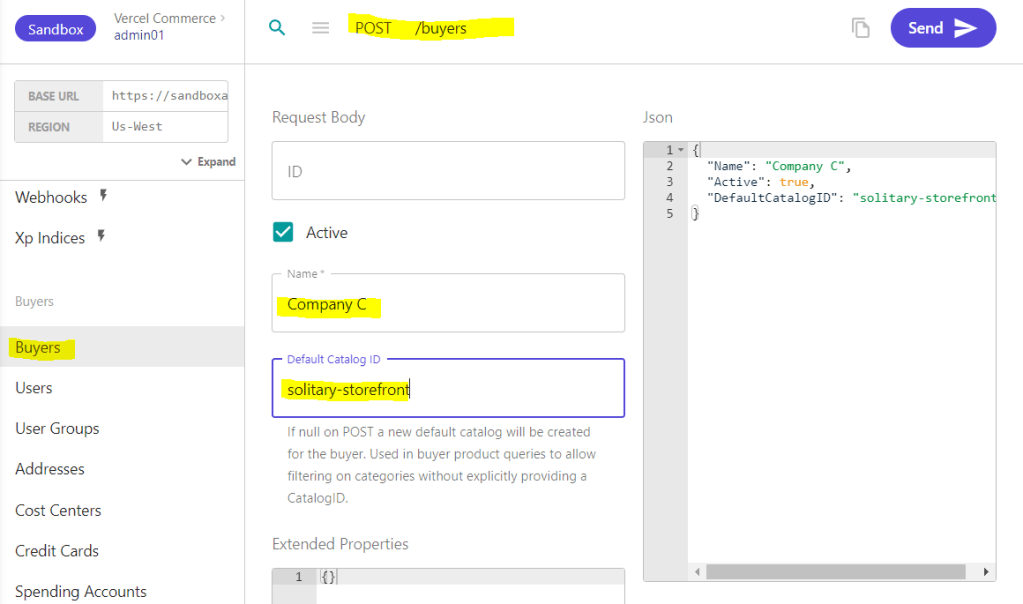
Go to Buyers, change the request to POST – Create a new buyer, and set the desired company name, a Default Catalog ID and Active to true, then press Send. This should return a 201 with some additional information about the company, like its assigned ID, etc. You’ll need that ID going forward.
In this case I only have 1 catalog. If I don’t set a Default Catalog ID, OrderCloud will create a new one for this company. Since I don’t want that I’ll set the Default Catalog ID
Setting up a User
Next, you want to set up a User in that company. So, go to Users and set the request to POST – Create a new user.
Fill in the required fields for the user, as seen in the image, and the Buyer-ID should be the ID you got when creating the company in the previous step.
Setting up a Security Profile
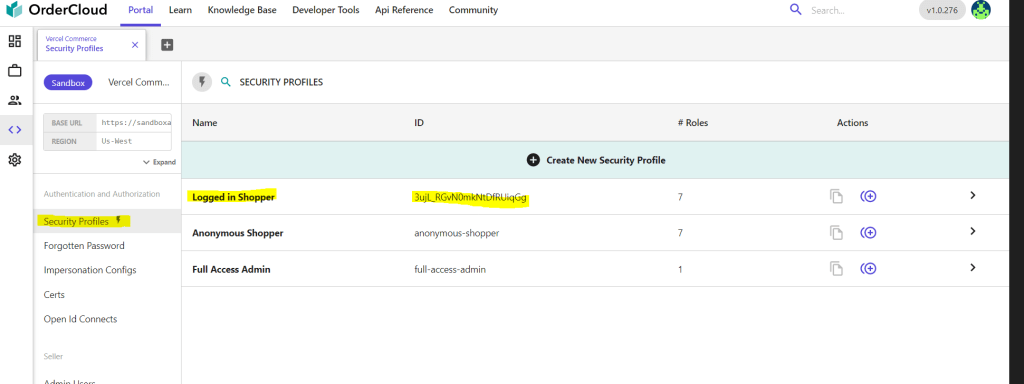
If you already have your security profiles defined, you can skip this. Otherwise, go to Security Profiles, and here I’ve created a profile called Logged-in Shopper. This could be defined however you want. Maybe one Security Profile per company, etc. Here, I’m just going with a general approach for now, and I’ve given it some standard shopping and buyer roles.
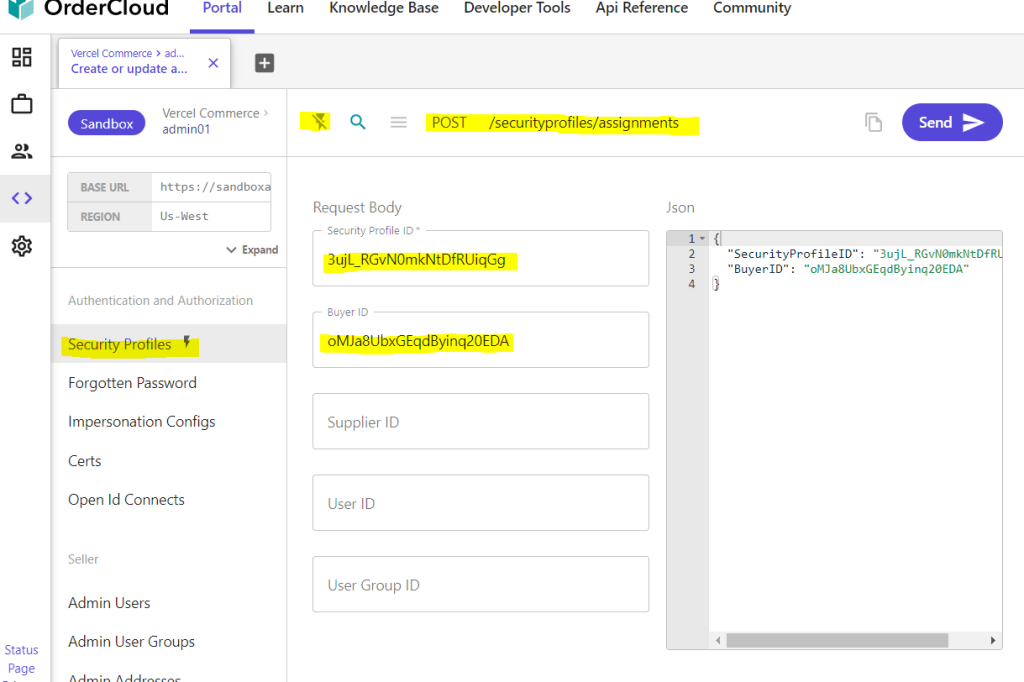
Now lets assign this profile to our company so all it’s users get the roles we’ve setup. Stay on Security Profiles and shut off the Enhanced UI (the thunder icon).
Change the request to POST – Create or update a security profile assignment
Set the ID of your Security Profile, in my case the ID of Logged in Shopper, in the “Security Profile ID” and the ID of my company in “Buyer ID” and SEND.
Now we should have a new company, a user tied to that company and set roles for that company and it’s users.
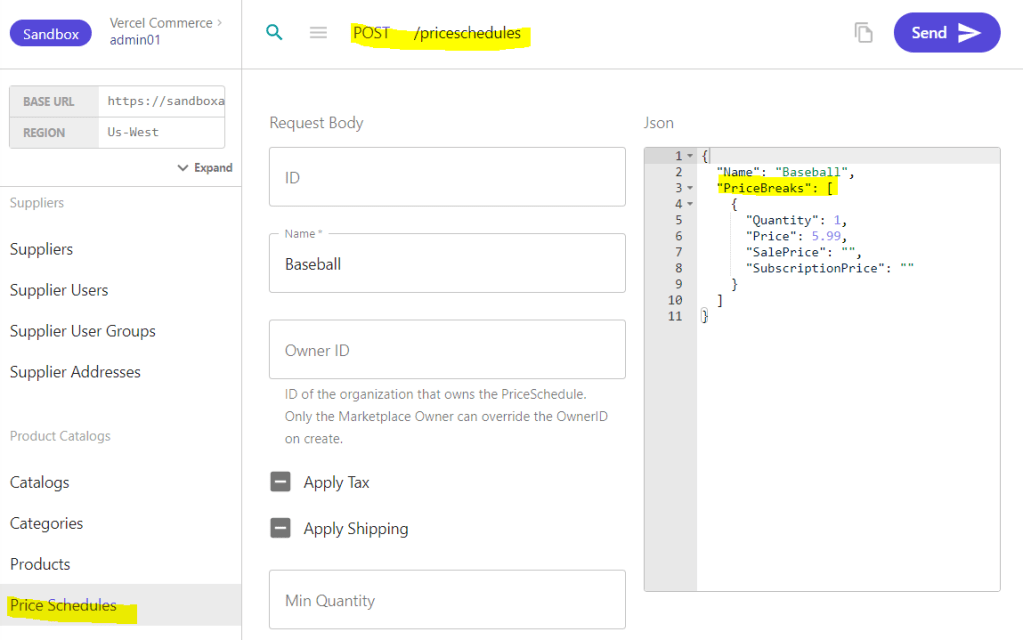
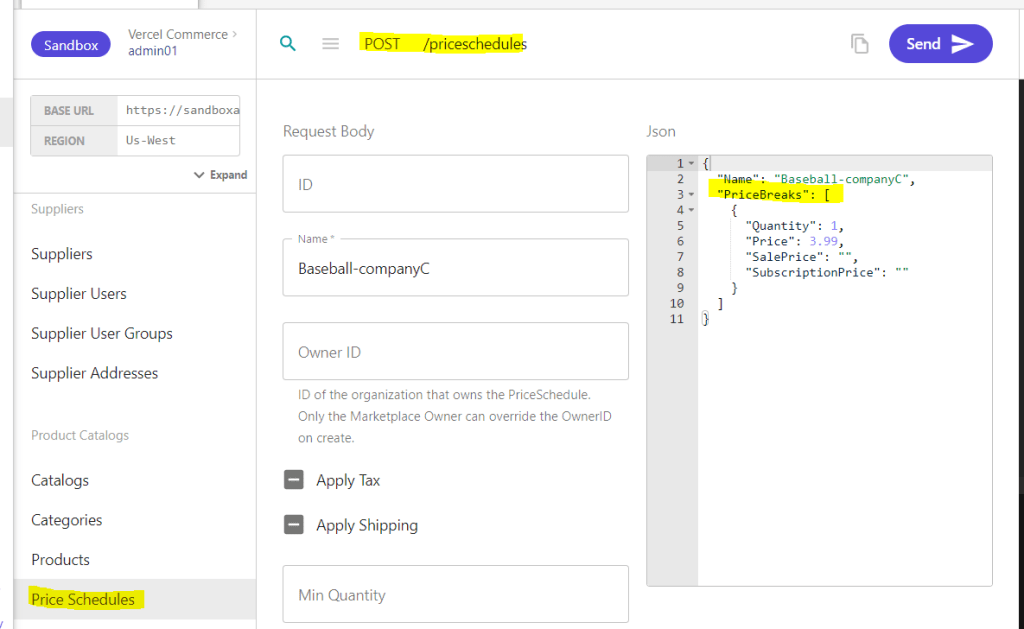
Create Price-Schedules
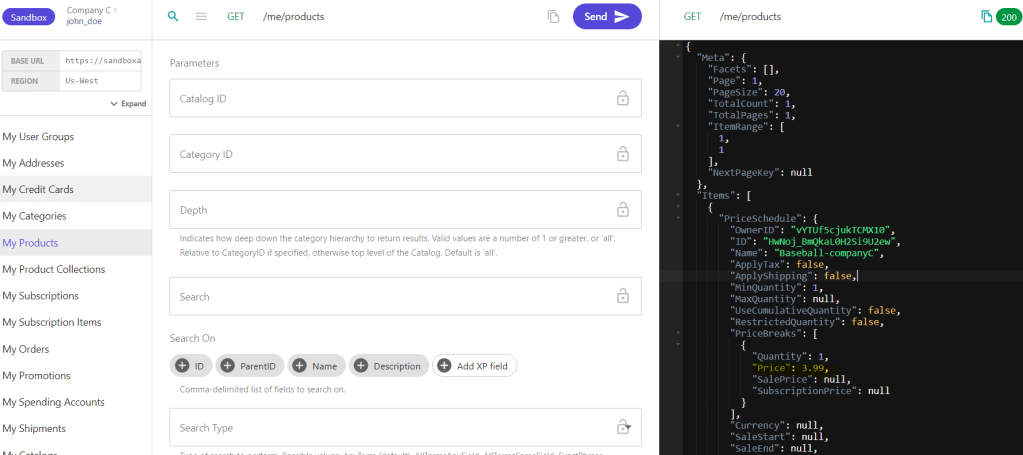
Normally I would create my product first then the Price schedules. But since I would be jumping back and forth, I’ll start by creating the price schedules for a product called “Baseball“.
I’ll create two price schedules. One for the standard price, which goes for 5.99, and one for my buyer, which costs 3.99, as you can see below.
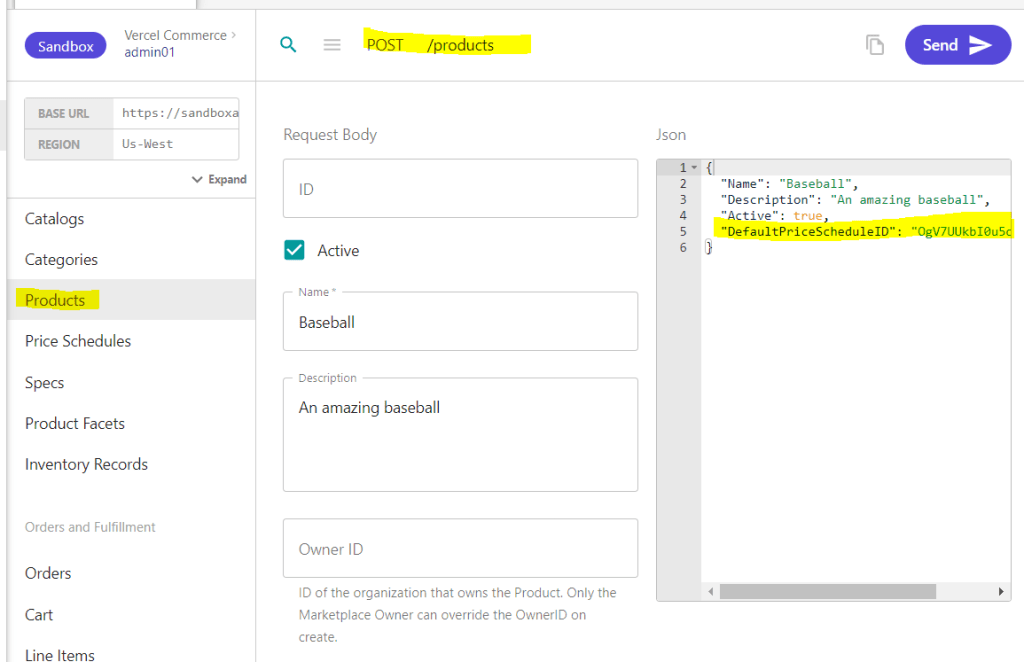
Create a product
Go to Products and make a POST – Create a new product.
Fill in the required info and what else you want and make it active. In the DefaultPriceScheduleID,you want to set the ID of the standard price schedule, the one for 5.99.
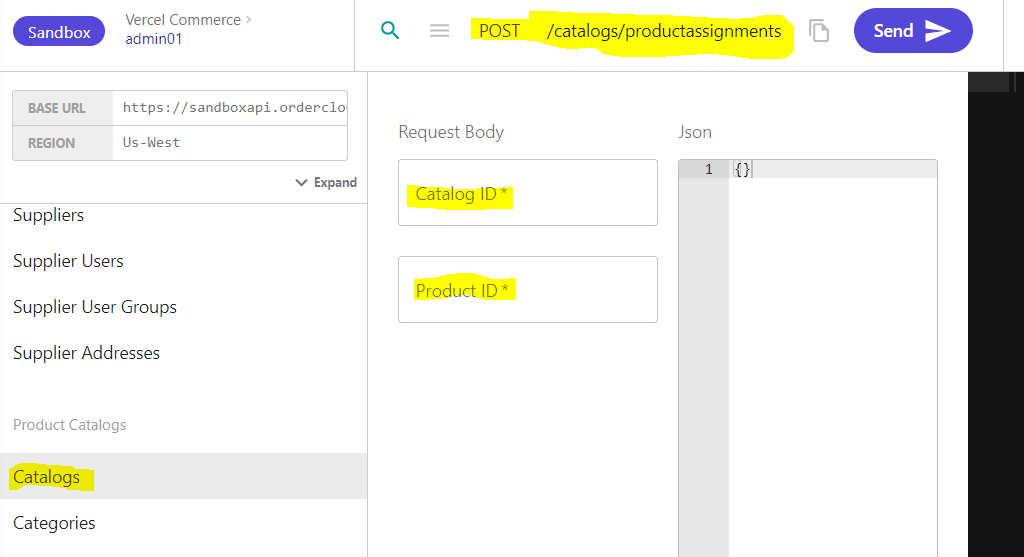
Before we make the price schedule assignment we need to assign our new product to a catalog. Otherwise we’ll get an exception 🙂
So go to Catalogs and put in your catalog Id and your product Id for the new product. When we created our buyer/company we set the default catalog Id. It should be the same Id here in this case.
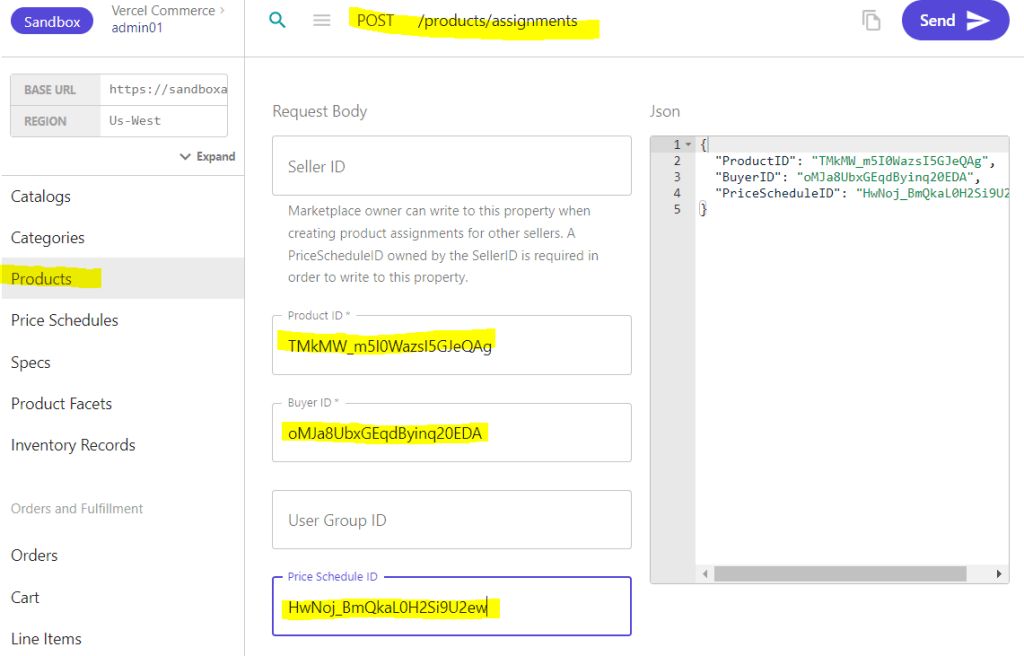
Now we want to make a price schedule assignment with the Product ID and our Buyer ID. This can be done like in the image below.
Lets review
Here’s what we’ve done:
Set up a Buyer
Set up a User
Set up a Security Profile
Create Price-Schedules
Create Product
Assigned Product to Catalog
Assign Price-Schedules
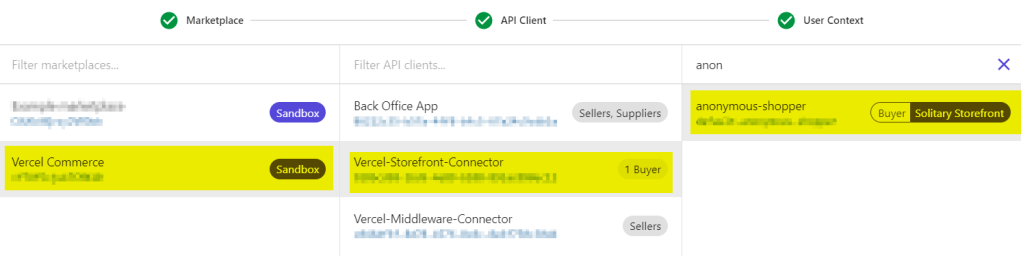
It’s time to see it in action. Let’s get the product as an anonymous user by switching my user context to an anonymous shopper – a user that has no connection to any company.
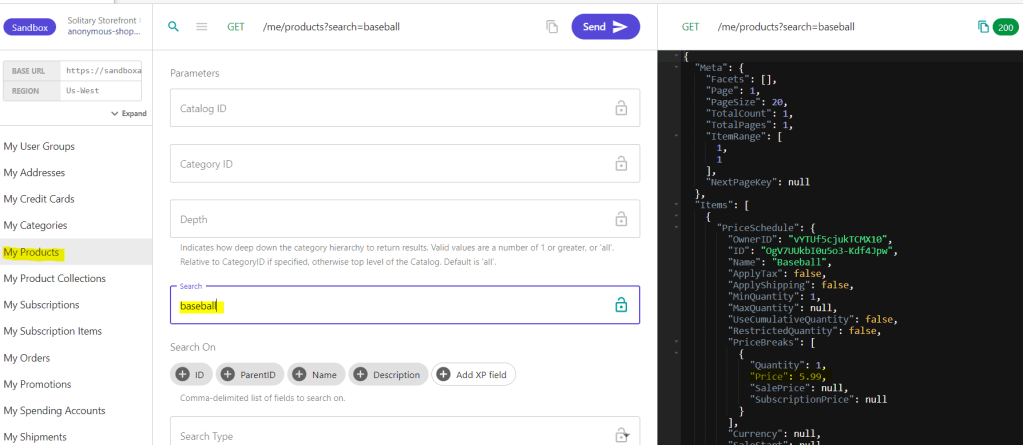
Then go down to the “Me and My stuff” section and call the “My Products“. As you can see in the JSON response, the Price is 5.99.
Now lets do the same, but as a context user that belongs to our company – the one we created at the beginning of this post. Then, do the same request in “My Products” to see if the price has changed to 3.99. This is because OrderCloud will give me the appropriate price schedule from the buyer user.
I was following this amazing video guide from Rob at Sitecore on how to setup Vercel Next.js commerce site with OrderCloud integration. You should check it out for a fast and easy start with OrderCloud and and Vercel.
When I followed the video guide I got a lot of errors on some steps when setting it up locally. This is just because we all have different machines, versions running etc. So nothing unusual.
But I thought I’d do a blogpost about the errors I found during the installation process so it might help anyone else if they get stuck in the process following the guide to setup a Vercel project with OrderCloud.
Note
You shouldn’t just trust someone who says you should run terminal commands you don’t know what they do. Same goes for me. Therefore I’m linking to all the official sites on each step. If you’re still unsure talk with someone in your organization.
If you get the same error and did the solution, try restarting your terminal as this is required for some operations.
Run terminal as administrator
Let’s start
1. npm i -g vercel
npm i -g vercel doesn’t work.
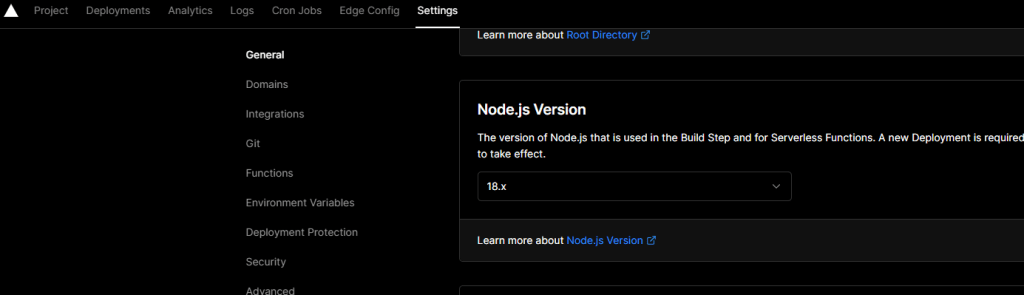
Check your node version. It needs to be the same as in your Vercel project. Go to Settings -> General and scroll down to the section Node.
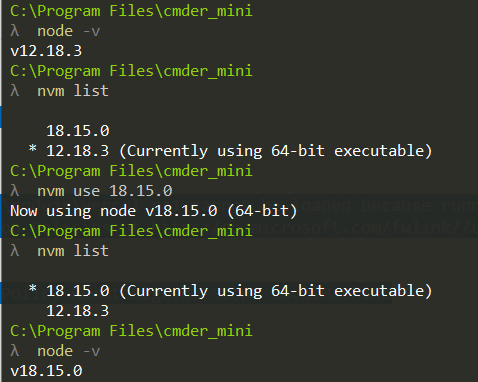
In your terminal in the project root. Run node -v
I recommend installing nvm – Node Version Manager. This makes it so you can have multiple node versions installed and you can switch between the different versions in your terminal like in the image below. (Link: https://github.com/nvm-sh/nvm)
If you’ve installed nvm check your node versions by running nvm list. If you don’t have the version in nvm list that you need. You can install LTS (Long term support) or a specific version like this:
nvm install –lts
nvm install 18.15.0
Then refer to the image above on how to switch between node versions. You should now be able to run npm i -g vercel as in the video guide.
2. vercel link
vercel link throws this error: vercel : File C:\Program Files\nodejs\vercel.ps1 cannot be loaded because running scripts is disabled on this system. For more information, see about_Execution_Policies at https:/go.microsoft.com/fwlink/?LinkID=135170.
Run this command then restart your terminal (Can’t run command? Are you running terminal as administrator?):
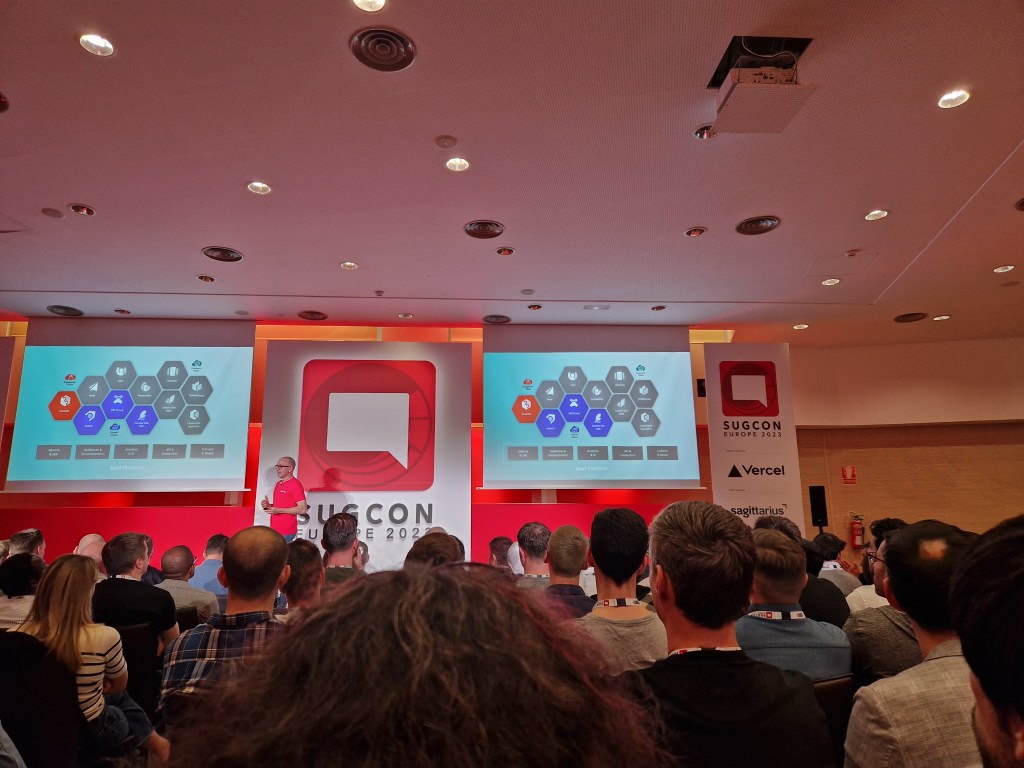
This year we got to meet up in Málaga, Spain, for this years SUGCON, Sitecore User Group Conference. It was an amazing event, just like every year. Thank you to the people involved in making it a reality and to the sponsors.
So I just wanted to highlight some of the key takeaways I got from this year’s SUGCON. To be fair, I could obviously not attend all the sessions, so this post is from the experience I had with the talks I had the chance to go to.
1. Sitecore
We kicked off the conference with the introduction of Sitecore CEO Steve Tzikakis and CPO Dave O’Flanagan, where they talked about the past year and what Sitecore has produced and what they envision going forward. As always, it’s inspiring to hear them talk about the evolving world that is Sitecore and how they’re pushing forward as a leader in the market. They have shown that in the last couple of years. I have great faith in the future of Sitecore.
Last SUGCON we heard about a handful of new Sitecore Products and this year we got presented with a dozen! This is massive and shows that Sitecore is a leader with the composable future we have ahead of us. There are so many strong Sitecore products and in a world where clients can choose what products they need at the right time, it is a game changer. This was talked about at last year’s SUGCON also, but now you can see how much work Sitecore has put in over the last year.
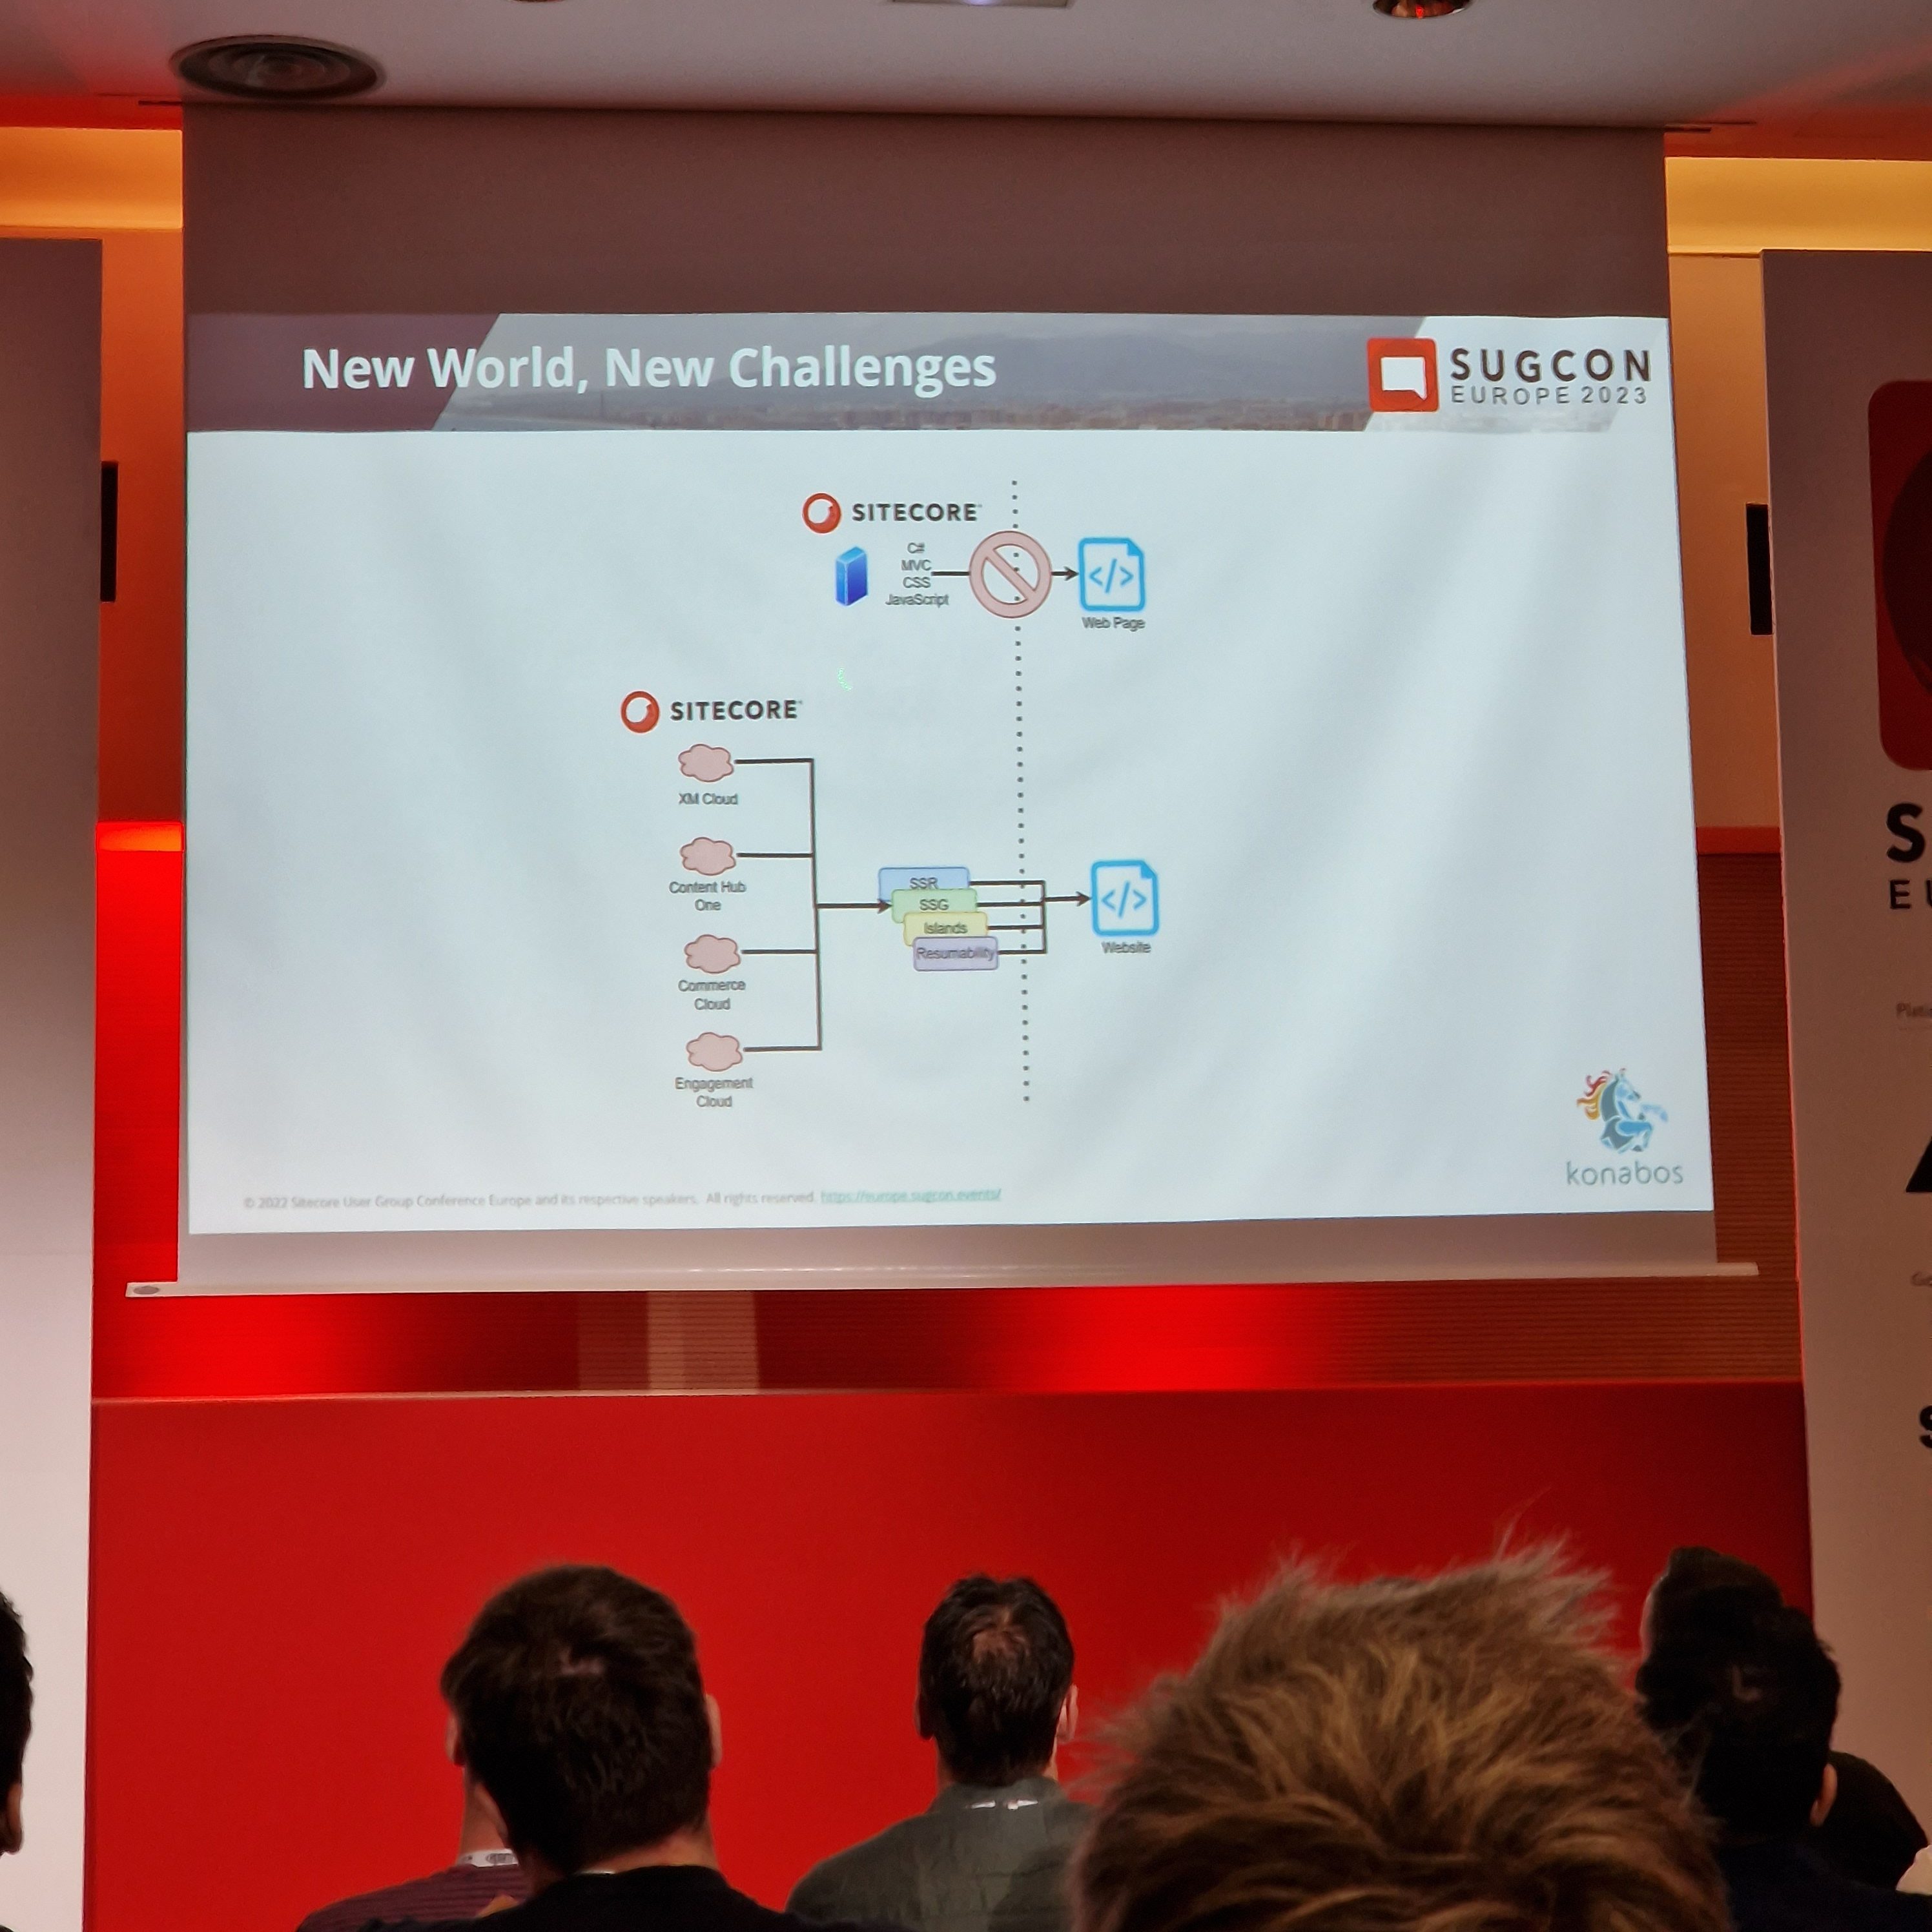
XM Cloud! It even had its own track to keep up with all the sessions this year. There were a lot of presentations about XM Cloud, and for good reason. Sitecore is telling us more than ever that it’s time to move into the cloud when it comes to Sitecore solutions. A lot of customers are still on XP on-premises solutions, and Sitecore is giving us all the help and tools we need to migrate over. We also heard a lot of cases of how partners have tackled this migration process and what’s worth thinking about.
3. Headless
Sitecore is composable, and with that, everything is headless. With headless JSS, we got examples of going with .NET Core or Next.js. Customers who want to stay ahead of their competition need to start going headless and composable before they are left in the dust with .NET MVC and all monoliths.
Mike Edwards gave us a very interesting presentation on “Headless rendering 101” where he went over how to render your headless solutions. For example, the difference between SSR (Server Side Rendering), SSG (Static Site Generation), SPA (Single Page Application), what frameworks you could use with each and how the process of requests is made. He talked about page hydration and how there are different ways of doing that, like Progressive Hydration & Island Architecture.
4. Contenthub ONE
We saw presentations on Contenthub ONE. Sitecores new lightweight headless CMS perfect for Omnichannel. We heard from the Sitecore team and also SUGDE presenting how they redid their old website to use Contenthub ONE and what they learned. Check it out here https://www.sitecore-usergroup.de/
Contenthub ONE is a fast and lightweight headless CMS where you can serve content through GraphQL to your frontend. There is a modern CLI and UI interface. You can setup security roles that provide different interface experiences based on your role. I think this will be a great addition to the lineup in Sitecore products.
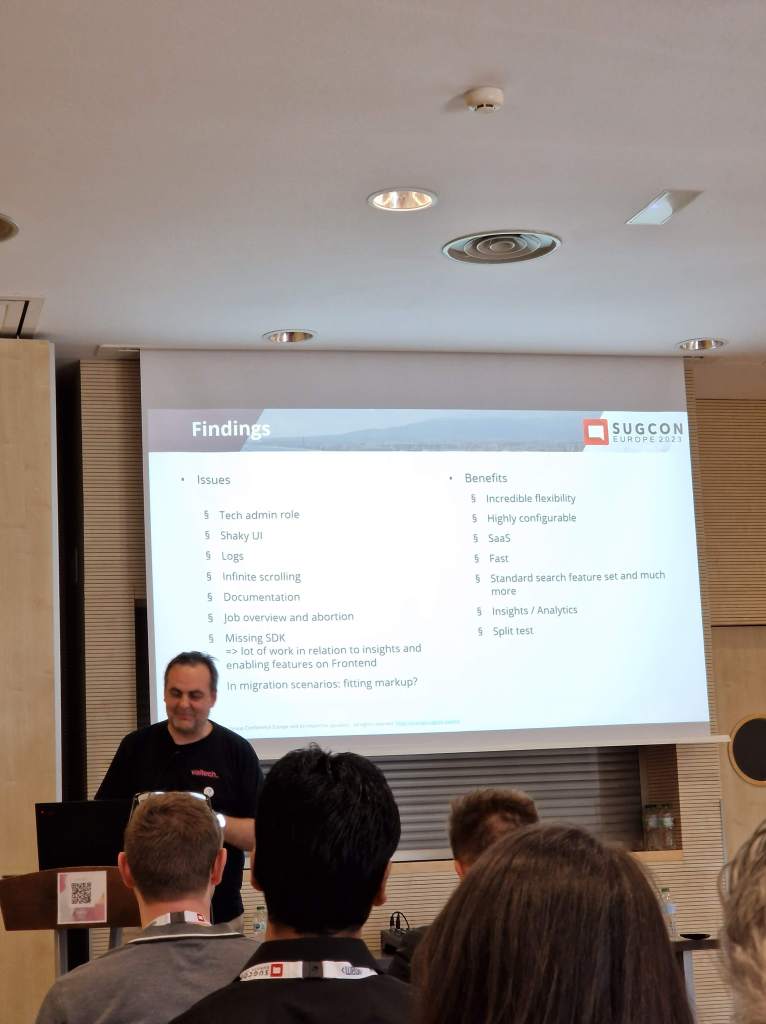
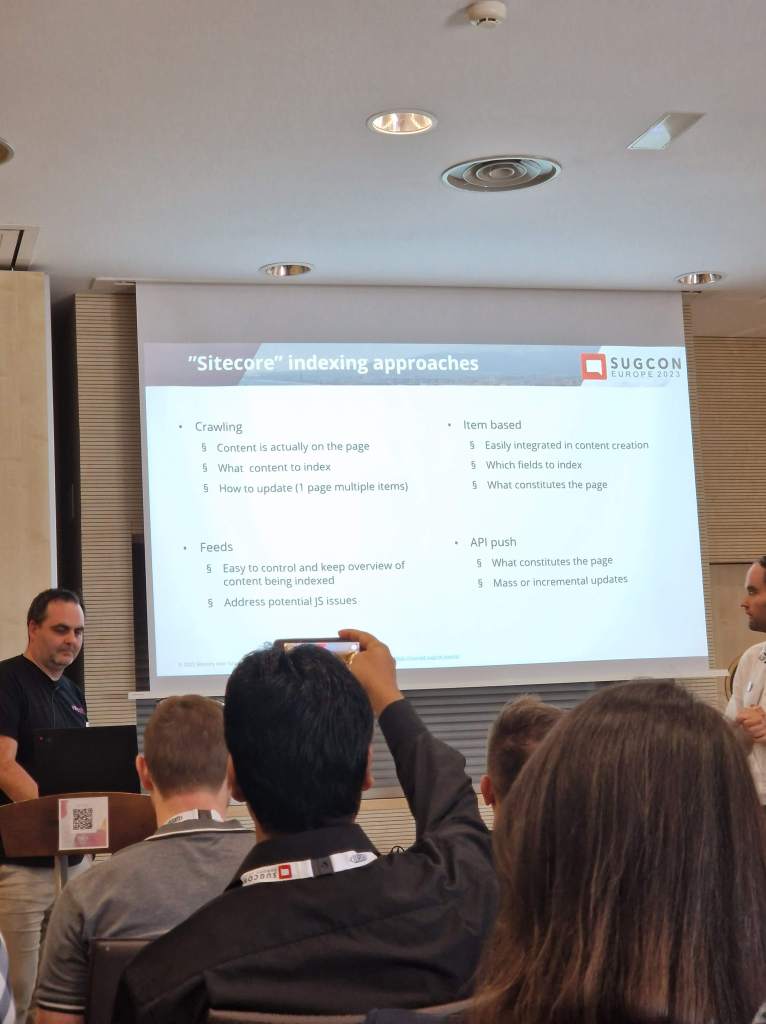
Sitecore Search is another new product that is super fast and predictive. It’s cloud, it’s headless, and it’s AI. You can use Sitecore Search in tandem with CDP for an exceptional personalization experience, but you can also use it on its own, and you don’t require a Sitecore CMS to run it. It’s headless and serves content through APIs. It has a consumption-based price and also depends on how much you index through pushing via API and crawling your site. I guess my only concern for now is not knowing the range of costs for typical clients.
There are no questions about the technology and usability of the product. I was impressed by the product and look forward to starting to use it.
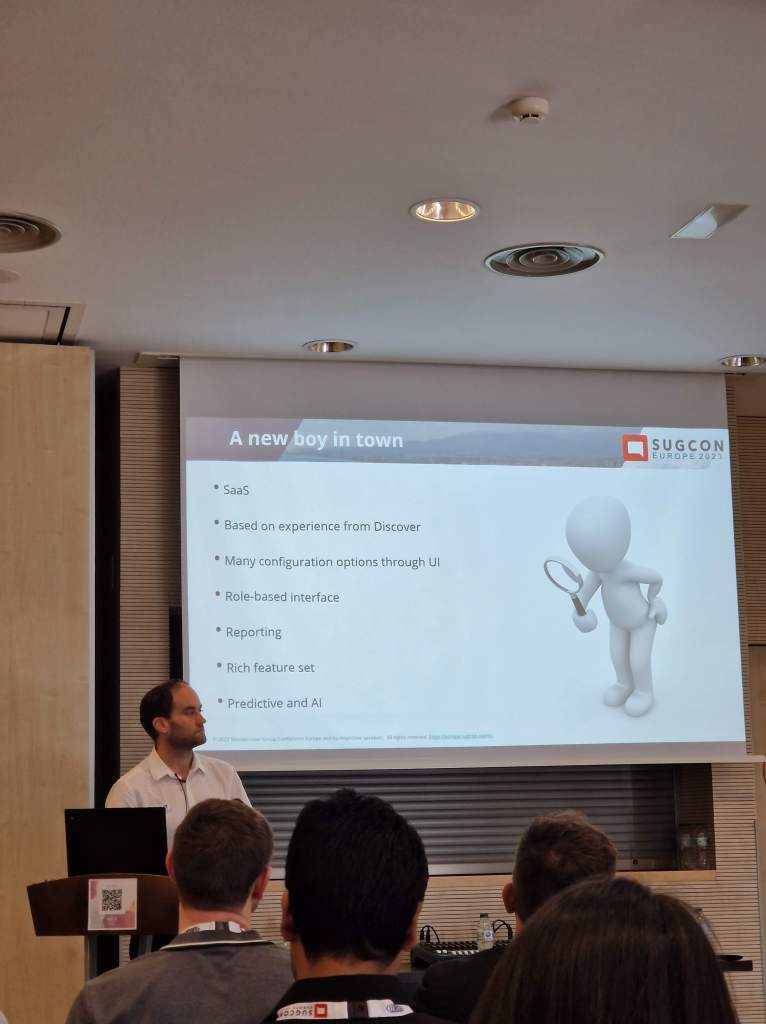
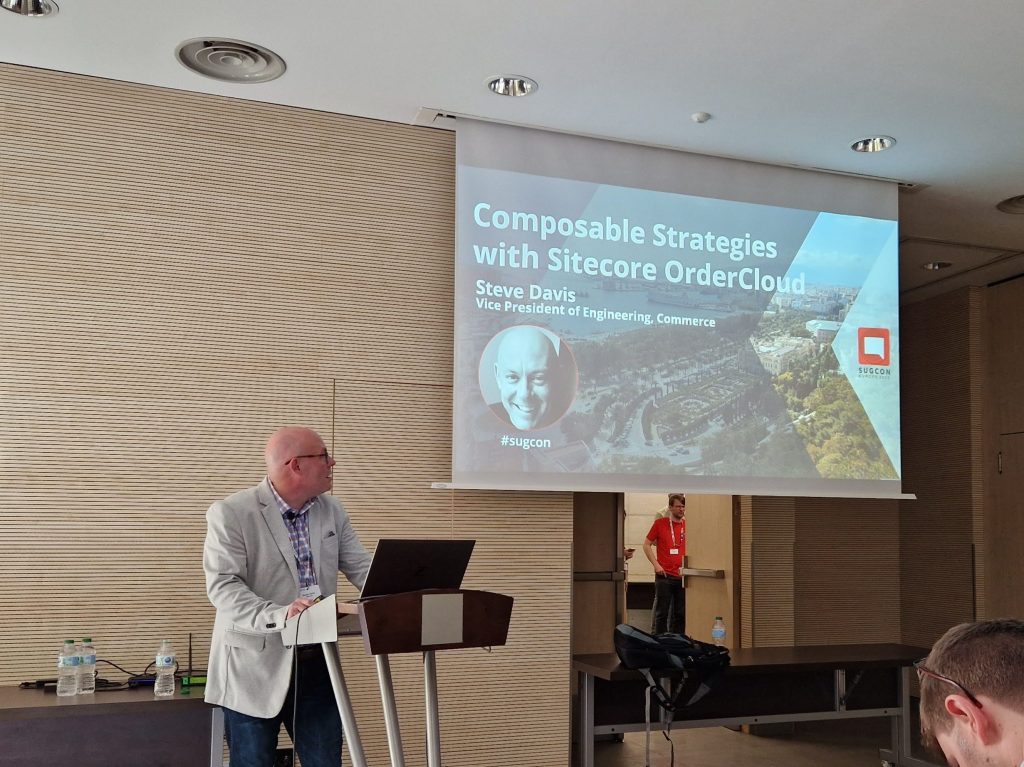
OrderCloud was something I was interested in learning more about, but there weren’t many sessions about it this year. We got two interesting talks from Steven Davis and Himadri Chakrabarti.
To summarize what I learned:
API first – future proof your headless commerce platform
Supports complex setups
Seen more B2B and B2X clients in OrderCloud than B2C at the moment, probably because B2C customers generally don’t require as complex setups that OrderCloud can support. That doesn’t mean OrderCloud isn’t right for B2C.
Since it’s API first it’s language agnostic and there are SDKs available which makes it developer friendly.
With webhooks and integration events you can easily integrate OrderCloud to other external systems.
OrderCloud is:
Product visiblity – what the customer can purchase
Order distribution – capturing and fulfilling orders
User segmentation – managing customers
OrderCloud is NOT:
CRM
Warehouse management system
Tax calculator
Solution for shipping, payments, personalization, email marketing, and frontend
Bonus
Pentia’s own Thomas Stern had a session where he “hacked Sitecore”. With a sense of humor and a great show of expertise at security, I think we all had a shiver down our spines that we should not take security lightly. And it’s a great case to upgrade your solutions to later versions!
But before I installed the package from the Known Issue, I wanted to make sure my custom code was solid and that I wasn’t making any errors there myself. Spoiler, it was, so take a look in your custom code before (if any).
My issue was that I misunderstood the process of how contacts are retrieved with the xConnect API works. I thought I could just get a contact by some Facet, like an email, and then I would get that contact with all it’s Facets and values.
In my case I wanted to set the “Personal” Facet if it was null and then save it. But I got the contact without the ExpandOptions{PersonalInformation.DefaultFacetKey… which meant that the Facet “Personal” was always null. So when I submitted it, it threw an error because I was trying to add a Facet that already existed on the contact. With the updated ExpandOptions like below, I was now getting the correct Facets on the contact and it worked like a charm.
var identifier = new IdentifiedContactReference(Constants.EmailSource, email);
var contact = context.Get(identifier, new ExpandOptions(PersonalInformation.DefaultFacetKey, EmailAddressList.DefaultFacetKey));

if (contact.GetFacet<PersonalInformation>(PersonalInformation.DefaultFacetKey) == null)
{
    PersonalInformation personalInfoFacet = new PersonalInformation() {FirstName = firstname, LastName = lastname};
    context.SetFacet(existingContact, PersonalInformation.DefaultFacetKey, personalInfoFacet);
}

context.Submit();
Hope this helps bring some clarity as it did for me! 🙂
The ActionFilterAttribute class allows you to add custom behavior to a controller action method before or after it is executed. You can do this by overriding one or more of the methods provided by the class to implement your own custom logic that is executed either before or after the action method is called. This can be useful for a wide range of purposes, such as authentication and authorization, logging, or caching.
Example
For example, you could create a custom ActionFilterAttribute that authorize by Sitecore role on action method’s execution before or after it is called, like this:
using Sitecore.Security.Accounts;

public class SitecoreRoleAttribute : ActionFilterAttribute
{
    private readonly Role _role;
    public SitecoreRoleAttribute(Role role)
    {
       _role = role;
    }

    public override void OnActionExecuting(ActionExecutingContext filterContext)
    {
        if(Sitecore.Context.User.IsInRole(role))
           base.OnActionExecuting(filterContext);

        filterContext.Result = new RedirectResult("/");
    }

    public override void OnActionExecuted(ActionExecutedContext filterContext)
    {
        //same principle as above method
    }
}
In this example we create a custom action filter attribute called SitecoreRoleAttribute that inherits from ActionFilterAttribute. We override the OnActionExecuting and OnActionExecuted methods to execute code before or after executing the actionmethod is called. You could easily add some conditions in the methods to decide if the action should even be run.
To use this custom attribute, we can simply apply it to the action method we want to log like this:
[SitecoreRole(ACustomRole)]
public ActionResult MyActionMethod()
{
    ...
}
“ACustomRole” above must be of the correct Type and you would’ve probably already have access to it in the constructor.
Now, whenever the MyActionMethod is called, the SitecoreRoleAttributeaction filter will check the conditions before and after it is called.
OpenAI’s DALL·E API allows us to generate AI images based on a textual descripton. In this post I’ll show how we can use the API to create an image and store it in Sitecore.
To use the API you must sign up for an API key on openai.com. Copy that API key and use it in your code. Then we can make a request to the API with a description of the image you want to generate.
With the Free trial usage you get $18 worth of credits to use the API. Generating one image is only a few cents. So it should be enough for a POC or just testing it out.
Using the HttpClient, we’ll send a POST request to the API endpoint with a JSON payload containing the description. Parse the JSON response to get the URL of the generated image, then use memorystream to save it in the media library.
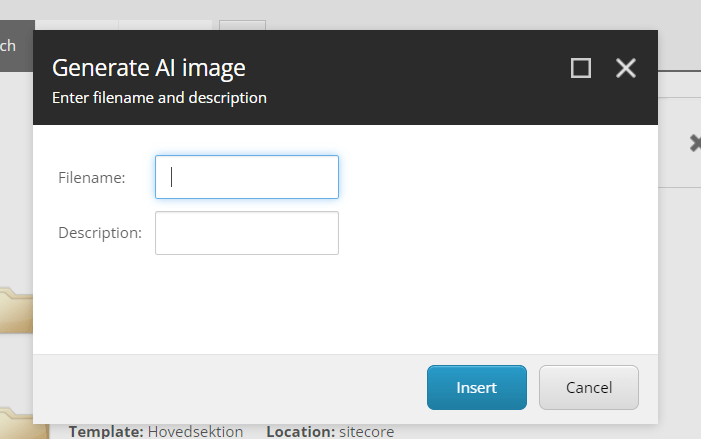
With the CodeBeside in above XML I can catch the OnOk event which will generate the image from the API. From there I can grab the input texts from my dialog window. That code looks like this:
public class GenerateImage : Sitecore.Web.UI.Pages.DialogForm
  {
    protected override void OnOK(object sender, EventArgs e)
    {
      Sitecore.Web.UI.HtmlControls.Button senderB = sender as Sitecore.Web.UI.HtmlControls.Button;
      string apiKey = "<Your_API_key>";
      string apiEndpoint = "https://api.openai.com/v1/images/generations";

      var filename = senderB.Page.Request.Form.Get("Filename");
      var description = senderB.Page.Request.Form.Get("Description");

      HttpClient client = new HttpClient();
      client.DefaultRequestHeaders.Authorization =
        new System.Net.Http.Headers.AuthenticationHeaderValue("Bearer", apiKey);

      string jsonPayload = JsonConvert.SerializeObject(new
      {
        prompt = description,
        n = 1, //how many images to generate
        size = "512x512"
      });

      StringContent content = new StringContent(jsonPayload, Encoding.UTF8, "application/json");
      HttpResponseMessage response = client.PostAsync(apiEndpoint, content).Result;

      if (response.IsSuccessStatusCode)
      {
        string jsonResponse = response.Content.ReadAsStringAsync().Result;
        dynamic result = JsonConvert.DeserializeObject(jsonResponse);

        // Get the generated image URL
        string imageUrl = result.data[0].url;

        // Download the image
        using (var imageResponse = new HttpClient().GetAsync(imageUrl).Result)
        {
          if (imageResponse.IsSuccessStatusCode)
          {
            using (var stream = new MemoryStream())
            {
              imageResponse.Content.CopyToAsync(stream).Wait();
              stream.Seek(0, SeekOrigin.Begin);

              var mediaCreator = new MediaCreator();
              var options = new MediaCreatorOptions
              {
                Versioned = false,
                IncludeExtensionInItemName = false,
                Database = Factory.GetDatabase("master"),
                Destination = "/sitecore/media library/AI-generated-images/"
              };

              using (new SecurityDisabler())
                mediaCreator.CreateFromStream(stream, $"{filename}.png", options);
            }
          }
        }
      }
    }
  }
We we’re trying to log the clients IP when using some of our API methods and they all returned the same IP.
So we used Request.UserHostAddress. Which obviously was returning the servers IP address all the time.
So how can we get the client IP?
Well by reading how the application Gateway works [1] we can see that it inserts six additional HTTP/s headers.The one i’m interested in is “x-forwarded-for”.
If you’re interested you can also log this in the IIS by adding a custom field to the IIS site log. Check resource below [2].
Then use the following code to get the IP. If you’re not going through a proxy or Load balancer the X-Forwaded-For will be empty and therefore we return Remote-Addr instead.
 public static string GetIp()
    {
      var ip = String.IsNullOrWhiteSpace(HttpContext.Current.Request.ServerVariables["HTTP_X_FORWARDED_FOR"])
        ? HttpContext.Current.Request.ServerVariables["REMOTE_ADDR"]
        : HttpContext.Current.Request.ServerVariables["HTTP_X_FORWARDED_FOR"];

      if (ip == null)
        return string.Empty;

      if (ip.Contains(","))
      {
        ip = ip.Split(',').First().Trim();
      }
      return ip;
    }
Alt texts are more important than people might think. They can make a huge difference in SEO scoring, placing you higher up in the search results like Google or Bing. Your alt-texts should be more than just “bird”, if it’s an image of a bird. Because it also gives value to those with any visual impairments for instance. So for example “A green hummingbird hovering next to a flower” gives more value than just “bird”.
But for me personally, it’s just as “hard” to write alt texts as it is to choose an icon in Sitecore for my components 😉 So to make life easier I thought I’d show an implementation of how to generate alt texts that give value using Microsoft Computer Vision. We’ll then generate the alt text to our image in Sitecore as an editor.
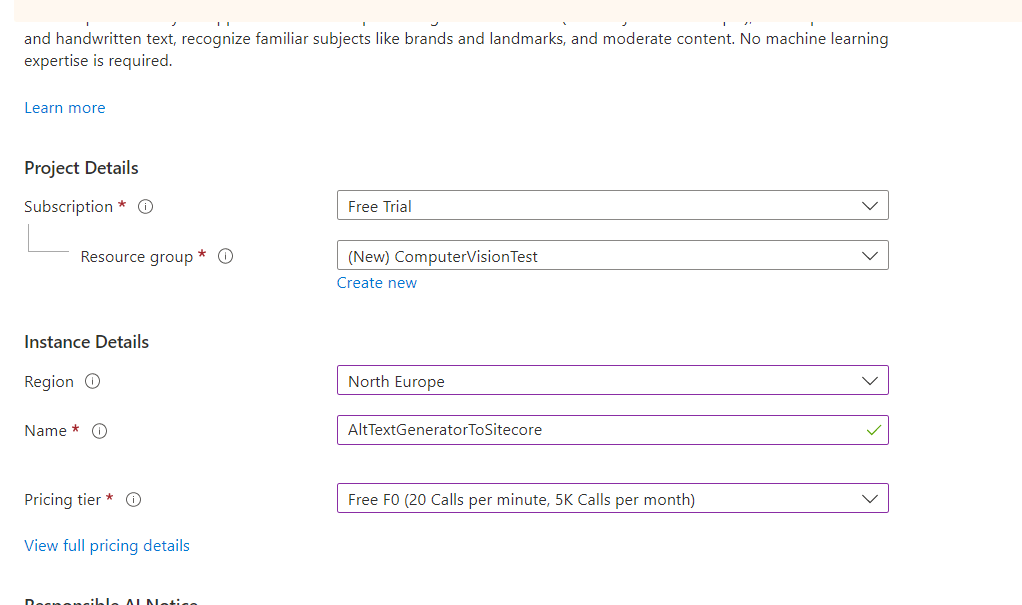
1. Prepare your Azure Computer Vision
First you must setup a Computer Vision in your Azure account. You’ll need the keys from that to get the data in code.
Locate Computer Vision and press “Create computer vision”
Sample setup of computer vision.
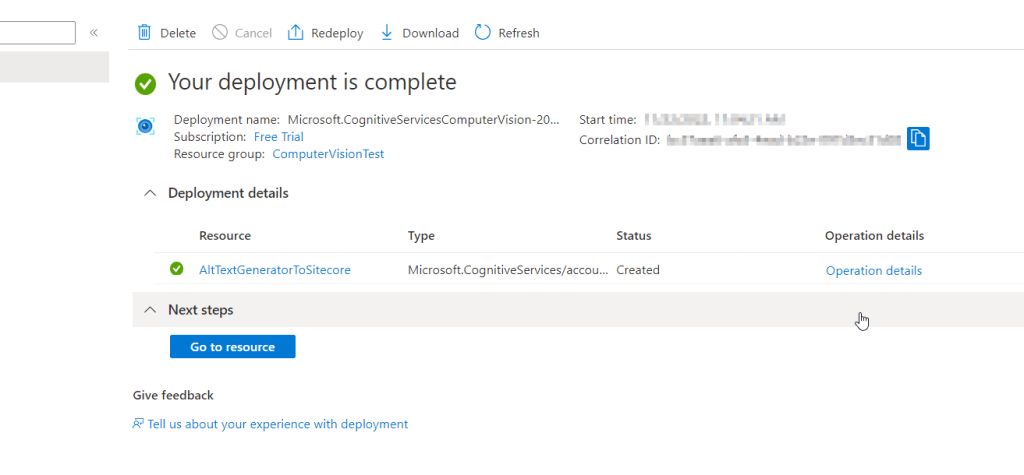
After it deploys, click on the resource link or in this case “AltTextGeneratorToSitecore”. You will need the key and endpoint from the resource you create to connect your application to the Computer Vision service. You’ll paste your key and endpoint into the code later.
2. Nuget reference
Either create a new project or fit the code in an existing project.
First, you need to reference the Microsoft.Azure.CognitiveServices.Vision.ComputerVision nuget package to your code by using the Nuget Package Manager or IDE
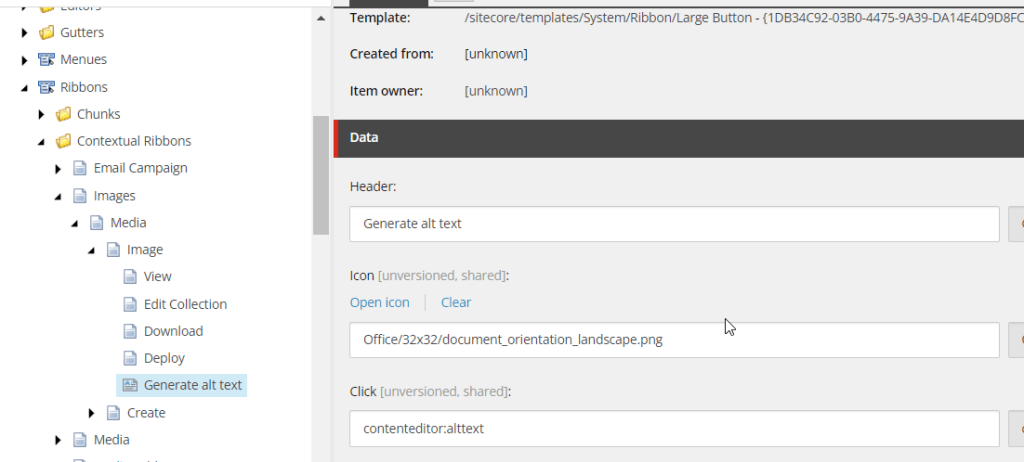
In Sitecore, switch to Core database and navigate to /sitecore/content/Applications/Content Editor/Ribbons/Contextual Ribbons/Images/Media and create a new Large Button.
It should look something like this
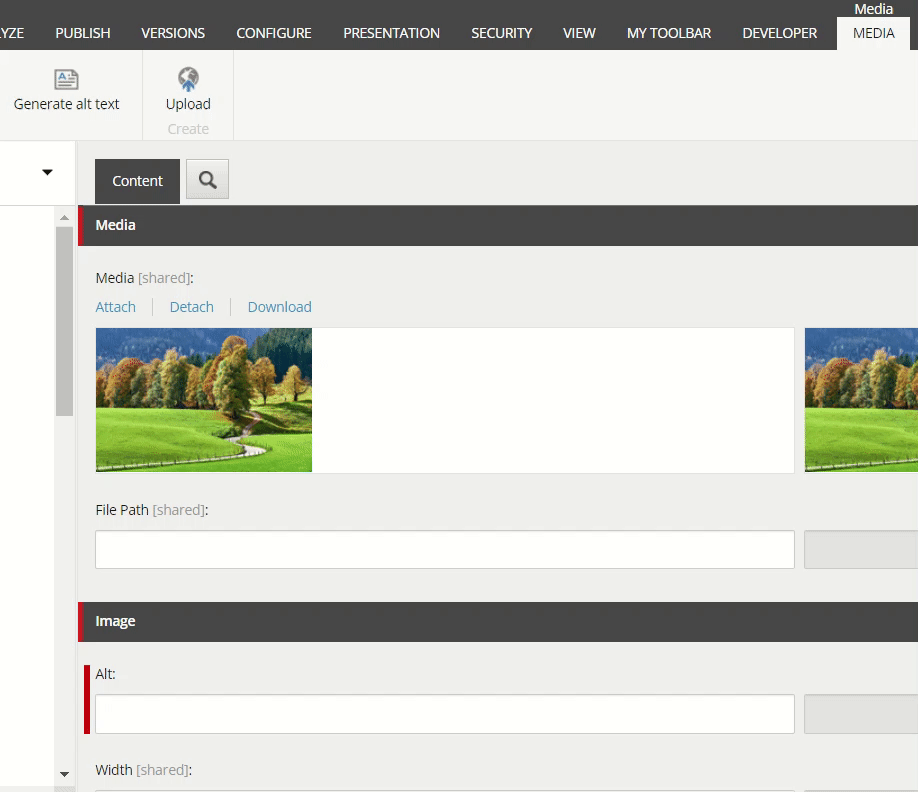
Now when you go to the media library and select an image you can autogenerate an alt text by pressing the new custom button we made.
This is my example image, I will now generate an alt text to it
Voilà! Works like a charm.
You could use other Features than just Description from the Image Analysis. Read more in sources below.
You could also implement some conditions on the confidence score if you think it will generate bad results.
Would love to hear if you have any ideas how this idea could be improved or extended!