Sitecore OrderCloud is back with another great feature that has been highly anticipated – Product Bundles. It was recently released with API version 1.0.308. Aiming to provide ecommerce businesses with more flexibility, Product Bundles cater to a wide range of use cases to enhance customer experience.
Use case
A few examples on why it’s useful.
Suppose you’re buying a GoPro camera. There are probably hundreds of accessories for GoPro alone, and with Product Bundles you can setup and sell for instance “GoPro starter kit” or “GoPro battery kit”.
If you’re selling event tickets, you can also create a bundle like the “ticket + dinner package”.
The possibilities are only restricted by your imagination. This feature is an excellent opportunity for cross-selling. If customers typically purchase Product A alongside Product B, why not combine them into a bundle and offer a modest discount? It’s a common commerce feature, and it’s exciting to see it integrated into OrderCloud.
Bundles aren’t intended to replace individual products. Instead you create a bundle and assign specific products with it. New endpoints have been introduced regarding bundles, price schedules, catalogs etc. Let’s have look.
New endpoints
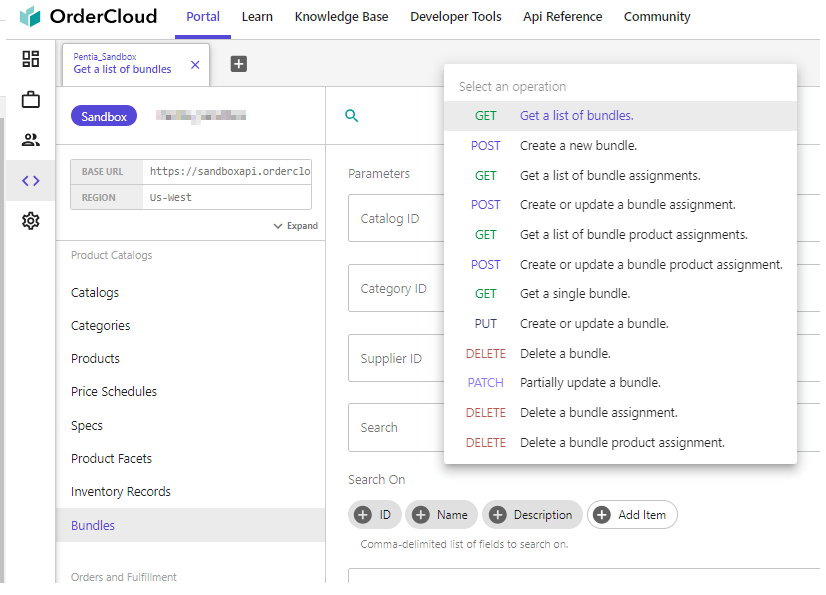
There are new /bundles endpoints under “Product Catalogs“, if you’re using the OrderCloud Portal. For a deeper overview, you can read up on all the endpoints at OrderClouds API reference for bundles.
Bundles follow the same visibility rules as products. They need to be active, present in a catalog, etc. Additionally, all products within a bundle must be visible to the user.
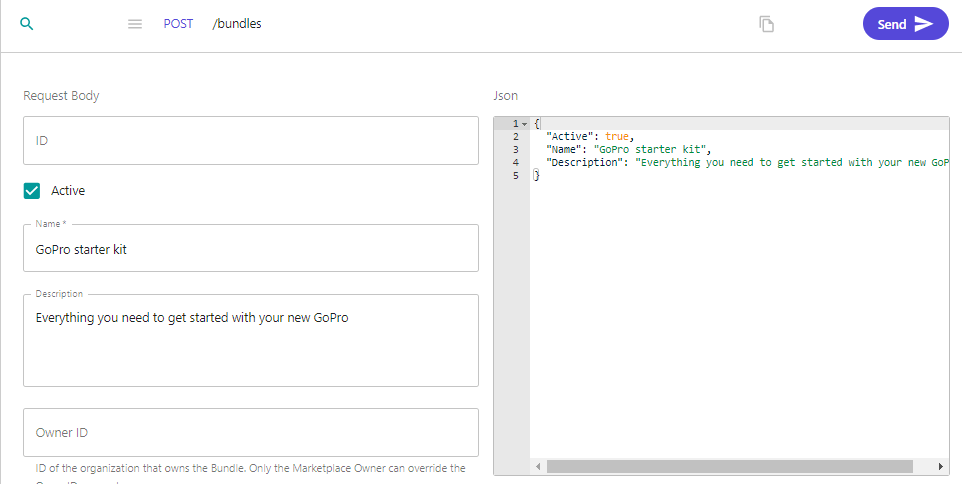
1. Use either the OrderCloud portal or make a POST /bundles with the below information.
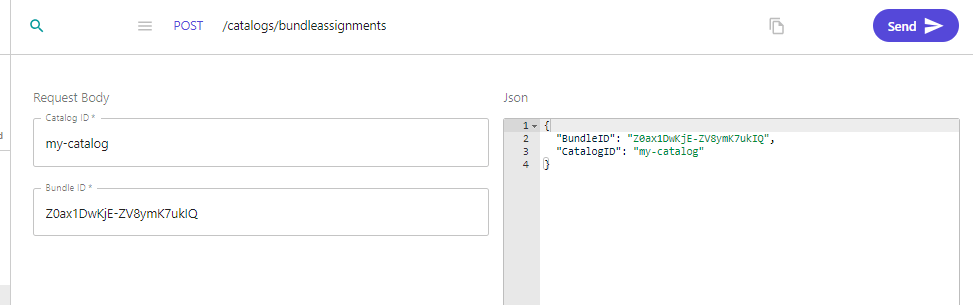
2. Create a catalog bundle assignment with POST /catalogs/bundleassignment or in the portal as below.
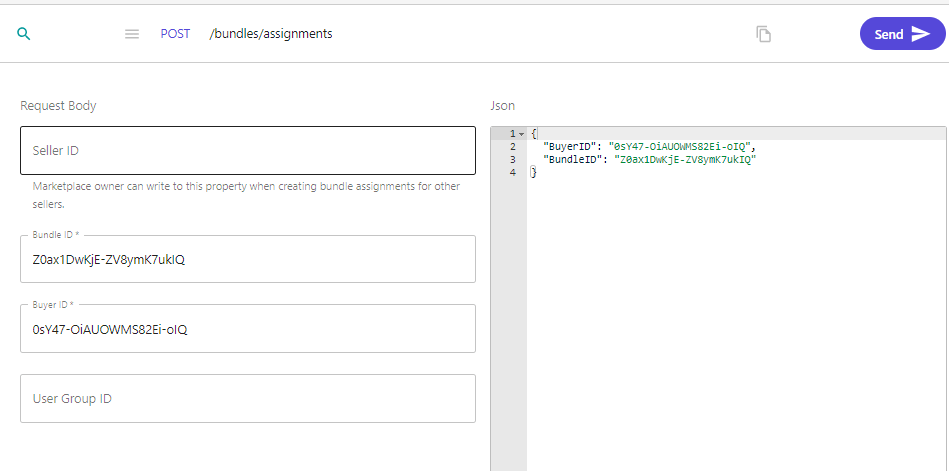
3. Create a bundle assignment for a buyer if you wish. POST /bundles/assignments
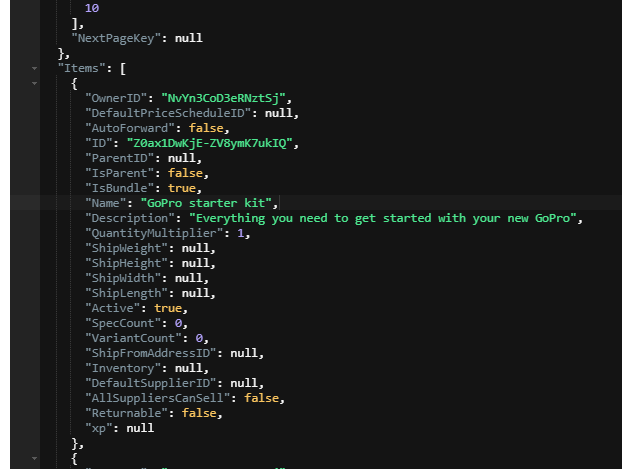
4. Now we can see our bundle is added to our list of products in our catalog if we make a request to /products?catalogID=my-catalog
Note the new property IsBundle. This makes it easy for you to customize your commerce experience by identifying your bundles.
Assign products to a bundle
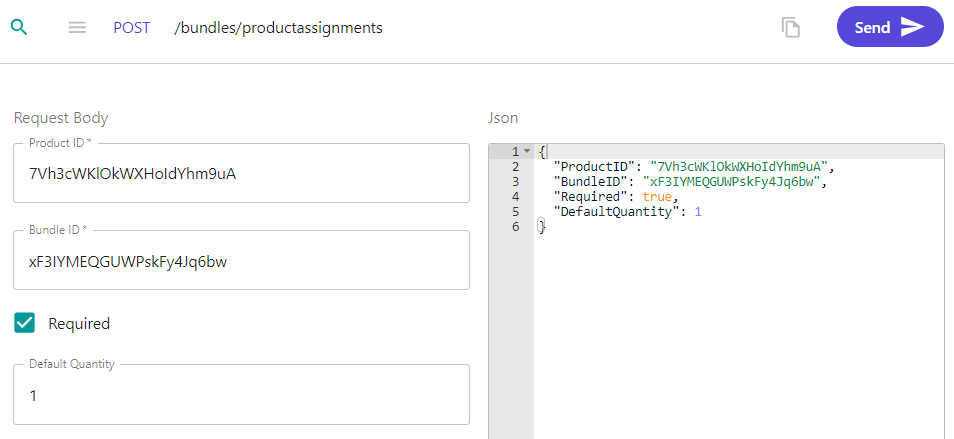
1. Use POST /bundles/productassignments. to assign products to a bundle. I’ve created 3 products for my “GoPro starter kit”, and now i’m assigning them using this endpoint.
GoPro
GoPro sleeve
GoPro tripod
If you want to automatically add these items to your cart when adding the bundle to your cart you need to set the Required field to true and set a Default Quantity. You can also pass them in to the cart as normal lineitems. In this case I prefer that this bundle add the product automatically and with a specific quantity so I set those fields.
Price schedules
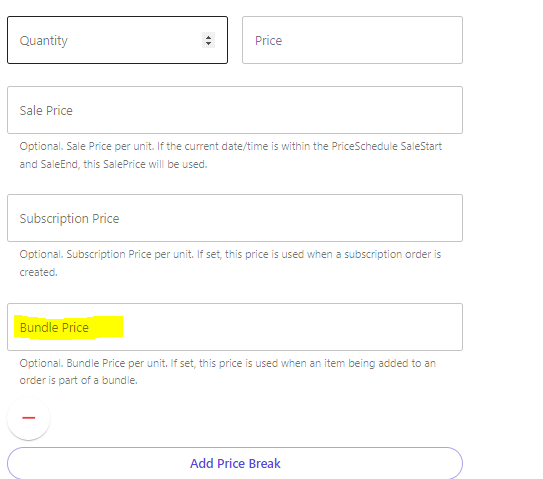
When creating a new price schedule, a “Bundle Price” option is now available. Once this price schedule is assigned to a product within a bundle and the bundle is added to the cart, the product will reflect the price set in that field.
Results
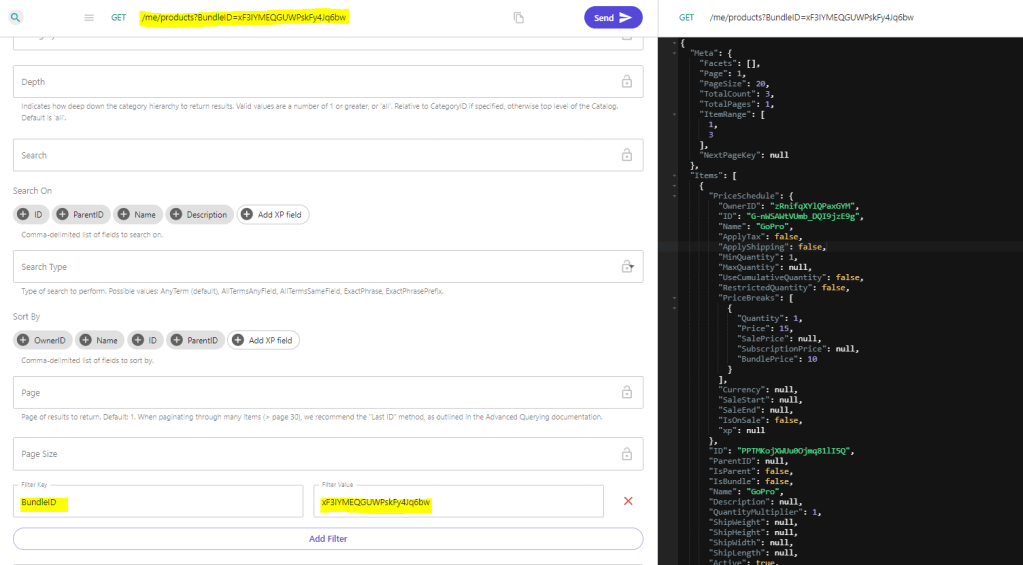
Regular product searches remain unchanged. However, you can now utilize the new filter BundleID={id} to exclusively retrieve products linked to a specific bundle, given correct catalog and price schedule assignments.
GET /me/products?BundleID=xF3IYMEQGUWPskFy4Jq6bw
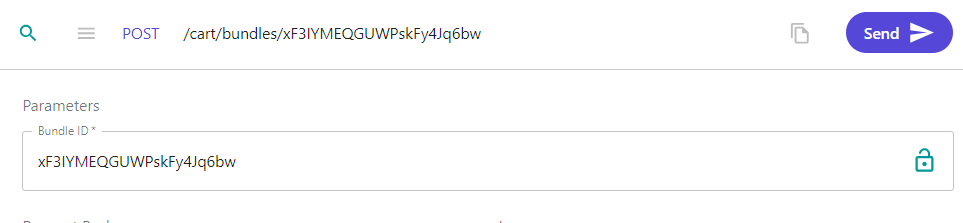
To add the bundle to your cart, use POST /cart/bundles/{bundleID}
Either execute a GET /cart or GET /cart/lineitems to access cart information. When fetching the line items we can see there are 4 line items: 1 is our bundle, and 3 are the products assigned to that bundle, each priced at their Bundle Price.
Notes
New Roles have been established, including BundleReader, BundleAdmin, and BundleAssignmentAdmin.
As mentioned, this was a highly wished for feature. The OrderCloud team is working on expanding the possibilites with Product Bundles. Coming soon are integrations for custom validation and price overrides. The just released new endpoints that supports adding bundles to subscriptions, or recurring bundles!
A noteworthy mention: Ensure the bundle xp schemas align with product xp schemas to avoid indexing issues.
With Product Bundles, Sitecore OrderCloud continues its journey in providing robust features, empowering businesses to tailor unique ecommerce solutions that resonate with their customers. Happy bundling! 🛍️🎉
In part 1 I want to introduce you to Sitecore OrderCloud and how to get going with Next.js JSS.
I started my OrderCloud journey this year and wanted to share with you what I’ve learned.
In this part I will share some insights I have about why to choose OrderCloud, who is it right for, both as developer and for your customers, what questions did I have and how did I come to a conclusion about them. In the upcoming parts I will show you how to setup a Next.js application with JSS and Sitecore and the OrderCloud SDKs, so follow me on social media or my blog to keep yourself updated on upcoming posts.
What is OrderCloud?
Let’s start with an introduction on Sitecore OrderCloud. What is OrderCloud? It’s an API-first, headless commerce platform that offers flexibility, scalability, and customization to help businesses build unique and innovative eCommerce experiences. Sitecore OrderCloud uses MACH architecture which stands for
Microservices: Microservices architecture breaks down applications into smaller, independent processes that communicate with each other. This allows each service to be updated or scaled independently, increasing the flexibility and resilience of the application.
API-first: Meaning it’s designed around the API being the model for the product.
Cloud-native SaaS: Cloud-native refers to applications that are built for the cloud, taking full advantage of cloud computing architectures. They can scale up or down as needed.
Headless: Headless architecture separates the frontend and backend of an application. This decoupling allows developers to make changes to either side without impacting the other. It also lets developers use the same backend for different frontends for example.
MACH architecture enables businesses to choose the best-of-breed tools and easily add, replace, or remove them in the future. This is often crucial for your customers success story and a leap away from the monolithic platform we’re used to and gives huge flexibility to the customers. If OrderCloud uses MACH you can be positive that they’ll always have a modern and up to date solution with the ever changing landscape of commerce.
Sitecore OrderCloud is a pure headless platform that makes it completely language agnostic, meaning you can use whatever programming framework or language you want. As long as you can handle HTTP requests you’re good to go
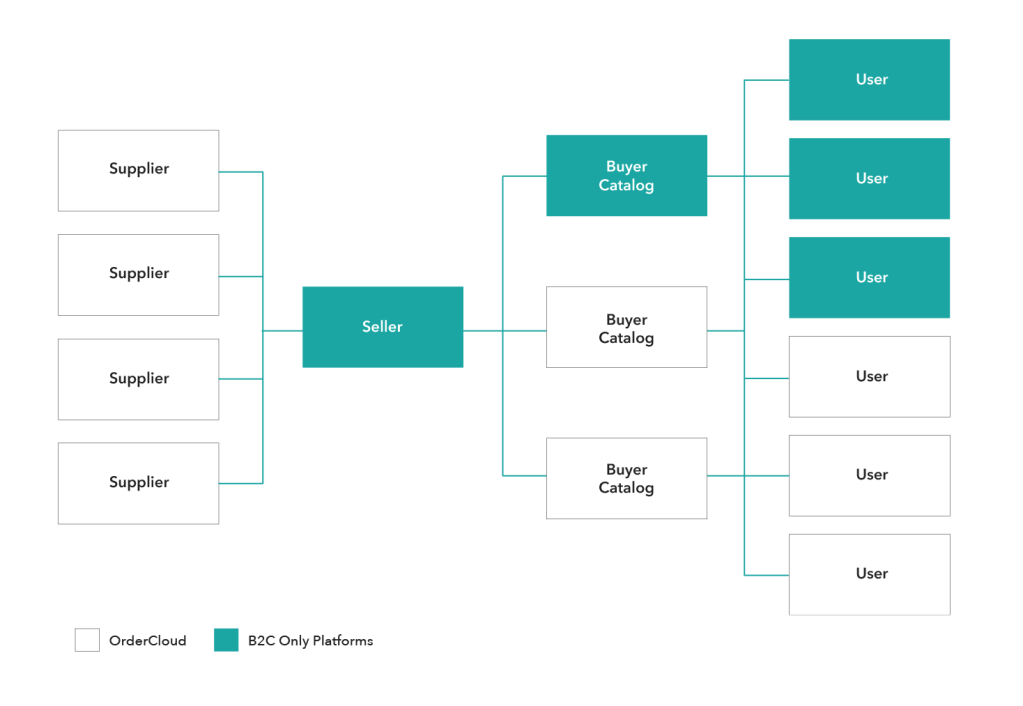
OrderCloud is:
Product visiblity – what the customer can purchase
Order distribution – capturing and fulfilling orders
User segmentation – managing customers
OrderCloud is NOT:
CRM
Warehouse management system
Tax calculator
Solution for shipping, payments, personalization, email marketing, and frontend
– so all of these things are integrations you need to add if needed. For instance payment integration when an order is placed. Or while OrderCloud supplies simple email on certain events, it’s still limited and you might want to integrate an email system like Sendgrid for example to fit your customers needs.
Is Sitecore OrderCloud right for you?
That’s a great question, and this is where OrderCloud shines in my opinion. It is designed to handle B2B, B2C and B2X commerce scenarios. They can be the most basic B2B setup or a complex solution with lots of customization that fits exactly the needs of your customers.
When I started looking into OrderCloud and got to know the platform you can see that it gives an enormous flexibility and can cover any cases that your customer needs. Because if there’s one thing we all know, it’s that each customer’s commerce solution always have their own way, their own third party systems that need integration and their own preferences for pretty much everything. And here OrderCloud gives you that ease of use with for example Integration events or Webhooks to run custom code or make requests to third party applications before or after API calls to OrderCloud. And there’s Connectors in Sitecore Connect to easily integrate with external systems.
With the pace at which technology is advancing, it’s crucial for businesses to choose platforms that aren’t just relevant now but will remain so in the foreseeable future.
It takes into account the unique needs of every business, ensuring that integrations, customizations, and operations run smoothly. So, if you’re thinking about which platform to choose, OrderCloud is certainly worth considering.
First, you start by creating an account on https://portal.ordercloud.io/. It’s free and you get a sandbox environment where you can play around with the API and test all the features, invite your team members without any limitations. You can create a new marketplace in five regions at the moment but when you have a case for OrderCloud just contact their team and they will help you setup one for your region.
It really helped us to have an open and free sandbox so every developer can get a feeling for the API and how it all connects and works. I really recommend you to make an account and try it out. It can also help spark new ideas.
Second, implement Headstart.
Headstart are solutions built on OrderCloud, by the OrderCloud team, to help you kick-start your commerce projects. It’s an opinionated solution and you need to build on this to fit your specific needs or your clients needs, but it will get you, as it’s name, a headstart with the project. There are 2 headstart projects, both on Github, the links are down below. One is a .NET and Angular and the other is a pure Next.js solution. In this part series we will take a look at how to do this with Next.js.
If you’re not familiar with Next.js, in short, It’s a popular React framework developed by Vercel that enables server-side rendering (SSR), static site generation (SSG), and other advanced web development features.
The Headstart solution in .NET and Angular has 3 main components:
The middleware: This is built on .NET 6, maybe they’ve now updated it to Net 7, i’m not sure, and gives you the project on how to integrate Sitecore OrderCloud with various third-party tools or applications to create a more comprehensive solution.
Buyer: The frontend buyer application, where customers visit to buy products, which is built on Angular. It gives a complete shopping experience from the perspective of the buyer user. This includes browsing products, adding them to the cart, checking out, manage account information etc.
Seller: The frontend admin application, which is also written in Angular. This is the backoffice, where sellers and suppliers can manage the products, customers, orders and other administrative tasks. This is not always required. Some customers already have a third-party system which they use to handle their products, like a ERP or PIM. In which case you would let the customers use that and you just handle those changes through your middleware to connect OrderCloud with those systems.
At the moment, you only get the Seller Admin application in the Next.js headstart. Sitecore has confirmed their focus will be on this project going forward, which might give some help determining what headstart to choose.
Both headstarts are available on github, you can download it and also contribute to it if you want.
Must I use Headstart?
No. It’s just as common to make your own project from scratch. It all comes down to what your customer needs and what fits your developer team.
I decided to use the Headstart as a base template that will be extended and built-upon for customization. So it’s basically a fork of the Next.js headstart and i’ll continuously merge changes as they come in to the master branch from Sitecore. So it’s important to only extend and not replace anything from the branch to not break anything down the line.
Do I have to use Sitecore XM/XP with OrderCloud?
Nope, yet again, the power of everything being headless is that you don’t need to. But Sitecore has obviously made it easier and give more features that works with their other products. Like Sitecore Send, Search, Discovery etc.
You can use Sitecore OrderCloud completely standalone.
If you have a customer which already has Sitecore XP, for instance, you can utilize that with JSS. So you can use data from Sitecore that is decoupled and with a Next.js storefront and a NET 6/7 in our middleware.
JSS, or it’s new name Sitecore Headless Services module, “..enables developers to decouple the data application from the rendering application”[1]. It allows for headless development with Sitecore and Javascript applications. Sitecore provides JSS SDKs for this also.
Next.js Headstart and JSS
Based on your client and their needs, imagine you decide to make a NextJS JSS app which uses the OrderCloud javascript SDK as your buyer application. The client already has a Sitecore XP and they have a relatively short time-to-market for the initial phase.
This approach lets you take advantage of various Sitecore features the client is already familiar with, such as Forms, components, data storage solutions, and the experience editor, among others. The headless nature of Sitecore may seem intimidating initially, but once set up, it offers a swift and user-friendly experience.
Now, think about the backoffice. Visualize using a base like the Headstart for NextJS, which employs the OrderCloud SDK. This can be tailored further based on the client’s unique requirements. You could fork the Headstart backoffice project to extend upon as you wish to get going faster.
You can easily deploy this all on Vercel and there are several guides and videos in the Sitecore community on how to get started with Vercel.
Lastly, think about middleware. Consider leveraging Azure functions or microservices to process requests to external systems. This can be for various purposes such as calculating tax, providing shipping and payment options, updating inventory, and more.
What are the challenges of using OrderCloud?
Ordercloud gives you an enormous option for customization and flexibility, but if you’re new to Ordercloud, there’s a lot of work to do yourself that isn’t provided by the platform. This means a steep learning curve, but a better reward in the end.
To cope with that, I was using the knowledge base and Learn path on the OrderCloud site. Next, I went to the courses on OrderCloud at learning.sitecore.com, and then doing the Certification was enough to get me going. So, all in all, I think it’s not that hard if you’re familiar with working with APIs and have a grasp of eCommerce. And obviously using the Headstart projects to your advantage.
As long as you’re familiar with the challenges you can weigh those against the pros of using it.
Stick around for part 2 where I’ll give a demo on how to setup a NextJS JSS app and the NextJS headstart project.
Sitecore OrderCloud has been a game-changer in the B2B eCommerce landscape. With its headless, API-first approach, businesses have the flexibility and scalability they need to meet their unique requirements. A significant feature in OrderCloud is the concept of Extended Properties, also known as XP.
What are XP Fields?
XP fields, short for Extended Properties, are a unique feature in OrderCloud’s API which are essentially extra fields in an OrderCloud resource, like Order, Product, PriceSchedule, etc. They allow developers to store custom data alongside the standard properties of an object. XP fields are basically a JSON object that can be added to most resources within the platform. These fields can be as complex or as deeply nested as you need, providing great flexibility in the kind of data you can store.
Benefits of XP Fields
The beauty of XP fields lies in the flexibility it provides. With XP fields, you can create a custom solution tailored to your specific needs. XP fields can store any key-value pair, including numbers, strings, booleans, arrays, and even other objects.
In addition, XP fields are also available for filtering, sorting, and searching on all list endpoints. This makes XP fields just as accessible as normal fields.
What to Store
What you choose to store in XP fields depends entirely on your specific use case. This might include custom user data, additional product information, or order details, for example. As we already know, XP fields are useful when you need to store data that does not fit into the standard OrderCloud data model.
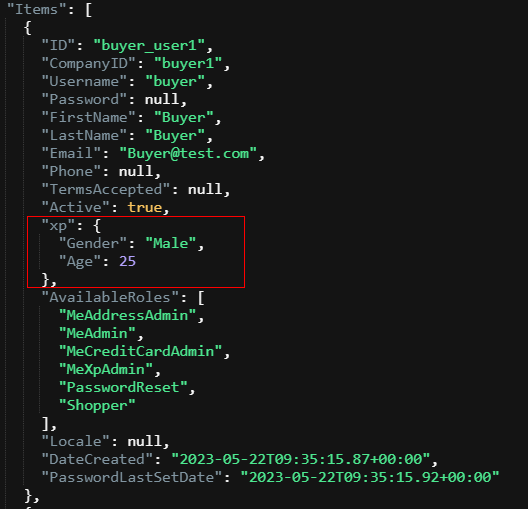
Consider, for instance, that you want to store additional details about users such as age, gender, or specific employment details. With XP fields, you can add this data directly to your user’s data model. The ability to nest objects within XP fields makes it possible to store more complex data structures.
What NOT to Store
While XP fields are incredibly flexible, it is important to note that they should not be used to store sensitive information such as credit card numbers, social security numbers, or passwords. This violates the rules of the platform. And obviously you shouldn’t store data that’s already taken care of by the standard OrderCloud data model.
Another crucial point to remember is that the entire XP object must be 8000 bytes or less, and each key in the XP should be consistently typed per object. This means that if you add a key with a specific type of value, all other entries with the same key should have values of the same type or be null. So you can’t use user.xp.Age = 25 as int on one user and user.xp.Age = “twenty-five” as string on another user. They need to be the same type.
How to Add XP Fields
Adding XP fields to a resource is a straightforward process. When creating or updating a resource, simply include an “xp” key in your JSON request body, with its value being the JSON object containing your custom properties.
Here’s a simple example of updating XP fields on a user:
In the world of e-commerce, effectively sorting and filtering products is essential for creating a seamless shopping experience. One powerful tool for achieving this is ‘facets’. Facets provide a way to categorize and filter products based on their characteristics, such as color, size, brand, etc.
OrderCloud supports the use of facets through its extended properties, XP, feature. In this post, we will take a look at setting up facets in OrderCloud and how to use them to fetch and filter products.
Setup Facets in OrderCloud
Let’s start with setting up facets for our products. We will use OrderCloud’s extended properties, to create our facets.
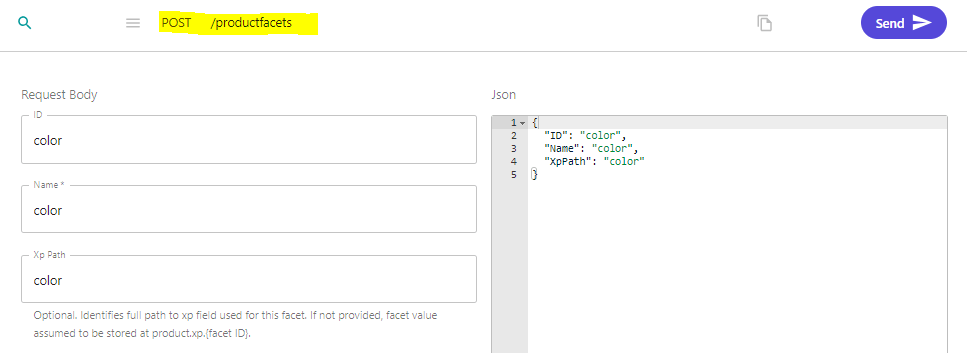
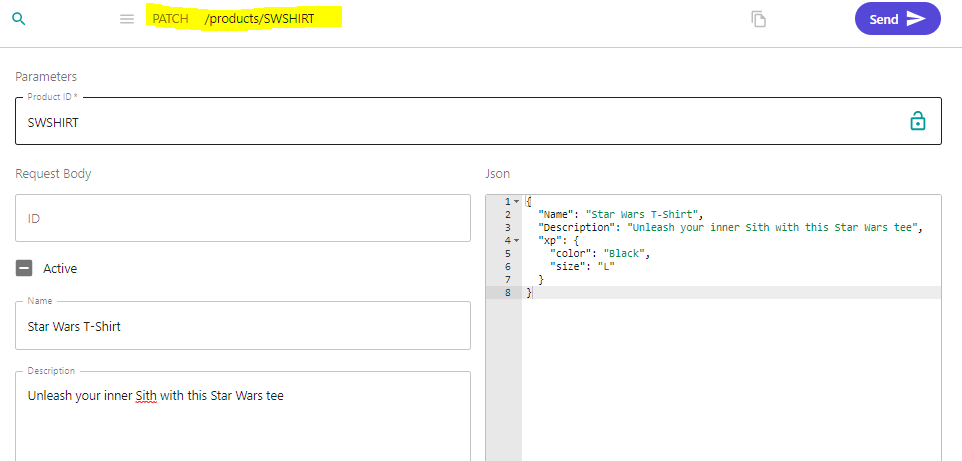
Creating Product Facets: To add a facet to a product, you need to send a POST request to the /productfacets endpoint. Here’s an example of how to do this for a “color” facet. I will setup one for “size” aswell
2. Adding Facet Values to a Product: After setting up the facets, we can add the value to our product using the XP feature. In our product data, we include an XP object with our desired fields:
This product now has a color facet with the value “Black” and a size facet with the value “L”.
Fetching Products and Viewing Facets
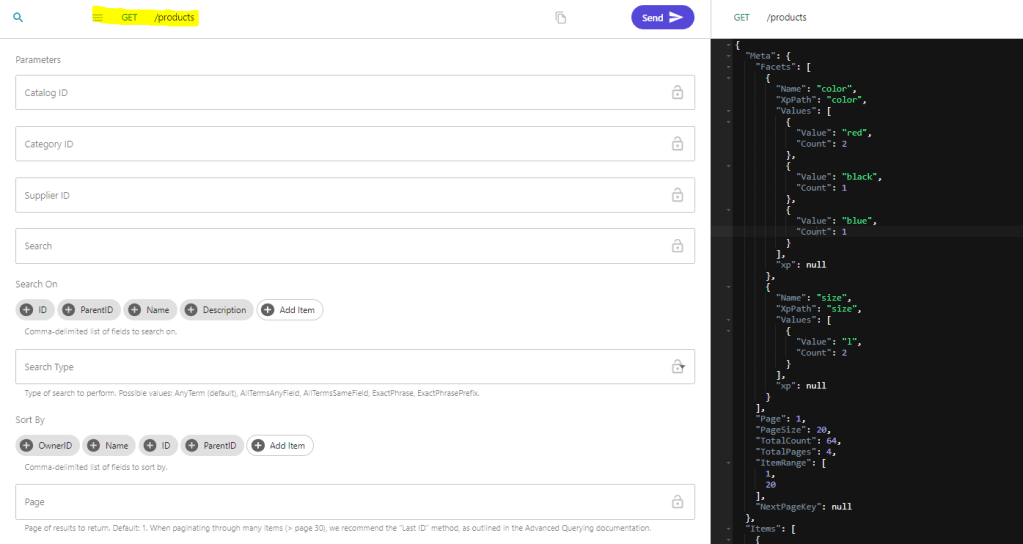
With our facets set up, we can get our products and view the facets in the response. When we get all products, any XP fields that match product facets are returned in the API response. We can do this using the following GET request:
In the response, we will see a “Facets” field in the “Meta” object. This provides a list of all unique facet values and their counts. I had some other products already with facets, but now it added a facet for color black with count 1 and added one size L.
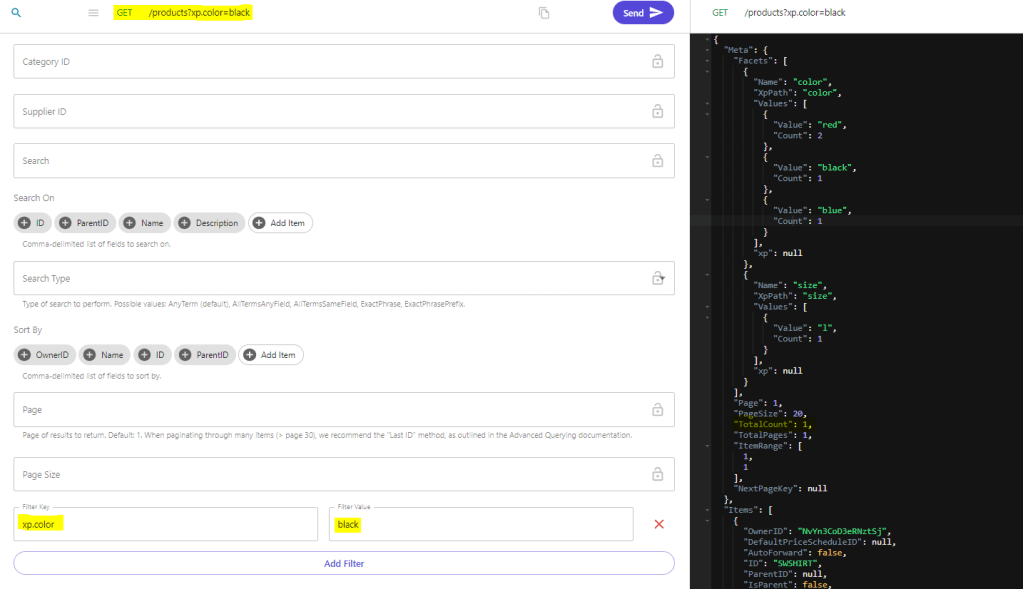
Querying Products by Facet
OrderCloud’s API provides the ability to filter products based on these facets. For example, if we wanted to fetch all products with the color “Black”, we could add a filter parameter to our GET request /products?xp.color=black
This will return all products with the color “Black” in the XP field.
Now you know how to use product facets in Sitecore OrderCloud. Thanks for reading and follow me on social media to get notifications on more Sitecore related blog posts!
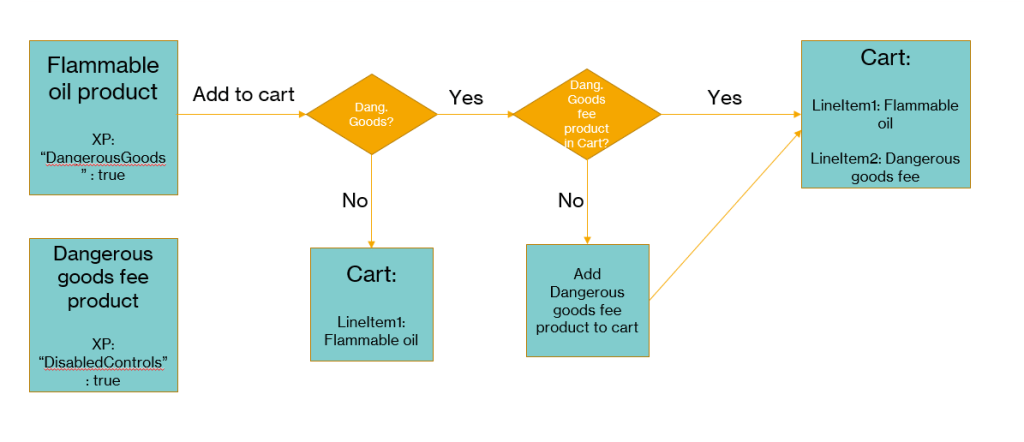
Let’s say you have a product that is flammable and/or toxic that you’re selling on your website. In most countries, these types of products need to be handled with certain safety measures during shipping to secure the safety of the transporter, product, and the environment. This would generally result in an extra fee on the shipping cost.
So, when I add a product that fall under this category to my basket, how can I present this fee to the customer and keep track of it in Sitecore OrderCloud?
I will present two options based on your specific case. Some options are better than others, depending on your user case.
Let’s take a look!
Option 1: Product representing the fee
In this option, we will create a new product called “Dangerous goodsfee” and add a price schedule to that product. On this product, we will also create an XP field called “xp.DisabledControls” and set it to true. This is essential because the product would appear like a normal line item in the basket without some form of validation, making it possible to be placed elsewhere in the cart view. (P.S. don’t forget to use the logic for the XP field in your order confirmation email too. It could be confusing if the fee product looks like normal products in the email.)
We don’t want buyers to add/update/delete this lineItem themselves so we set the XP field for custom validation. Since this is generic, we can also use it for other products.
On all products that should have a “Dangerous goods fee” applied to them, those products will be given a XP field called “xp.DangerousGoods” set to true
Following the above flowchart we can follow the “add to cart” flow. On our buyer app we will check the product for the XP field “DangerousGoods“. If it’s not true we just add the item to cart as normal. If it’s true we check the current cart if it already contains the product “Dangerous goods fee” or not.
If it does, just add the product we’re trying to add. If it doesn’t contain the “Dangerous goods fee” product, we add that to the cart also.
This option will make it possible to only add 1 unique fee per cart. As you will see in the next option we can add a fee per unique item.
Guide
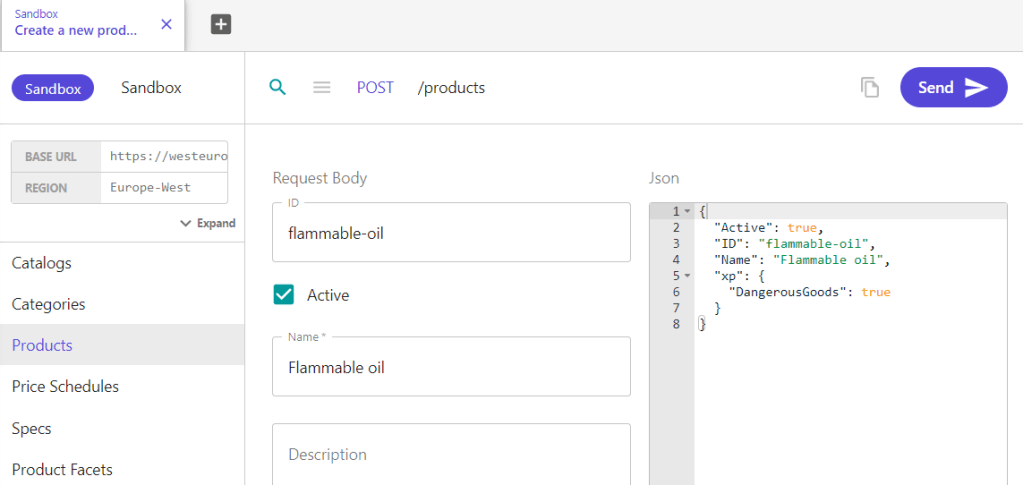
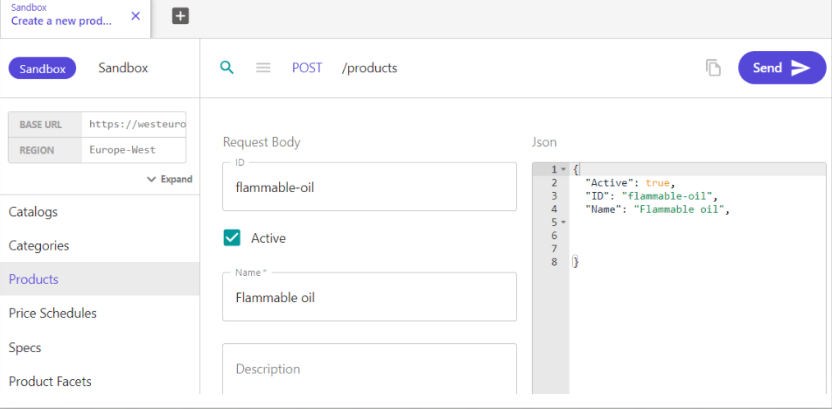
1. Create a new product or update an existing one that is the one that the buyer is adding to their cart, in this case the “Flammable oil”, that has the XP field “Dangerous Goods” : true
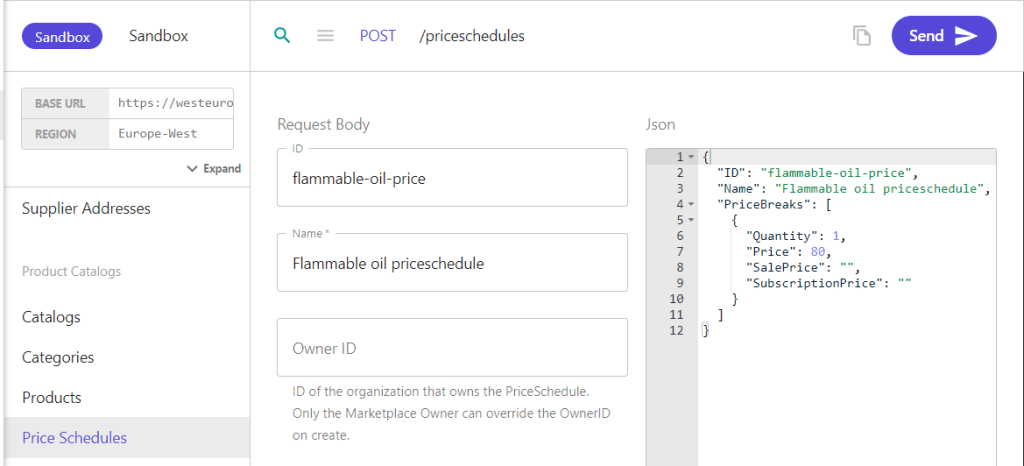
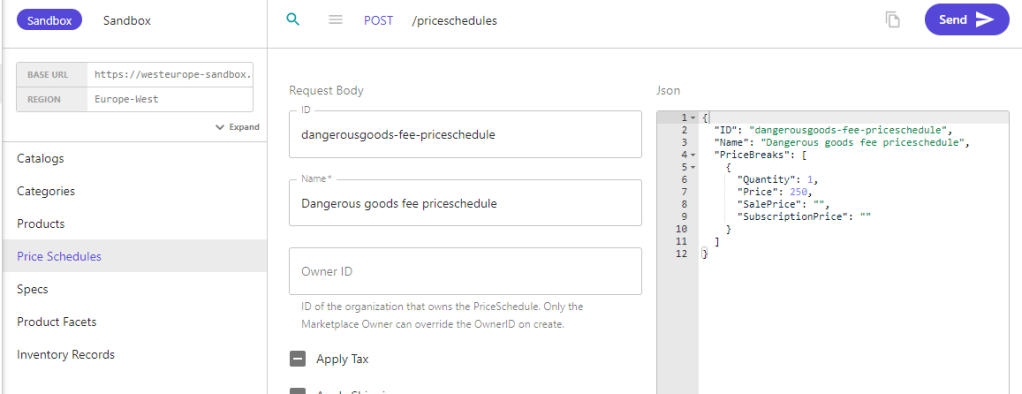
2. Create and/or assign a priceschedule to your product.
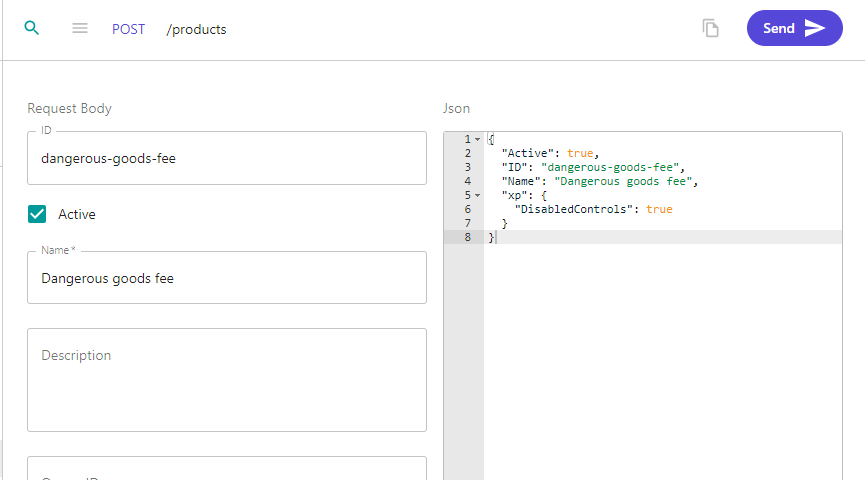
3. Create a new product to represent the dangerous goods fee. Add a XP field “DisabledControls” : true
4. Create a priceschedule then assign it to your fee product.
In your storefront, create custom code that when a buyer user adds, update or delete a lineitem from your cart, you must check if it has the XP field “Dangerous goods” = true. You must have the product ID saved somewhere for your Dangerous goods fee-product. Maybe in your Sitecore CM for instance, or whatever you find fitting?
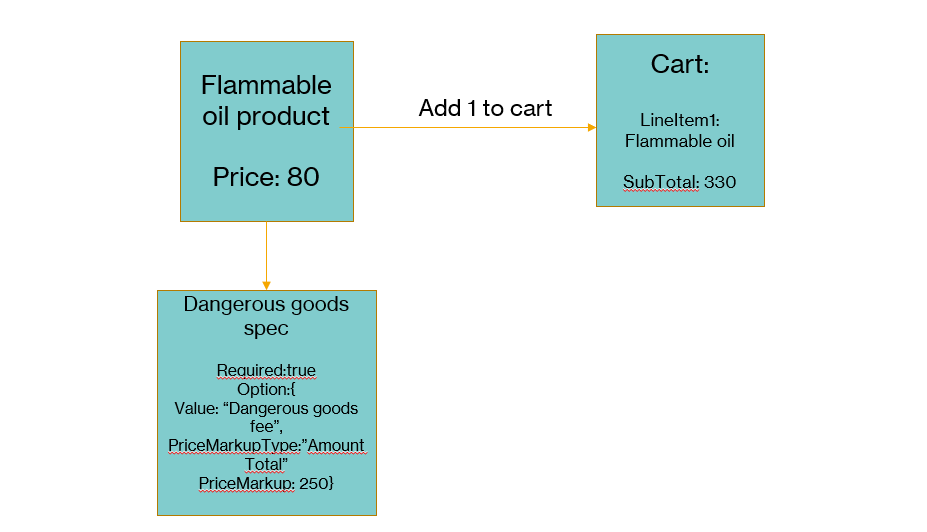
This option will add a fee per unique product in the cart. This will be a required spec option with a single option that always tags along with the product. On the setup of the spec we can set if it should multiply per quantity on the product and the price markup for that spec option.
Hiding some rows but this is the response from OrderCloud when adding the product through POST /cart/lineitems.
We can see that the LineSubTotal is 330, which is the 80 from the product and 250 from the spec.
The thing with this option is that if you add another product that has the same spec that too will add the fee. If you’re happy with adding a fee to each unique lineItem in your cart, this is a great way of achieving that.
If you only want 1 fee per cart, you’re better off with option 1.
Guide
1. Create your product
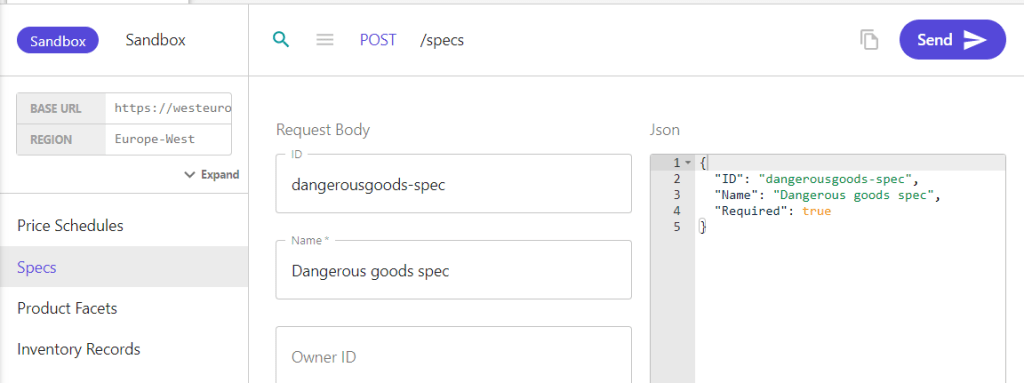
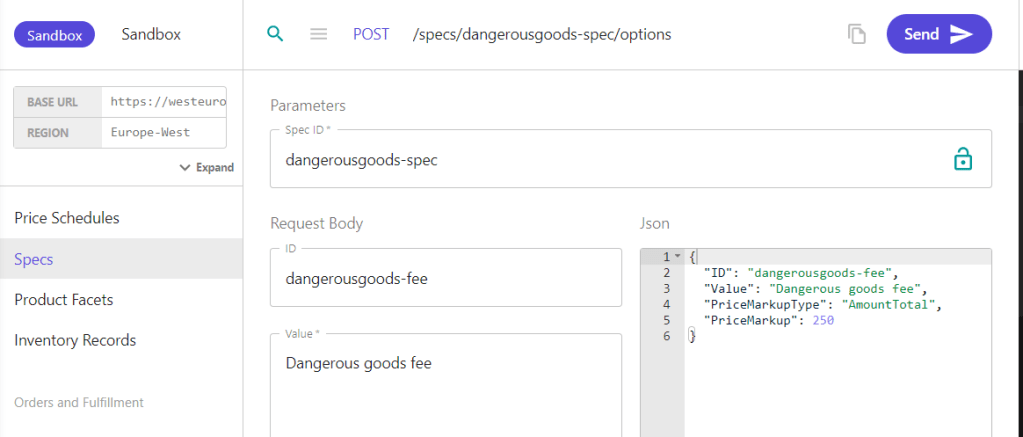
2. Create a new spec with fields like image below. It should be required.
3. Create a spec option with the spec ID from previous step. PriceMarkupType is set to Amount Total, if you want it to add up per quantity then you need to set Amount Per Quantity:
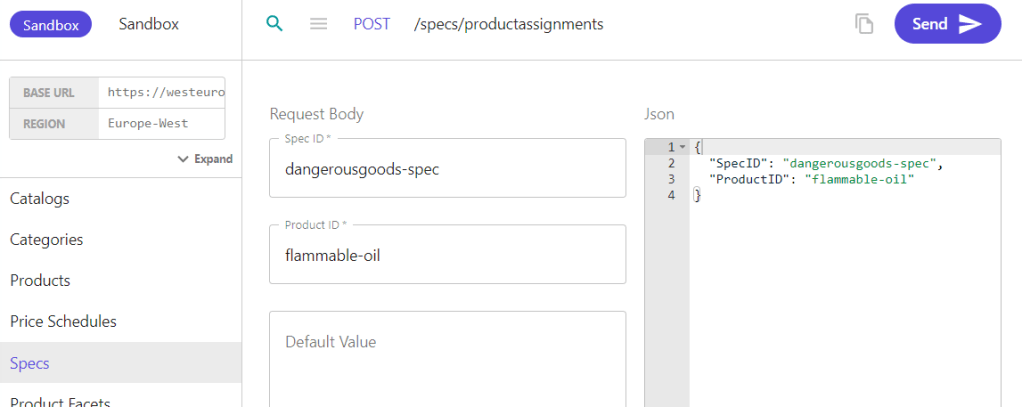
4. Assign the spec to the product from POST /specs/productassignments
5. Create a cart with a buyer user context that has the right access to view the product.
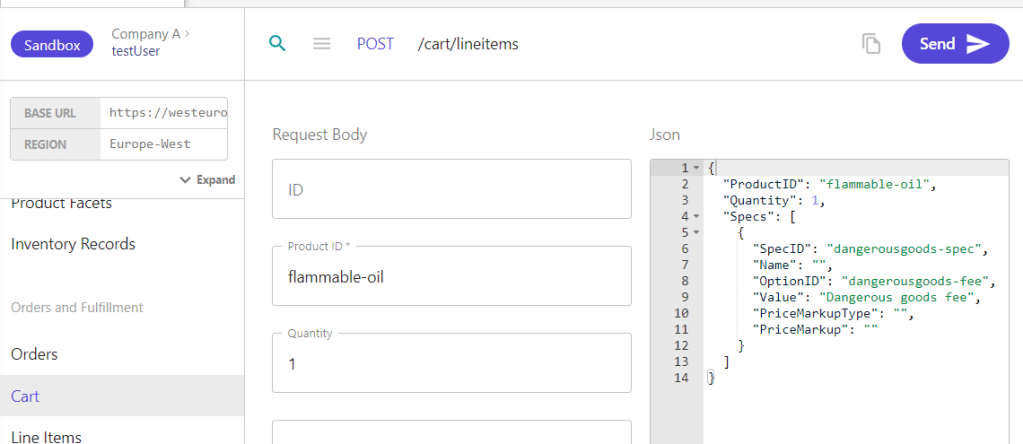
6. Add the Flammable oil product to the cart with POST /cart/lineitems (Create a new cart line item) Note the specID, optionID and value. Since we already setup the PriceMarkupType and PriceMarkup on the specoption we can leave them blank and let OrderCloud resolve them for us.
That’s it. Now if you get the cart you’ll see that the LineSubTotal will be 330 because we add the 80 + 250.
In this post, we’ll discuss defining your buyer-customers companies and how you can provide certain companies with better pricing on products.
A common scenario would be having anonymous or standard customers who receive the standard pricing for a product. Then, you have a logged-in buyer-user assigned to a company, which you define as a “large-volume” customer, for whom you want to offer better pricing on your products, like a 10% discount, etc.
The most common way to set up “companies” in Sitecore OrderCloud is to make them as individual Buyers. This is so that you can set elevated roles on the buyer if needed.
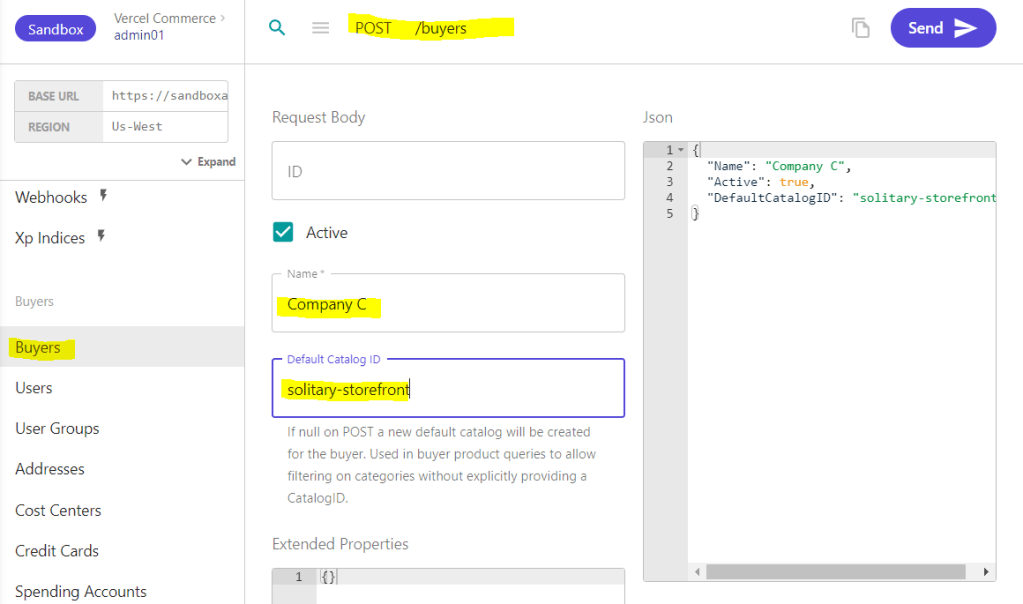
Go to Buyers, change the request to POST – Create a new buyer, and set the desired company name, a Default Catalog ID and Active to true, then press Send. This should return a 201 with some additional information about the company, like its assigned ID, etc. You’ll need that ID going forward.
In this case I only have 1 catalog. If I don’t set a Default Catalog ID, OrderCloud will create a new one for this company. Since I don’t want that I’ll set the Default Catalog ID
Setting up a User
Next, you want to set up a User in that company. So, go to Users and set the request to POST – Create a new user.
Fill in the required fields for the user, as seen in the image, and the Buyer-ID should be the ID you got when creating the company in the previous step.
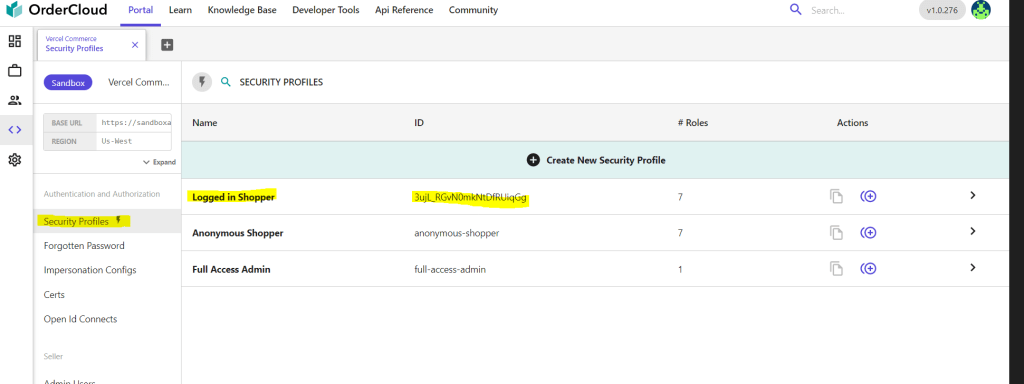
Setting up a Security Profile
If you already have your security profiles defined, you can skip this. Otherwise, go to Security Profiles, and here I’ve created a profile called Logged-in Shopper. This could be defined however you want. Maybe one Security Profile per company, etc. Here, I’m just going with a general approach for now, and I’ve given it some standard shopping and buyer roles.
Now lets assign this profile to our company so all it’s users get the roles we’ve setup. Stay on Security Profiles and shut off the Enhanced UI (the thunder icon).
Change the request to POST – Create or update a security profile assignment
Set the ID of your Security Profile, in my case the ID of Logged in Shopper, in the “Security Profile ID” and the ID of my company in “Buyer ID” and SEND.
Now we should have a new company, a user tied to that company and set roles for that company and it’s users.
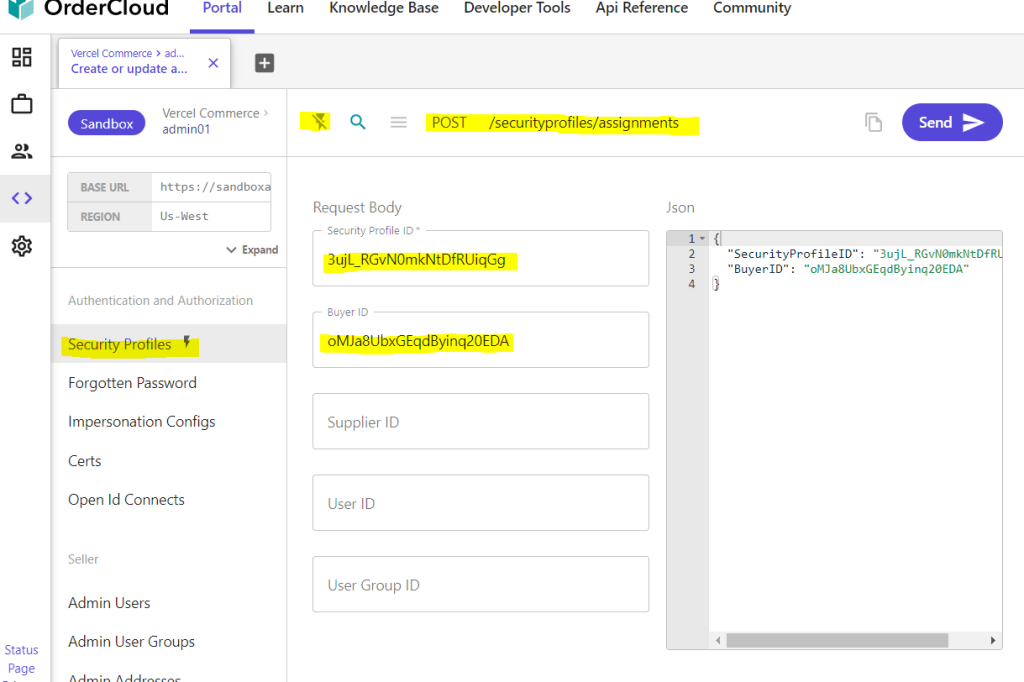
Create Price-Schedules
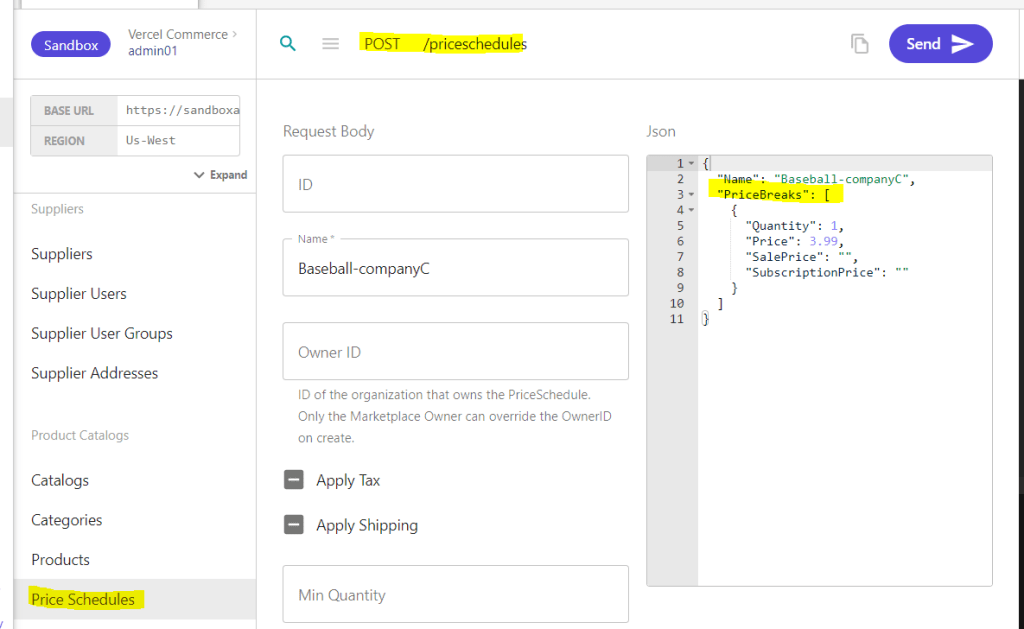
Normally I would create my product first then the Price schedules. But since I would be jumping back and forth, I’ll start by creating the price schedules for a product called “Baseball“.
I’ll create two price schedules. One for the standard price, which goes for 5.99, and one for my buyer, which costs 3.99, as you can see below.
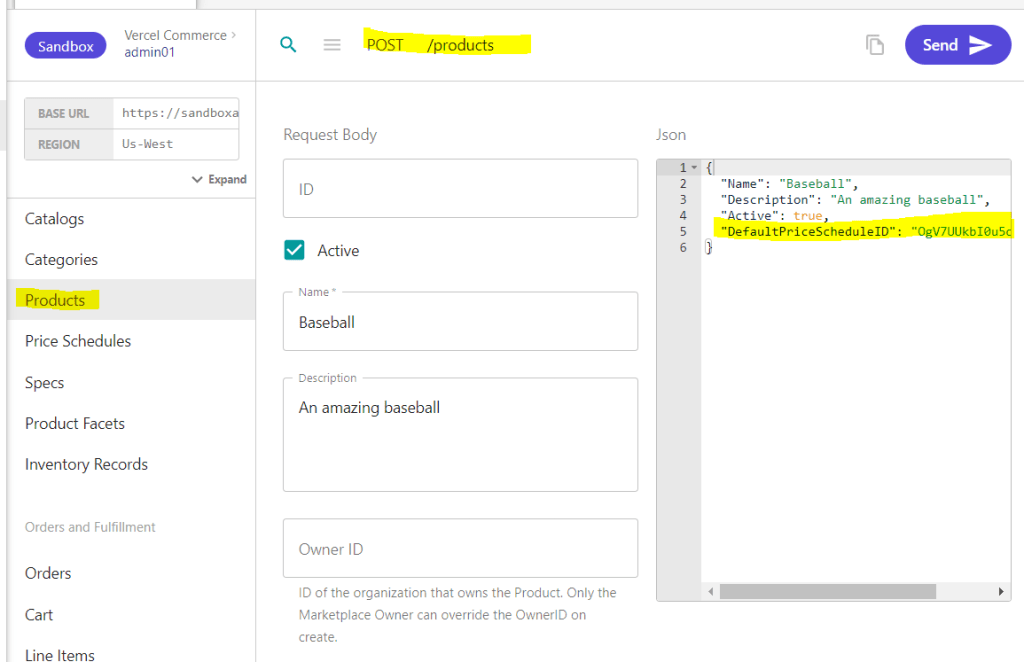
Create a product
Go to Products and make a POST – Create a new product.
Fill in the required info and what else you want and make it active. In the DefaultPriceScheduleID,you want to set the ID of the standard price schedule, the one for 5.99.
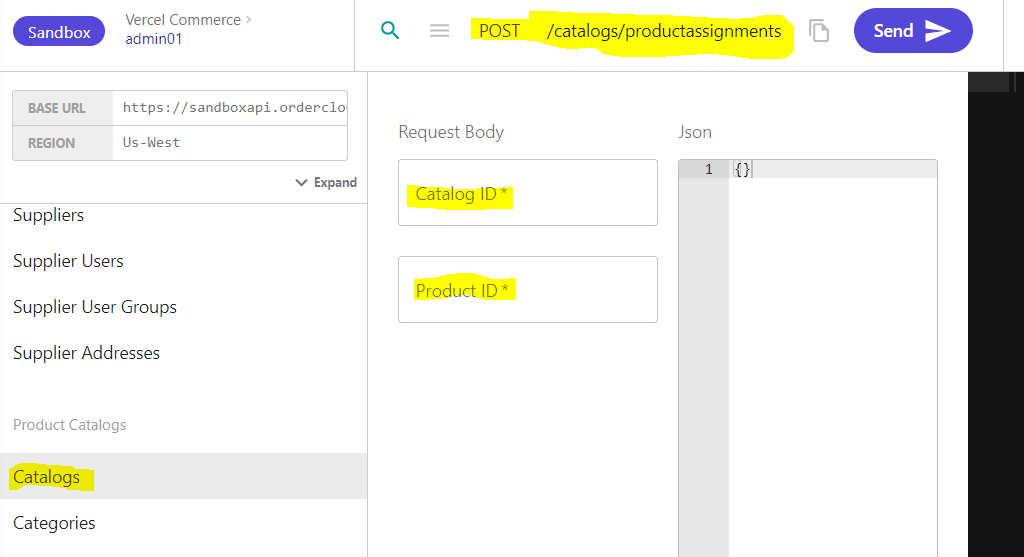
Before we make the price schedule assignment we need to assign our new product to a catalog. Otherwise we’ll get an exception 🙂
So go to Catalogs and put in your catalog Id and your product Id for the new product. When we created our buyer/company we set the default catalog Id. It should be the same Id here in this case.
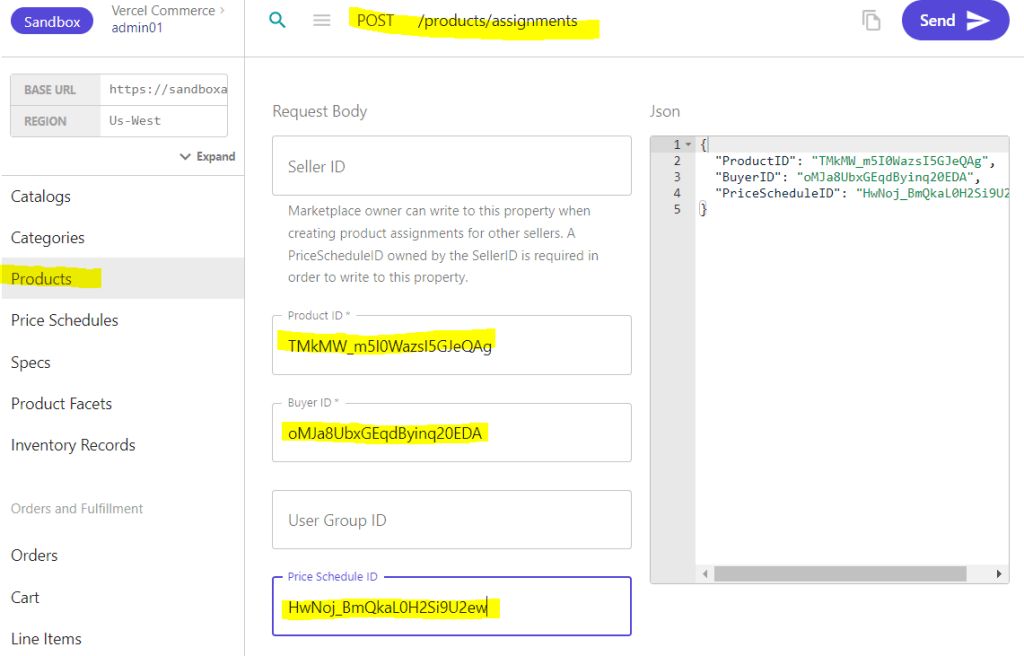
Now we want to make a price schedule assignment with the Product ID and our Buyer ID. This can be done like in the image below.
Lets review
Here’s what we’ve done:
Set up a Buyer
Set up a User
Set up a Security Profile
Create Price-Schedules
Create Product
Assigned Product to Catalog
Assign Price-Schedules
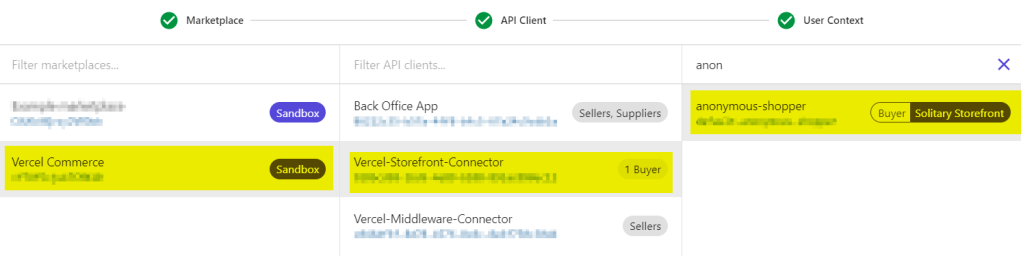
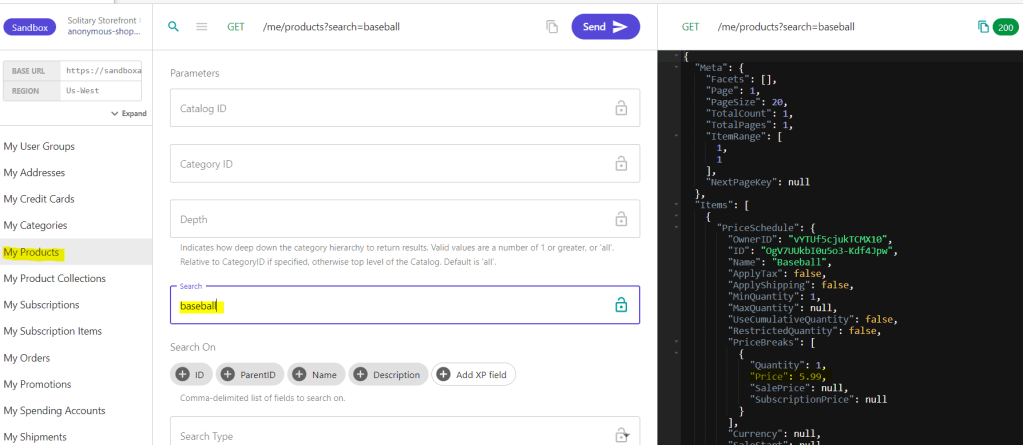
It’s time to see it in action. Let’s get the product as an anonymous user by switching my user context to an anonymous shopper – a user that has no connection to any company.
Then go down to the “Me and My stuff” section and call the “My Products“. As you can see in the JSON response, the Price is 5.99.
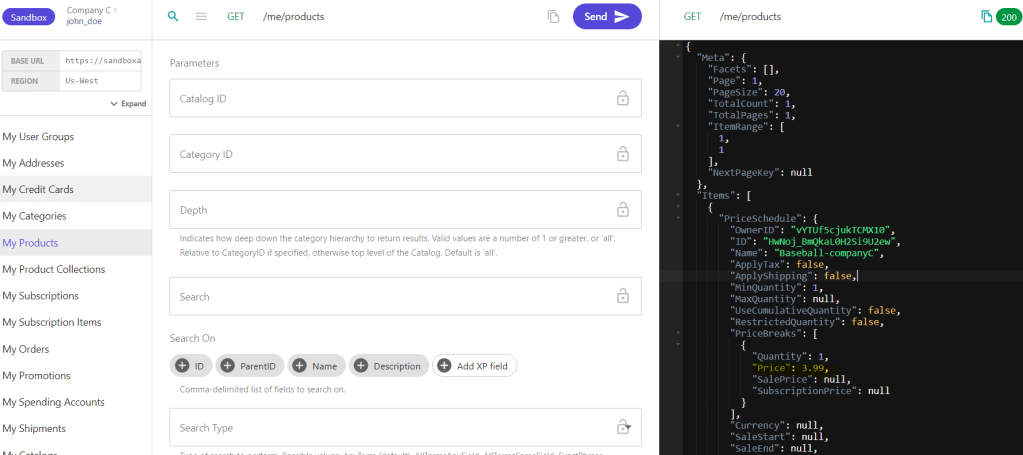
Now lets do the same, but as a context user that belongs to our company – the one we created at the beginning of this post. Then, do the same request in “My Products” to see if the price has changed to 3.99. This is because OrderCloud will give me the appropriate price schedule from the buyer user.
I was following this amazing video guide from Rob at Sitecore on how to setup Vercel Next.js commerce site with OrderCloud integration. You should check it out for a fast and easy start with OrderCloud and and Vercel.
When I followed the video guide I got a lot of errors on some steps when setting it up locally. This is just because we all have different machines, versions running etc. So nothing unusual.
But I thought I’d do a blogpost about the errors I found during the installation process so it might help anyone else if they get stuck in the process following the guide to setup a Vercel project with OrderCloud.
Note
You shouldn’t just trust someone who says you should run terminal commands you don’t know what they do. Same goes for me. Therefore I’m linking to all the official sites on each step. If you’re still unsure talk with someone in your organization.
If you get the same error and did the solution, try restarting your terminal as this is required for some operations.
Run terminal as administrator
Let’s start
1. npm i -g vercel
npm i -g vercel doesn’t work.
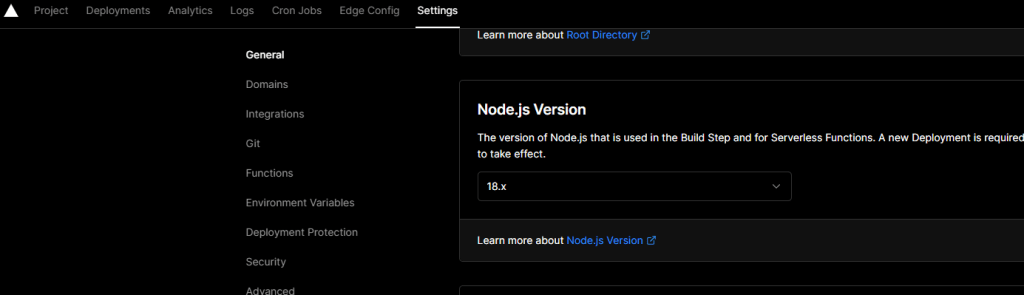
Check your node version. It needs to be the same as in your Vercel project. Go to Settings -> General and scroll down to the section Node.
In your terminal in the project root. Run node -v
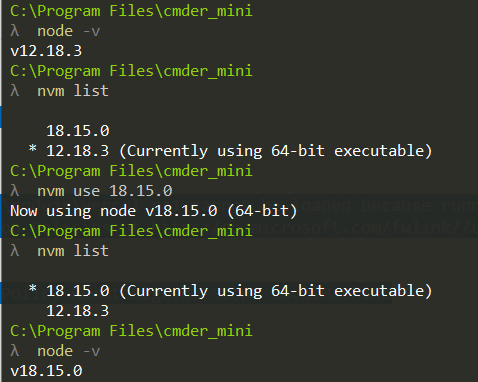
I recommend installing nvm – Node Version Manager. This makes it so you can have multiple node versions installed and you can switch between the different versions in your terminal like in the image below. (Link: https://github.com/nvm-sh/nvm)
If you’ve installed nvm check your node versions by running nvm list. If you don’t have the version in nvm list that you need. You can install LTS (Long term support) or a specific version like this:
nvm install –lts
nvm install 18.15.0
Then refer to the image above on how to switch between node versions. You should now be able to run npm i -g vercel as in the video guide.
2. vercel link
vercel link throws this error: vercel : File C:\Program Files\nodejs\vercel.ps1 cannot be loaded because running scripts is disabled on this system. For more information, see about_Execution_Policies at https:/go.microsoft.com/fwlink/?LinkID=135170.
Run this command then restart your terminal (Can’t run command? Are you running terminal as administrator?):
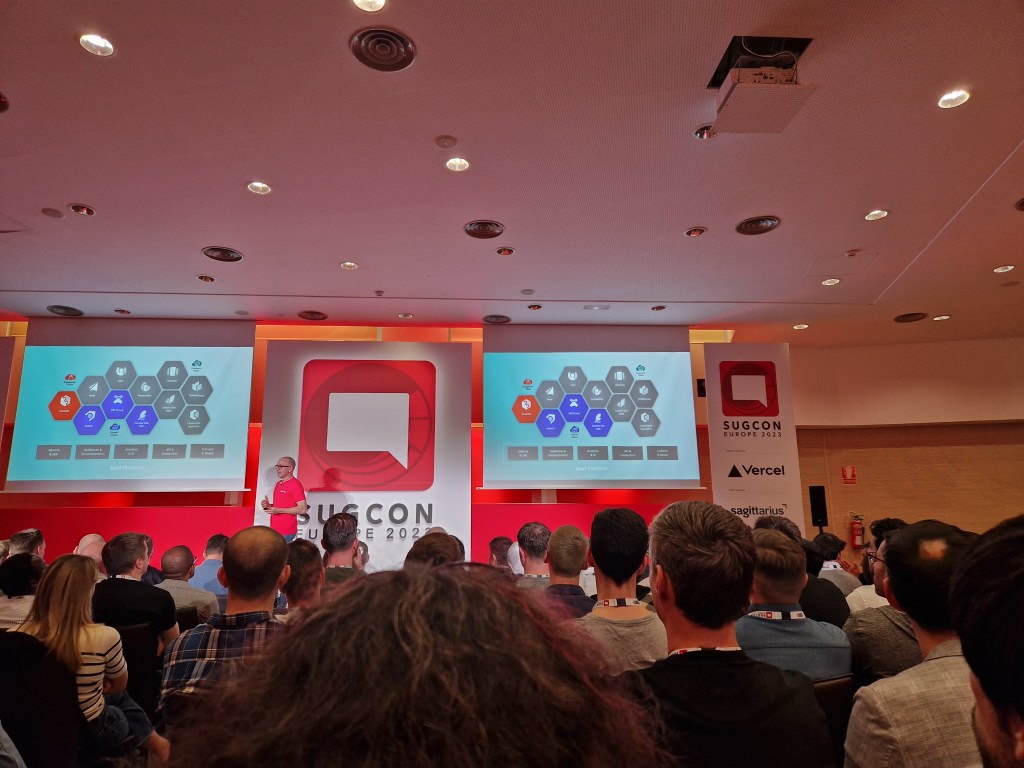
This year we got to meet up in Málaga, Spain, for this years SUGCON, Sitecore User Group Conference. It was an amazing event, just like every year. Thank you to the people involved in making it a reality and to the sponsors.
So I just wanted to highlight some of the key takeaways I got from this year’s SUGCON. To be fair, I could obviously not attend all the sessions, so this post is from the experience I had with the talks I had the chance to go to.
1. Sitecore
We kicked off the conference with the introduction of Sitecore CEO Steve Tzikakis and CPO Dave O’Flanagan, where they talked about the past year and what Sitecore has produced and what they envision going forward. As always, it’s inspiring to hear them talk about the evolving world that is Sitecore and how they’re pushing forward as a leader in the market. They have shown that in the last couple of years. I have great faith in the future of Sitecore.
Last SUGCON we heard about a handful of new Sitecore Products and this year we got presented with a dozen! This is massive and shows that Sitecore is a leader with the composable future we have ahead of us. There are so many strong Sitecore products and in a world where clients can choose what products they need at the right time, it is a game changer. This was talked about at last year’s SUGCON also, but now you can see how much work Sitecore has put in over the last year.
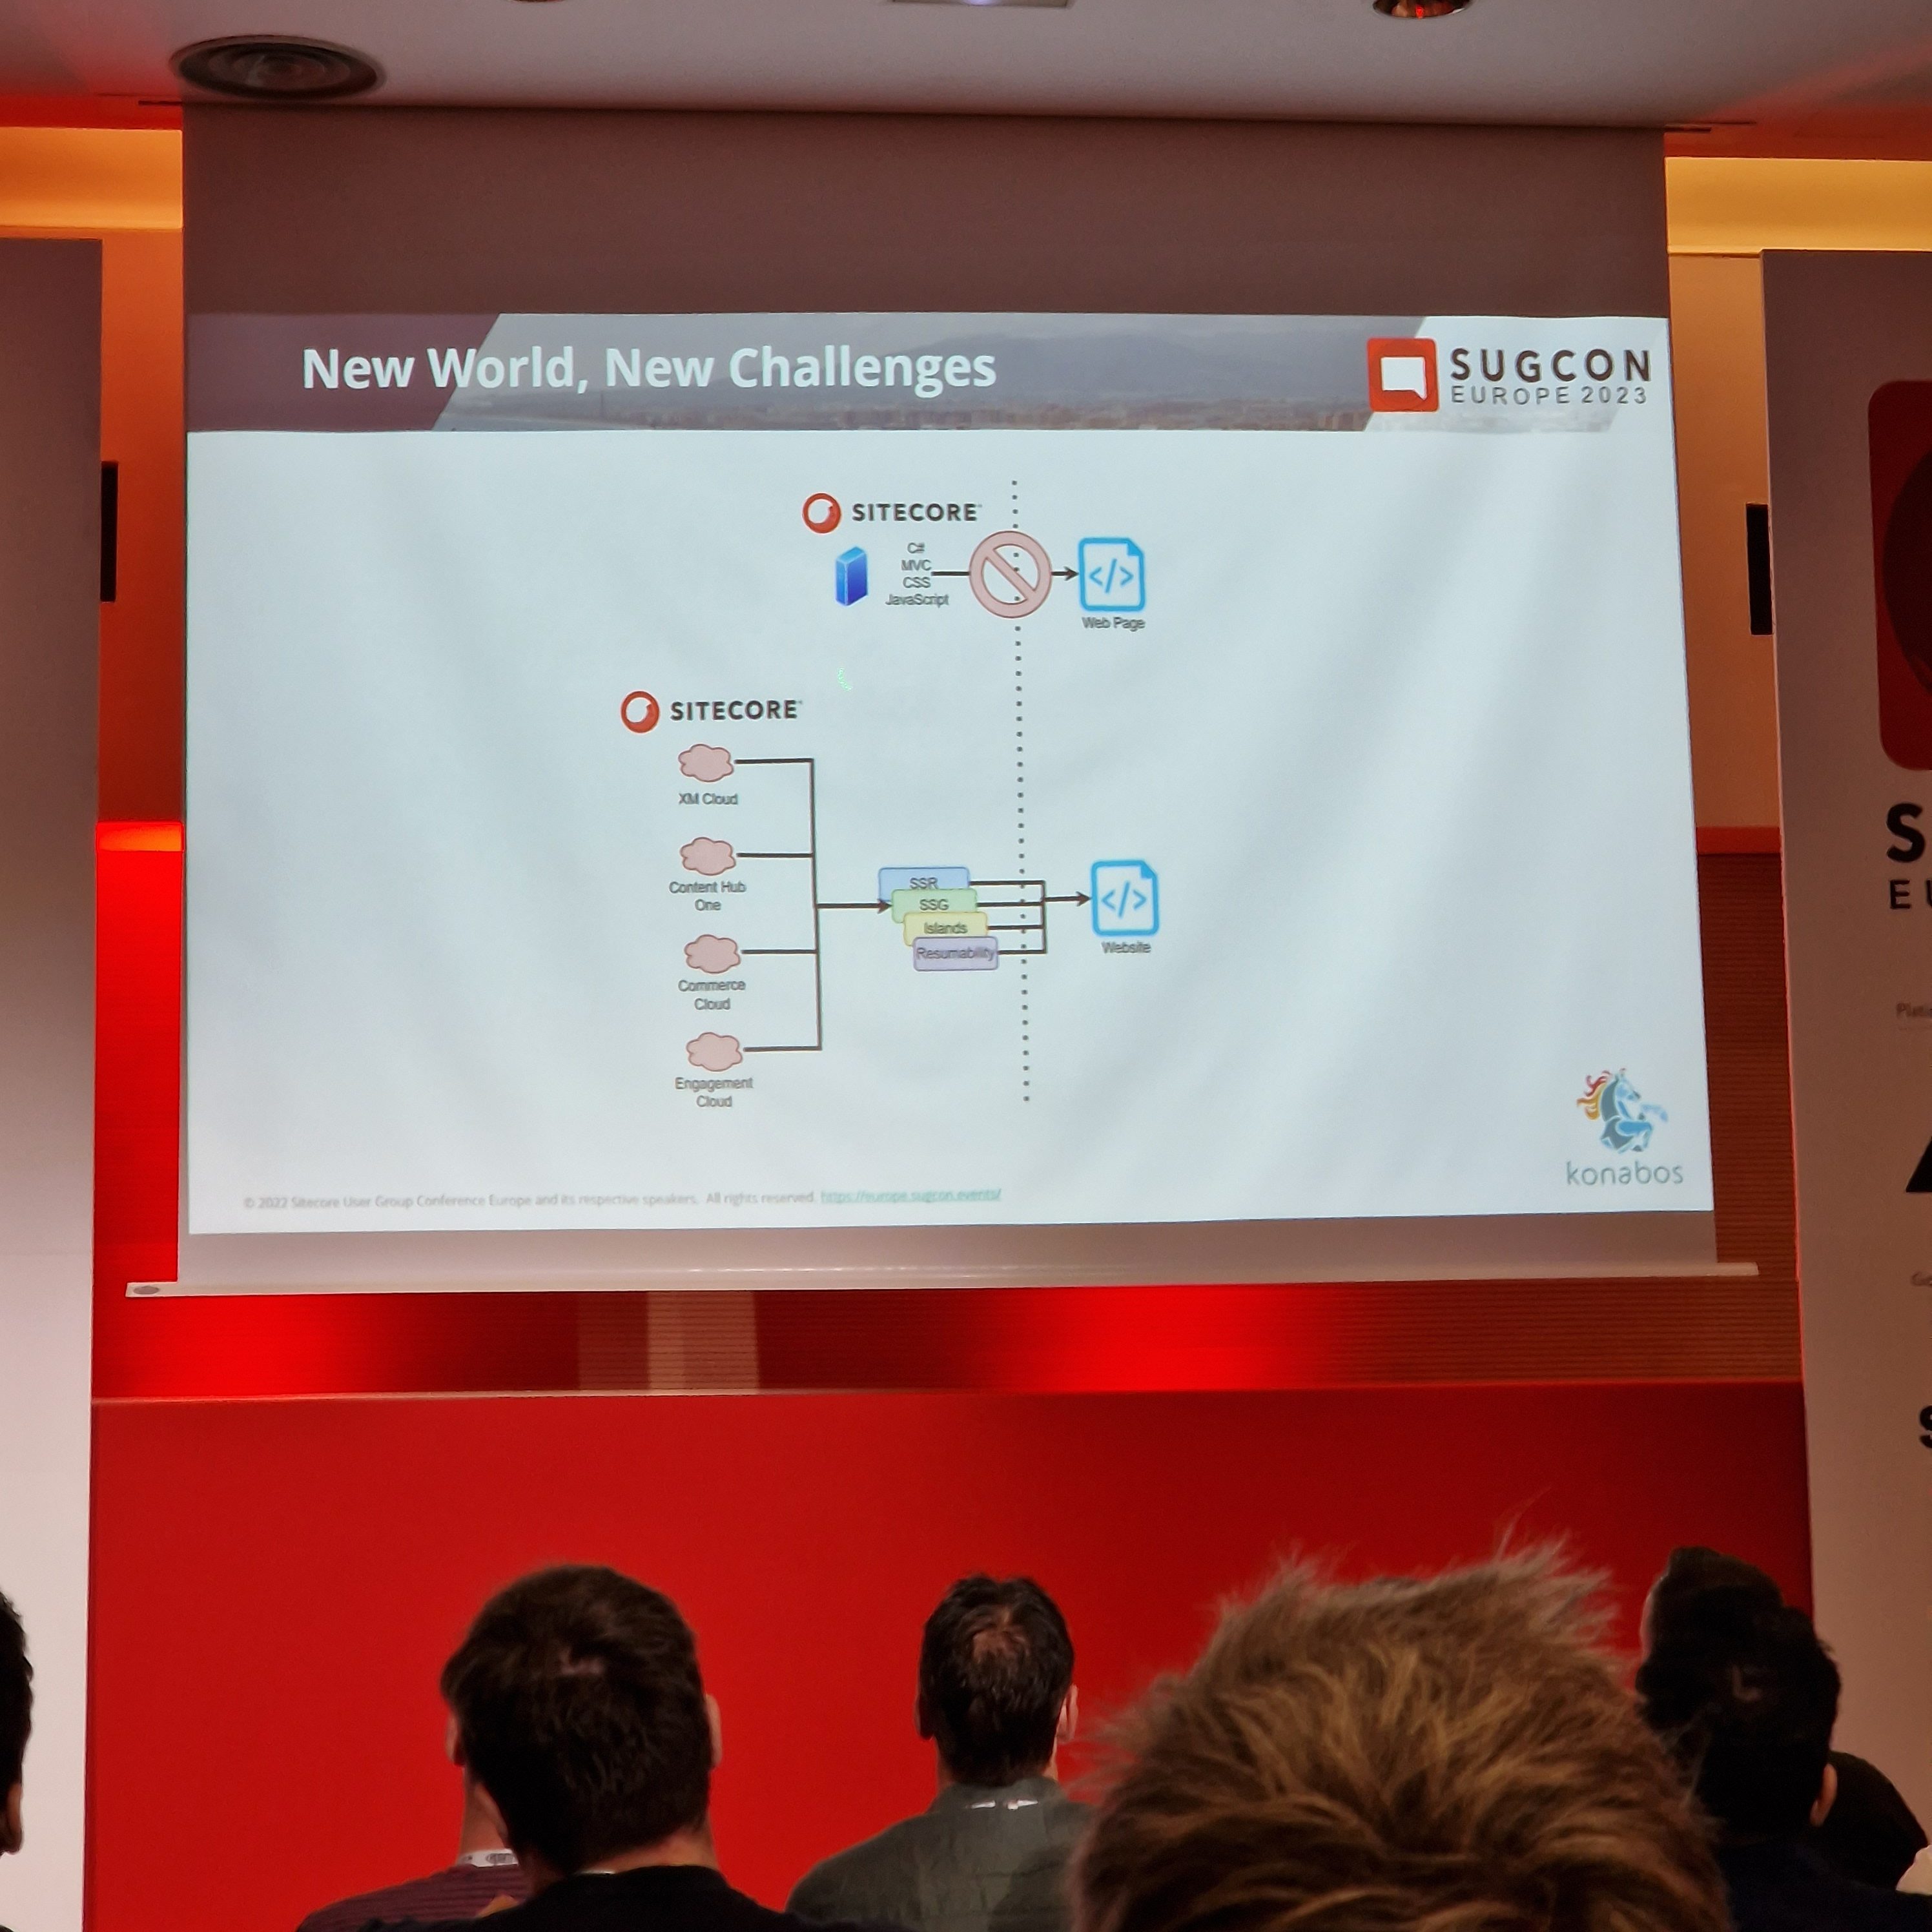
XM Cloud! It even had its own track to keep up with all the sessions this year. There were a lot of presentations about XM Cloud, and for good reason. Sitecore is telling us more than ever that it’s time to move into the cloud when it comes to Sitecore solutions. A lot of customers are still on XP on-premises solutions, and Sitecore is giving us all the help and tools we need to migrate over. We also heard a lot of cases of how partners have tackled this migration process and what’s worth thinking about.
3. Headless
Sitecore is composable, and with that, everything is headless. With headless JSS, we got examples of going with .NET Core or Next.js. Customers who want to stay ahead of their competition need to start going headless and composable before they are left in the dust with .NET MVC and all monoliths.
Mike Edwards gave us a very interesting presentation on “Headless rendering 101” where he went over how to render your headless solutions. For example, the difference between SSR (Server Side Rendering), SSG (Static Site Generation), SPA (Single Page Application), what frameworks you could use with each and how the process of requests is made. He talked about page hydration and how there are different ways of doing that, like Progressive Hydration & Island Architecture.
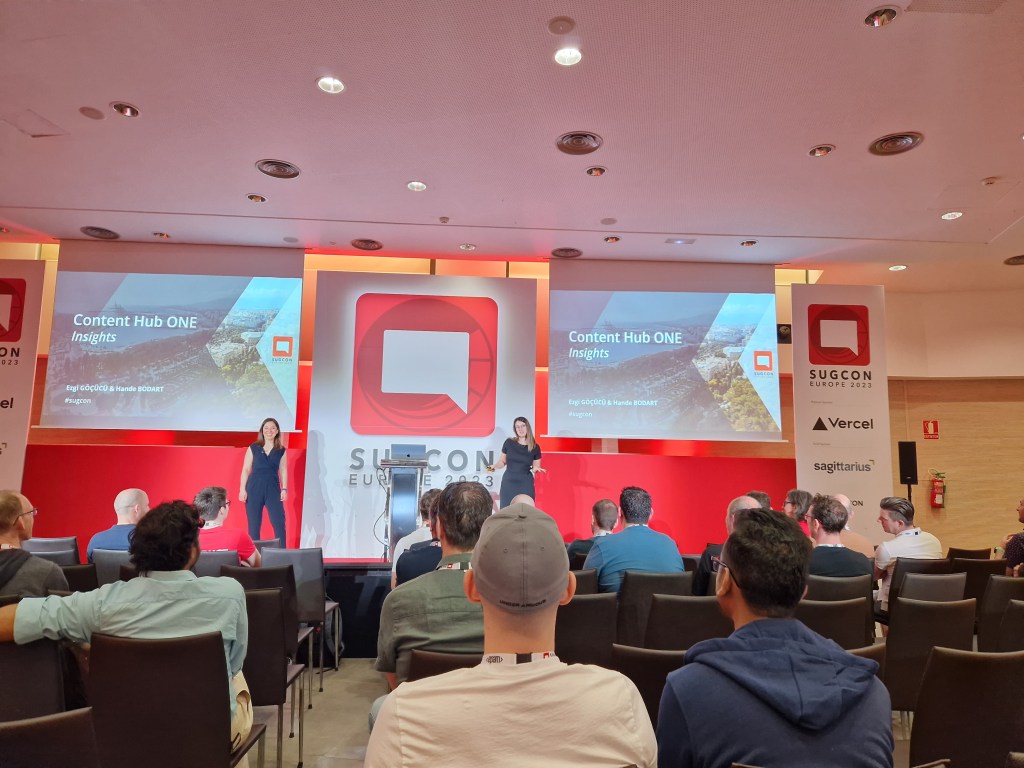
4. Contenthub ONE
We saw presentations on Contenthub ONE. Sitecores new lightweight headless CMS perfect for Omnichannel. We heard from the Sitecore team and also SUGDE presenting how they redid their old website to use Contenthub ONE and what they learned. Check it out here https://www.sitecore-usergroup.de/
Contenthub ONE is a fast and lightweight headless CMS where you can serve content through GraphQL to your frontend. There is a modern CLI and UI interface. You can setup security roles that provide different interface experiences based on your role. I think this will be a great addition to the lineup in Sitecore products.
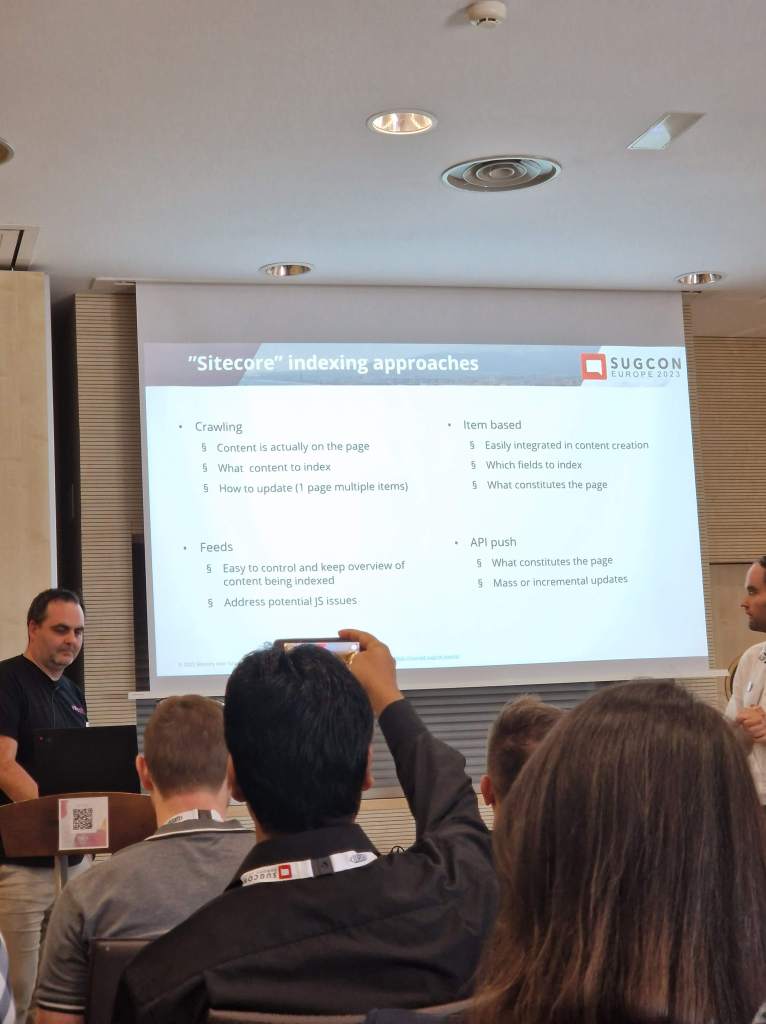
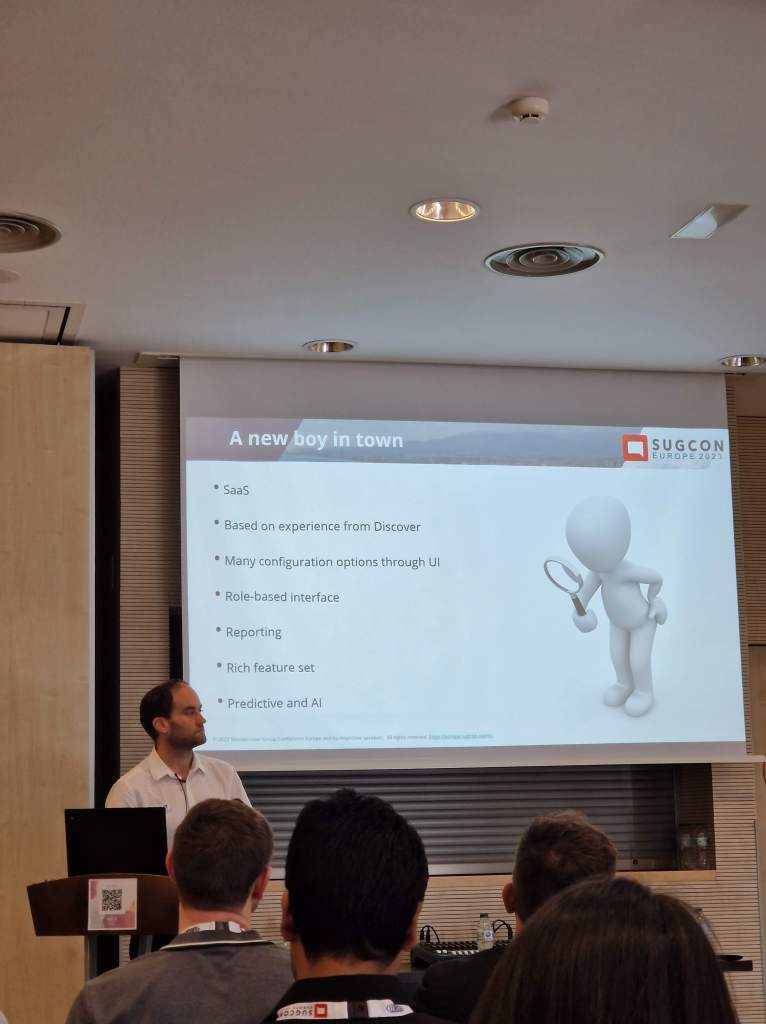
Sitecore Search is another new product that is super fast and predictive. It’s cloud, it’s headless, and it’s AI. You can use Sitecore Search in tandem with CDP for an exceptional personalization experience, but you can also use it on its own, and you don’t require a Sitecore CMS to run it. It’s headless and serves content through APIs. It has a consumption-based price and also depends on how much you index through pushing via API and crawling your site. I guess my only concern for now is not knowing the range of costs for typical clients.
There are no questions about the technology and usability of the product. I was impressed by the product and look forward to starting to use it.
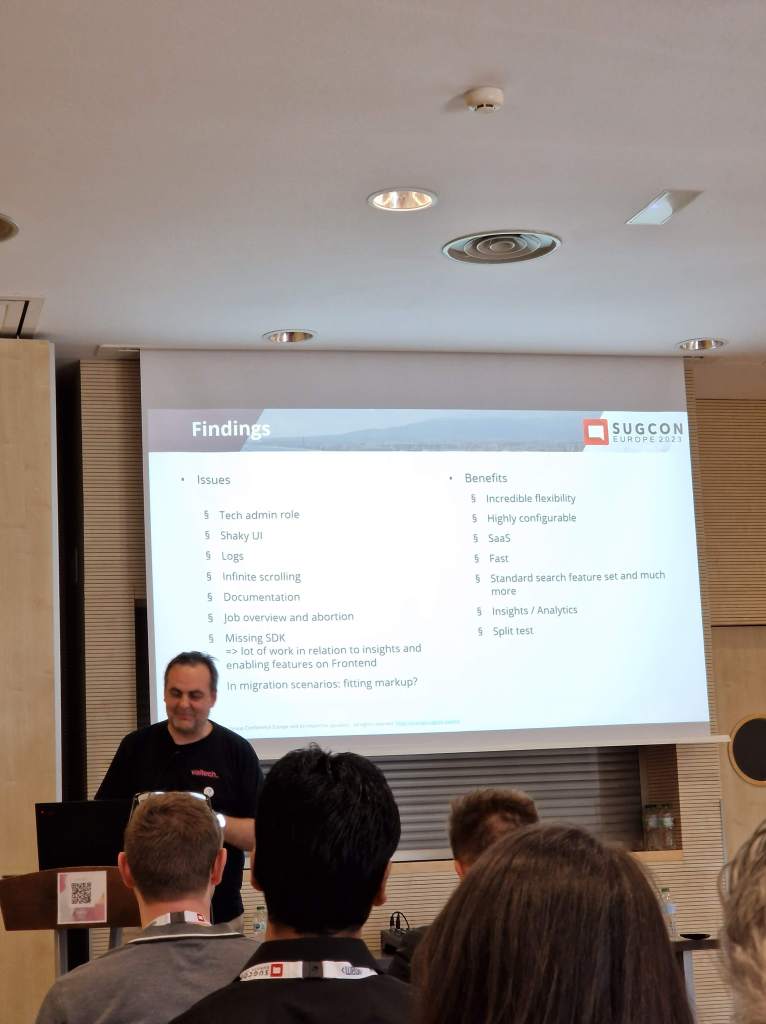
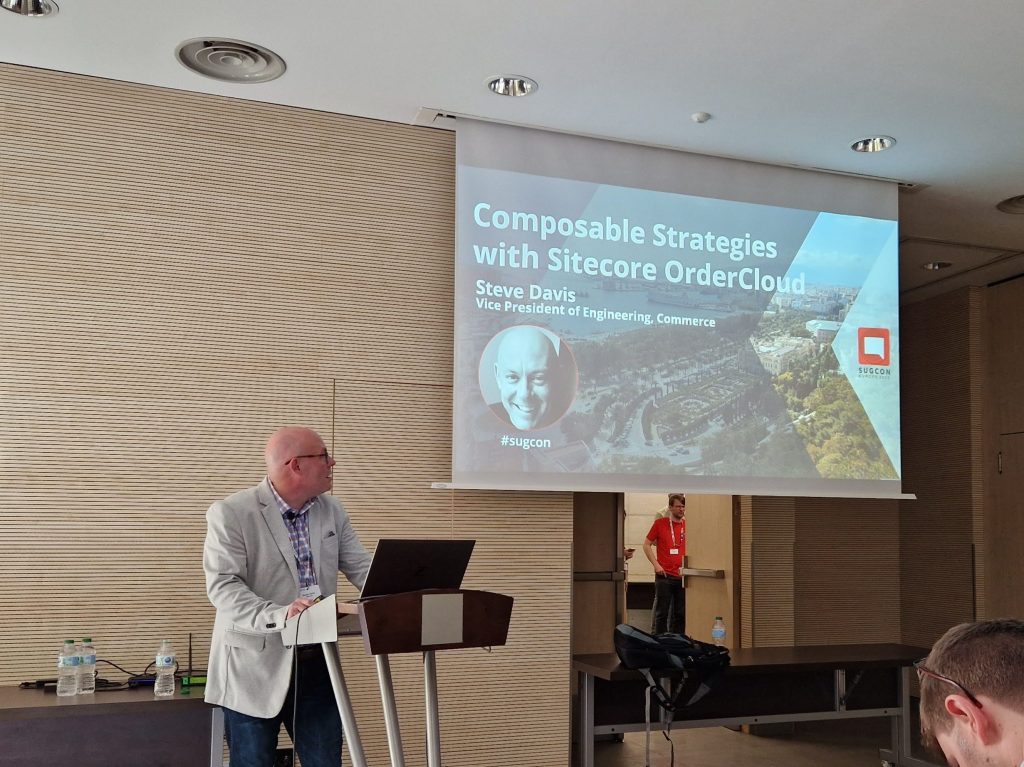
OrderCloud was something I was interested in learning more about, but there weren’t many sessions about it this year. We got two interesting talks from Steven Davis and Himadri Chakrabarti.
To summarize what I learned:
API first – future proof your headless commerce platform
Supports complex setups
Seen more B2B and B2X clients in OrderCloud than B2C at the moment, probably because B2C customers generally don’t require as complex setups that OrderCloud can support. That doesn’t mean OrderCloud isn’t right for B2C.
Since it’s API first it’s language agnostic and there are SDKs available which makes it developer friendly.
With webhooks and integration events you can easily integrate OrderCloud to other external systems.
OrderCloud is:
Product visiblity – what the customer can purchase
Order distribution – capturing and fulfilling orders
User segmentation – managing customers
OrderCloud is NOT:
CRM
Warehouse management system
Tax calculator
Solution for shipping, payments, personalization, email marketing, and frontend
Bonus
Pentia’s own Thomas Stern had a session where he “hacked Sitecore”. With a sense of humor and a great show of expertise at security, I think we all had a shiver down our spines that we should not take security lightly. And it’s a great case to upgrade your solutions to later versions!
But before I installed the package from the Known Issue, I wanted to make sure my custom code was solid and that I wasn’t making any errors there myself. Spoiler, it was, so take a look in your custom code before (if any).
My issue was that I misunderstood the process of how contacts are retrieved with the xConnect API works. I thought I could just get a contact by some Facet, like an email, and then I would get that contact with all it’s Facets and values.
In my case I wanted to set the “Personal” Facet if it was null and then save it. But I got the contact without the ExpandOptions{PersonalInformation.DefaultFacetKey… which meant that the Facet “Personal” was always null. So when I submitted it, it threw an error because I was trying to add a Facet that already existed on the contact. With the updated ExpandOptions like below, I was now getting the correct Facets on the contact and it worked like a charm.
var identifier = new IdentifiedContactReference(Constants.EmailSource, email);
var contact = context.Get(identifier, new ExpandOptions(PersonalInformation.DefaultFacetKey, EmailAddressList.DefaultFacetKey));

if (contact.GetFacet<PersonalInformation>(PersonalInformation.DefaultFacetKey) == null)
{
    PersonalInformation personalInfoFacet = new PersonalInformation() {FirstName = firstname, LastName = lastname};
    context.SetFacet(existingContact, PersonalInformation.DefaultFacetKey, personalInfoFacet);
}

context.Submit();
Hope this helps bring some clarity as it did for me! 🙂
The ActionFilterAttribute class allows you to add custom behavior to a controller action method before or after it is executed. You can do this by overriding one or more of the methods provided by the class to implement your own custom logic that is executed either before or after the action method is called. This can be useful for a wide range of purposes, such as authentication and authorization, logging, or caching.
Example
For example, you could create a custom ActionFilterAttribute that authorize by Sitecore role on action method’s execution before or after it is called, like this:
using Sitecore.Security.Accounts;

public class SitecoreRoleAttribute : ActionFilterAttribute
{
    private readonly Role _role;
    public SitecoreRoleAttribute(Role role)
    {
       _role = role;
    }

    public override void OnActionExecuting(ActionExecutingContext filterContext)
    {
        if(Sitecore.Context.User.IsInRole(role))
           base.OnActionExecuting(filterContext);

        filterContext.Result = new RedirectResult("/");
    }

    public override void OnActionExecuted(ActionExecutedContext filterContext)
    {
        //same principle as above method
    }
}
In this example we create a custom action filter attribute called SitecoreRoleAttribute that inherits from ActionFilterAttribute. We override the OnActionExecuting and OnActionExecuted methods to execute code before or after executing the actionmethod is called. You could easily add some conditions in the methods to decide if the action should even be run.
To use this custom attribute, we can simply apply it to the action method we want to log like this:
[SitecoreRole(ACustomRole)]
public ActionResult MyActionMethod()
{
    ...
}
“ACustomRole” above must be of the correct Type and you would’ve probably already have access to it in the constructor.
Now, whenever the MyActionMethod is called, the SitecoreRoleAttributeaction filter will check the conditions before and after it is called.
Is this your new site? Log in to activate admin features and dismiss this message