Track SitecoreAI Updates: Changelog Insights

If you don’t already follow the changelog, make sure to track the RSS feed. Since SitecoreAI is constantly getting updates and improvements to Page Builder, SDKs, etc., you really should follow the changelog so you can easily see when new features are released, start using them, and inform your editors. https://developers.sitecore.com/changelog

I thought I’d sum up some of my favorite features and improvements released the last couple of weeks. Not in any particular order

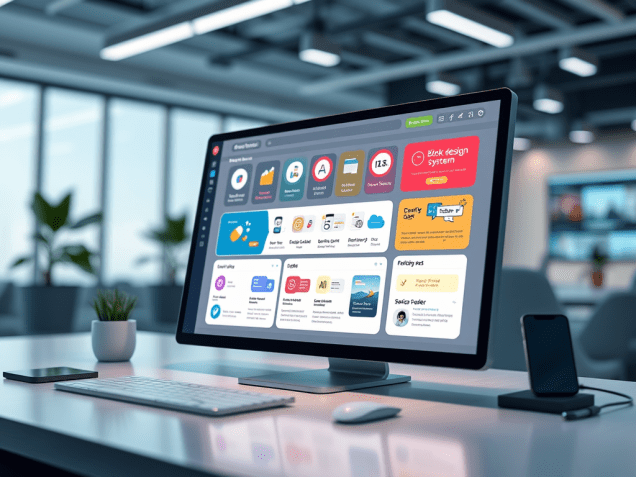
Blok Design System reaches General Availablity (GA)

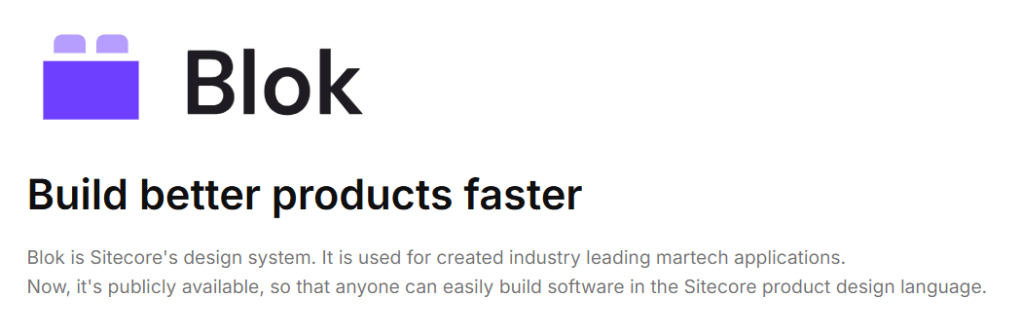
This is Sitecore’s design system to ensure a consistent look throughout SitecoreAI. I’ve used the Beta when trying new marketplace apps created with the new Marketplace SDK that came earlier this year.
It makes it really easy and the design matches rest of SitecoreAI which makes it look professionally integrated quickly and easy. With this realese it’s now ready for production.

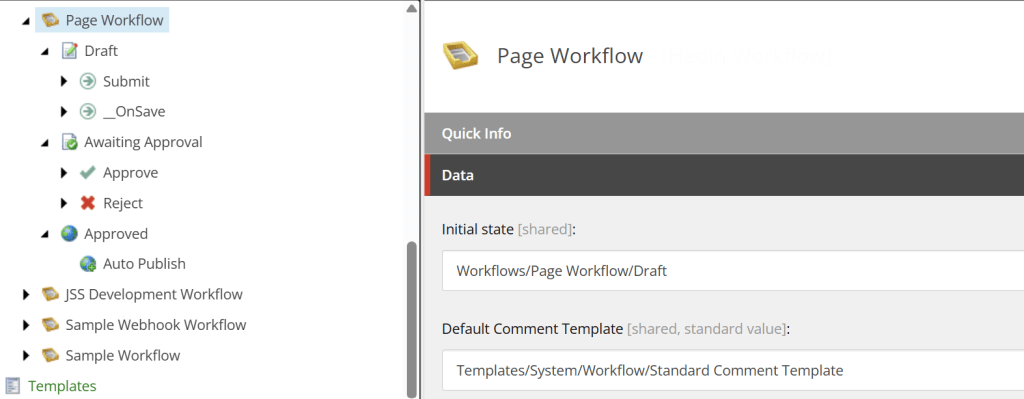
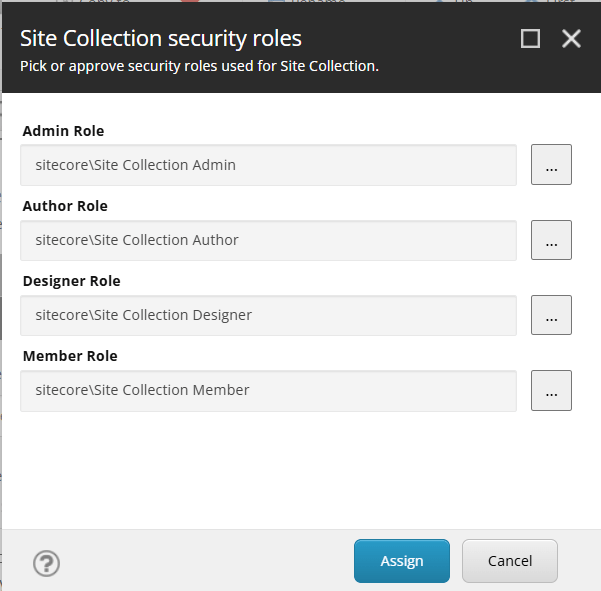
See where your content lives

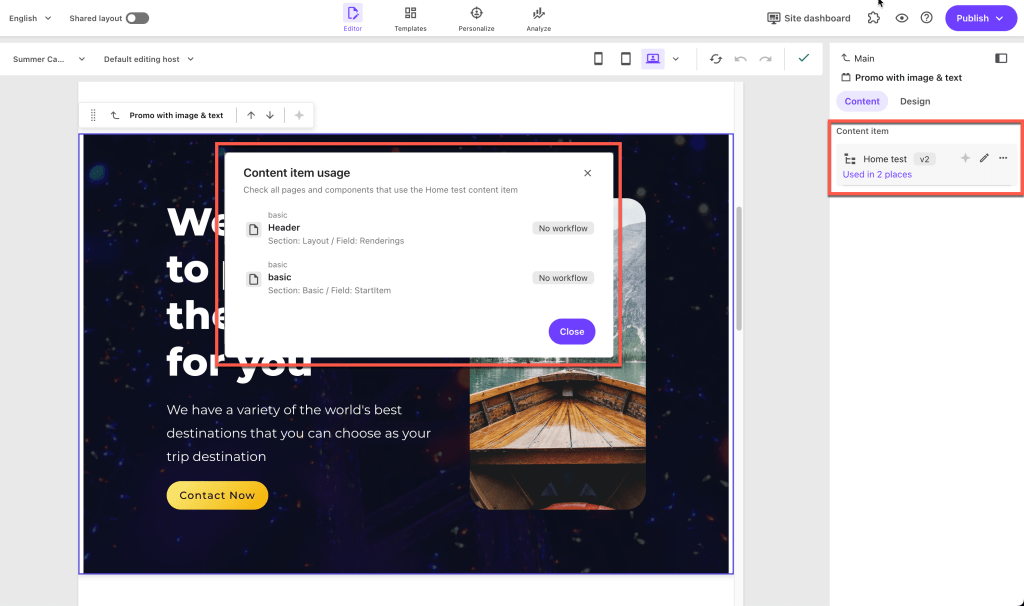
This brings clarity for editors working in Page Builder. I was working on a marketplace App to give editors more tools in Page Builder, and this was one of the features I had in mind. It’s great that it’s now incorporated in by Sitecore as a default feature.
We want our editors to be able to works as much as possible in Page Builder without having to switch to Content Editor unless needed. This is a step in the right direction.

Improvements and resolved issues for the Page builder

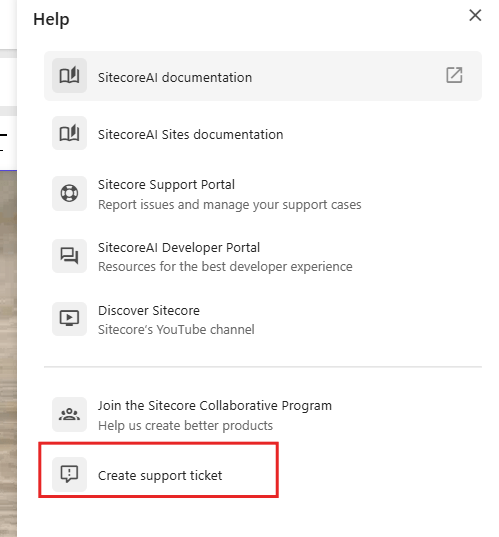
Create support tickets directly from Page Builder, insert link now respects cross-site linking is disabled, but most important maybe is that items deleted in Page Builder now ends up in the recycle bin as expected instead of being instantly deleted.

A nice touch for clarity is that it now says Unpublish if you set a publish restriction on a page, and it removes the page from Edge when triggered.

Share your solutions with the Sitecore community through public Marketplace apps

Marketplace apps can now be made public. When you’ve created an excellent app, you can submit it to Sitecore for review, and if it meets the standards, it can be published for all SitecoreAI to discover and use in the Marketplace. You can choose a free, freemium, or paid tier for your app.

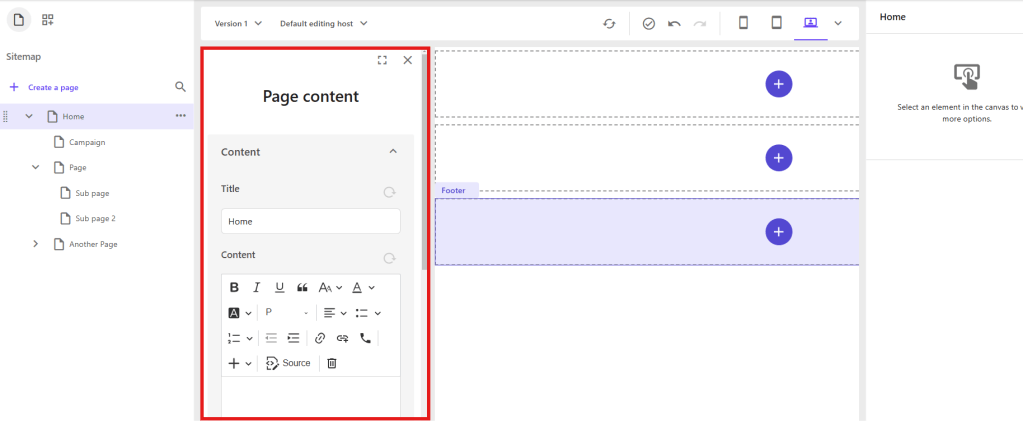
New Search feature and other improvements in the Page builder

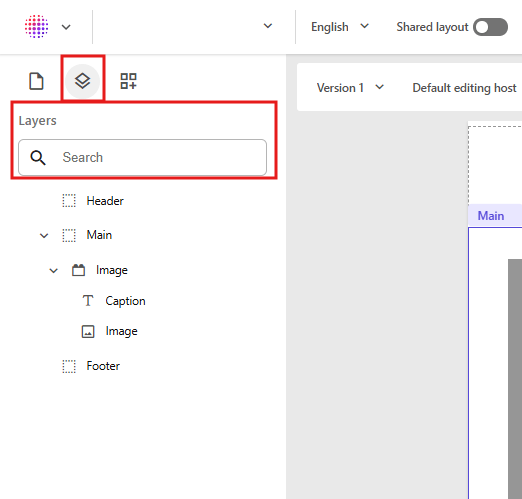
In a previous release we got the Layers tab in Page Builder in the left-hand pane. This makes it easier to see all components on your page in the correct order. You can also click a component in the tree to instantly focus that component or field in your editing window.

If you have lots and lots of components on your page, you can now search for specific names to filter out the otherwise long list.

Summary

These are just a handful of updates that have come to SitecoreAI. There are tons more like Sitecore Agentic Studio, Sitecore Marketer MCP and many more.
Make sure to follow the changelog, because SitecoreAI is evolving fast and you don’t want to miss out on new features and improvements!

https://developers.sitecore.com/changelog

XM Cloud Datasource Workflows: What, Why, and How

What is a Workflow in Sitecore?

In Sitecore, a workflow defines the series of steps content must go through before it can be published. It ensures that all content is reviewed and approved before becoming visible to website visitors. A typical workflow includes stages like Draft, In Review, and Approved to keep track of progress and prevent accidental publishing of unfinished content.

Most workflows in Sitecore are applied to pages and components. However, a datasource workflow is a little different. It applies to content stored separately in folders, not full pages. A datasource workflow ensures that this reusable content is properly reviewed and approved before being displayed in multiple places on the website.

Why Use a Datasource Workflow?

Using workflows for datasource items provides several advantages:

  • Control: Ensures that datasource items follow the same review process as full pages.
  • Reusability: Since datasource items are often reused across multiple pages, workflows prevent unapproved changes from affecting multiple locations.
  • Collaboration: Allows multiple content editors to contribute while maintaining oversight.
  • Versioning and Rollback: Keeps track of changes and allows reverting to previous versions if needed.

How to Implement a Datasource Workflow in Sitecore

Let’s look at a scenario where you have both a Page Workflow and a Datasource Workflow. In this setup, approving a page also automatically approves all datasource items associated with that page.

1. Create your Page Workflow. Setup the workflow and the states. Draft, Awaiting approval, Approved for instance. Add the necessary commands, such as Submit under the Draft state.


2. Create your Datasource workflow.

In your datasource workflow, create a command in the Draft state called Submit and Approve, and set the Next state to Approved.

This setup allows datasource items to be automatically approved when the page they’re linked to is approved.


3. Add Datasource Workflow Actions

Add a Datasource Workflow Action and point it to the command you created in Step 2 (Submit and Approve).

Here’s how the flow works:

  • The page (in Draft) is submitted.
  • The Datasource Workflow Action triggers the Submit and Approve command on all linked datasource items.
  • Because this command moves datasource items to Approved, they are automatically published along with the page.

If you prefer manual approval for datasources, you can instead move them to an Awaiting Approval state rather than approving automatically.


Now you can test and verify your workflows in Pages.
Workflows are very flexible, you can change these actions to match your specific needs. Try it out and get familiar with it.

Creating a Custom SXA Media Token in Sitecore XM Cloud

In Sitecore XM Cloud you organize media assets per site in the Media Library. You do that in your Media item under the Headless Site. SXA provides helpful tokens like $siteMedia, but they resolve to virtual media folders under the content tree, which breaks when you want to append subfolders (e.g. $siteMedia/Documents/*).

I recently needed to solve this problem in a multisite solution: allow editors to select media items (like PDFs) from a per-site folder in the Media Library using a field source like:

query:$siteMediaRoot/Documents/*

The Problem

Using query:$siteMedia/Documents/* in a field source results in Sitecore falling back to the entire Media Library, or showing no items. That’s because $siteMedia resolves to a virtual folder, and appending paths like /Documents doesn’t work.

I needed a token that:

  • Resolves to the actual media library root for the current SXA site (not the virtual one)
  • Supports appending subfolders like /Documents
  • Works across multiple sites with a shared component

Custom $siteMediaRoot Token

I created a custom SXA token called $siteMediaRoot by adding a processor to the resolveTokens pipeline. This token resolves to the real media folder path (e.g. /sitecore/media library/SiteA) so I can safely use subfolders. This code requires that there is a folder under Media library that has the same name as the Site. Then you just reference that to the Media item under your site.

Token Processor Code

public class ResolveSiteMediaRootToken : ResolveTokensProcessor
{
    private const string Token = "$siteMediaRoot";
    private readonly IMultisiteContext _multisiteContext;

    public ResolveMediaSiteRootToken() : this(ServiceLocator.ServiceProvider.GetService<IMultisiteContext>()) {}

    public ResolveSiteMediaRootToken(IMultisiteContext multisiteContext)
    {
        _multisiteContext = multisiteContext;
    }

    public override void Process(ResolveTokensArgs args)
    {
        if (!args.Query.Contains(Token)) return;

        var mediaRootItem = GetSiteMediaRoot(args.ContextItem);
        if (mediaRootItem == null) return;

        args.Query = ReplaceTokenWithItemPath(args.Query, Token, () => mediaRootItem, args.EscapeSpaces);
    }

    private Item GetSiteMediaRoot(Item contextItem)
    {
        var virtualRoot = _multisiteContext.GetSiteMediaItem(contextItem);
        if (virtualRoot == null) return null;

        var siteItem = _multisiteContext.GetSiteItem(contextItem);
        var siteName = siteItem?.Name;
        if (string.IsNullOrEmpty(siteName)) return virtualRoot;

        var matched = virtualRoot.GetVirtualChildren()
            .FirstOrDefault(c => c.Name.Equals(siteName, StringComparison.OrdinalIgnoreCase));

        return matched ?? virtualRoot;
    }
}

Pipeline Patch

<configuration xmlns:patch="http://www.sitecore.net/xmlconfig/">
  <sitecore>
    <pipelines>
      <resolveTokens>
        <processor type="YourNamespace.ResolveMediaSiteRootToken, YourAssembly"   patch:before="processor[@type='Sitecore.XA.Foundation.TokenResolution.Pipelines.ResolveTokens.EscapeQueryTokens, Sitecore.XA.Foundation.TokenResolution']" />
      </resolveTokens>
    </pipelines>
  </sitecore>
</configuration>

NuGet Setup

In your root packages.props (or Directory.Packages.props), add:

<Project xmlns="http://schemas.microsoft.com/developer/msbuild/2003">
  <PropertyGroup>
    <PlatformVersion>1.*</PlatformVersion>
  </PropertyGroup>
  <ItemGroup>
    <PackageReference Update="Sitecore.XmCloud.XA.Foundation.Multisite" Version="$(PlatformVersion)" />
    <PackageReference Update="Sitecore.XmCloud.XA.Foundation.TokenResolution" Version="$(PlatformVersion)" />
  </ItemGroup>
</Project>

Then in your .csproj file:

<PackageReference Include="Sitecore.XmCloud.XA.Foundation.Multisite" />
<PackageReference Include="Sitecore.XmCloud.XA.Foundation.TokenResolution" />

Final Usage

Now I can use the following in a Multilist or Treelist field source:

query:$mediaSiteRoot/Documents/*

And it dynamically resolves to:

/sitecore/media library/SiteA/Documents/*

Sitecore 10.4.1 – What Developers Should Know

Sitecore 10.4.1 is out. At first it looks like a small update, but there are several things that can impact your setup as a developer. Especially if you’re working with containers, Solr, Identity Server or Azure monitoring. Here’s a quick overview of the most important changes and a few thoughts from my own point of view.

Solr 9.8.1 is now required

This update switches to Solr 9.8.1. The older 8.11.2 version is no longer supported, so you will need to upgrade. With the new Solr version you get a big leap in Security and performance fixes from the older version. I would say that’s the most important parts. Just modernising your Solr foundation.

If you’re using Sitecore containers, you also need to use the new container deployment package that matches the new Solr version. The older container images will stop getting OS patches, so best to move forward.

Identity Server now uses .NET 8

The Identity Server in Sitecore is now version 8.0.16 and built on .NET 8. That’s a good step forward, but it does come with two changes you need to handle:

  • Encrypted SQL connections are required now.
  • You have to run a database upgrade script.

So if you’re automating your deployments or have custom Identity Server config, be ready to update both connection strings and database setup.

Azure Application Insights changes

If you’re using Application Insights for monitoring, the old Instrumentation Key is no longer supported. You have to use a connection string instead. This is a Microsoft change and Sitecore follows it now. There are updated ARM templates included if you use Azure to set it up.

Lots of resolved issues from previous version

See all resolved issues here

Sitecore 10.4.1 brings some important backend changes. For most environments, it’s worth upgrading to keep things supported and future proof, just make sure to test and read the updated install instructions carefully.

Here’s the link to the new version: https://developers.sitecore.com/downloads/Sitecore_Experience_Platform/104/Sitecore_Experience_Platform_104_Update1

Custom Roles Setup in Sitecore XM Cloud

Overview

If you have multiple sites under a Site Collection and want to manage access per site or across the entire collection, it’s best to create custom roles. This gives you flexibility, for example, some editors can be Authors for the whole Site Collection, while others only have access to a specific Site.

If you only have one site or don’t need granular access, you can use the default Site Collection roles and Site roles in Sitecore. In that case, simply run the Setup Security script on your Site Collection and then on the Site.

Recommended Role Structure

Create custom roles before running Setup Security.
Preferably create 4 roles per Site Collection and 4 per Site. Use the Sitecore domain.

Site Collection Roles:
sitecore/MySiteCollection Admin
sitecore/MySiteCollection Author
sitecore/MySiteCollection Designer
sitecore/MySiteCollection Member

Site Roles:
sitecore/MySite Admin

Create your new custom roles for a new Site by creating 4 new roles.
Create new roles in the Sitecore domain. Follow this pattern:

For the headless Site Collection, you create 4 new roles for that Site Collection aswell.

Role Membership Setup

In Role Manager, select the <Site> Author role, then click Member Of. Make it a member of:

  • sitecore\<Site> Member (itself)
  • sitecore\<SiteCollection> Member

You can add additional Sitecore roles (e.g., Sitecore Client Securing) if needed.
Read more about Sitecore roles

Running the Setup Security Script

  1. In Content Editor, right-click your Site Collection and run Scripts > Setup Security.

2. Choose sitecore as domain

3. In the dialog, link the 4 custom roles to the appropriate fields before clicking Assign.

4. Then repeat for the Site.

You can now assign users to your new Author role and they should be ready for editing your site. Don’t forget to setup Workflows to make the editor experience as expected in Page builder!

Notes

If you only have 1 site or don’t see a reason to split the roles up in any way, there are default Site Collection roles and Site roles predefined in Sitecore that you could use instead and just run the Setup Security script on your Site Collection and Site. But for granular access rights I recommend setting up site specific roles.

Discover the Latest Updates in Sitecore XM Cloud

The latest release of Sitecore XM Cloud introduces several exciting new features designed to enhance content management and optimization. Here’s a summary of the key updates:

Content authoring improvements

1. Direct Editing: You can now edit all written content on your page directly within the Page Builder. This includes content fields associated with the page itself, such as metadata, which can be edited in the Page Content pane. Maybe you have a Multilist Tag template on your page, then you can do those things from Page Editor now, which is great!


2. Component Editing: Edit content item fields included in a component by selecting the component and using the Content tab in the right-hand panel. Before we only had the Design tab. Useful for changing component data fields without going to Content Editor if it’s fields that aren’t visible or supported.

Enhanced Field Editing: The Page Builder now supports editing various field types, including File, Droplist, Droplink, Droptree, Taglist, Checklist, Multilist, Treelist, Multiroot Treelist, and Checkbox. General link fields also support email links. This has been a long requested feature as we want to move editors away from Content Editor and just use Page Editor as much as possible.

Automatic Saving: All content edits are automatically saved and immediately displayed. Undo and Redo buttons are available for as long as you remain on the edited page.

Sitecore Stream Integrations

This new Sitecore product surely deserves its own blog post. Sitecore’s new AI product is designed for marketers to boost productivity and assist with on-brand campaign ideas.

In XM Cloud, with a Sitecore Stream subscription, marketers can set up brand kits. These kits allow them to define rules for the AI, including

  • Logo
  • Visual Guidelines
  • Global Goals
  • Brand Context
  • Dos and Don’ts
  • Tone of Voice
  • Checklist
  • Grammar Guidelines
  • Image Style

These rules then enable the AI to help editors ensure that new content adheres to the brand guidelines. For example, the AI can generate a text prompt using the defined rules, creating a draft that editors can accept, regenerate, or modify.

https://doc.sitecore.com/xmc/en/users/xm-cloud/sitecore-stream-in-xm-cloud.html

You can use Sitecore Stream to help with A/b testing and personalize pages for visitors in XM Cloud.

To enable Sitecore Stream with Rich Text Editor(RTE) in Page Editor you need to upgrade to the new RTE.
https://developers.sitecore.com/changelog/xm-cloud/13112024/the-legacy-rich-text-editor-in-pages-will-be-deprecated-on-may-8th%2c-2025

Receiving the Sitecore MVP Award 2025

I’m incredibly honored to receive the Sitecore Technology MVP Award for 2025! This is my second time receiving this recognition, yet it feels just as exciting and rewarding as the first.

Over the past year, I’ve had the privilege of meeting many amazing people in the Sitecore community and giving back through the mentorship program, an experience that has been truly fulfilling.

2024 was also a year of deepening my involvement with Sitecore’s evolving product ecosystem, particularly OrderCloud, Search, and XM Cloud. Exploring these innovations has given me valuable insights into how Sitecore continues to lead the way in composable digital experiences.

A huge thank you to the Sitecore MVP team for this recognition and for all the hard work you do to support the community.

Looking forward to another great year of learning, collaboration, and connecting with you all! 😊