Custom database, custom index and ContentSearch

Lets go over how we can setup a custom database with a custom index then query it with Sitecore ContentSearch. You could also skip step 1 if you’re getting your data from somewhere else that’s not stored in Sitecore as items.

1. Create database

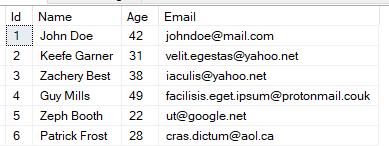
If you’re using SQL open Sql Server Management Studio and add a new database. In this case I’ll create it next to my Sitecore databases. Setup the tables how you want them. For demonstration purpose I’ll just setup a basic customer table. Here’s an image for reference to the code later on.

2. Create Solr core

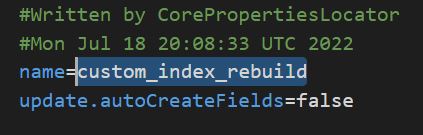
At your Solr installation folder, go to <pathToSolr>\server\solr\ and duplicate the core directory for sitecore_master_index and rename to desired indexname, for instance:

  • companyName_custom_index

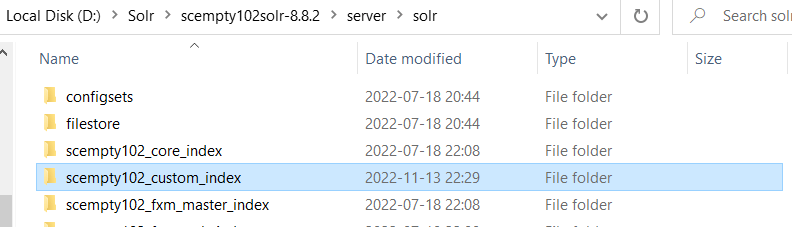
Go into the newly created folder and delete everything except the conf folder.

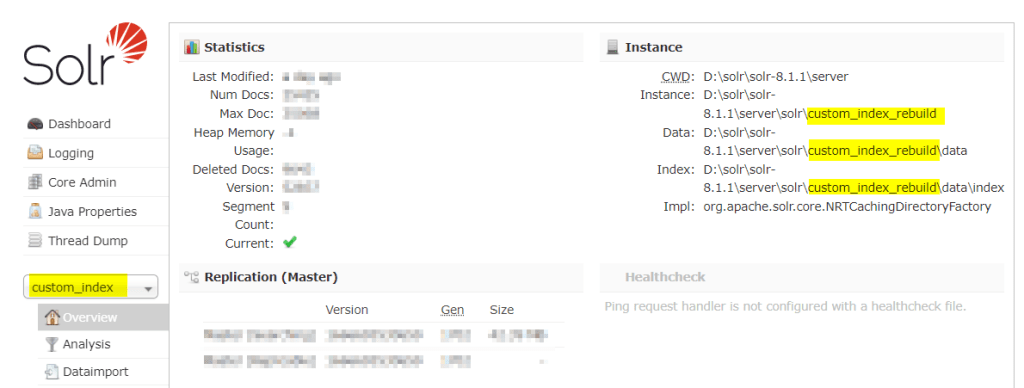
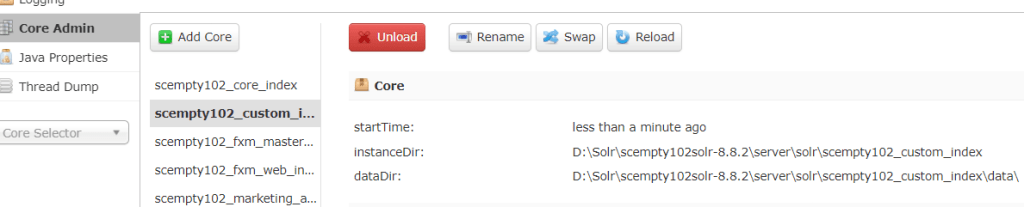
Next open up your Solr admin and add a new core by putting in your new foldername in previous step. Should look something like this.

3. Create Custom Index configuration

Now we need to create the index configuration for the core to connect with your Sitecore instance.

  1. Create a new .config file in your solution and add this sample configuration
<configuration xmlns:patch="http://www.sitecore.net/xmlconfig/" xmlns:role="http://www.sitecore.net/xmlconfig/role/" xmlns:search="http://www.sitecore.net/xmlconfig/search/">
    <sitecore>
        <contentSearch search:require="solr">
         <configuration type="Sitecore.ContentSearch.ContentSearchConfiguration, Sitecore.ContentSearch">
                <indexes hint="list:AddIndex">
                    <index id="scempty102_custom_index" type="Sitecore.ContentSearch.SolrProvider.SolrSearchIndex, Sitecore.ContentSearch.SolrProvider">
                        <param desc="name">$(id)</param>
                        <param desc="core">$(id)</param>
                        <param desc="propertyStore" ref="contentSearch/indexConfigurations/databasePropertyStore" param1="$(id)" />
                        <configuration ref="contentSearch/indexConfigurations/defaultSolrIndexConfiguration">
                        </configuration>
                        <locations hint="list:AddCrawler">
                            <crawler type="MyProject.Foundation.Indexing.Crawlers.MyCrawler, MyProject.Foundation.Indexing">
                            </crawler>
                        </locations>
                    </index>
                </indexes>
            </configuration>
        </contentSearch>
    </sitecore>
</configuration>

Create your Indexable class

namespace MyProject.Foundation.Indexing.Indexable
{
  public class IndexableCustomerField : IIndexableDataField
  {
    private readonly Customer _customer;
    private readonly PropertyInfo _propertyInfo;

    public IndexableCustomerField(Customer customer, PropertyInfo fieldInfo)
    {
      _customer = customer;
      _propertyInfo = fieldInfo;
    }

    public string Name
    {
      get { return _propertyInfo.Name; }
    }

    public string TypeKey => string.Empty;
    public Type FieldType => _propertyInfo.PropertyType;
    public object Value => _propertyInfo.GetValue(_customer);
    public object Id => _propertyInfo.Name.ToLower();
  }

  public class Customer
  {
    public int Id { get; set; }
    public string Name { get; set; }
    public int Age { get; set; }
    public string Email { get; set; }
  }

  //indexable class
  public class IndexableCustomer : IIndexable
  {
    private Customer _customer;

    public IndexableCustomer(Customer customer)
    {
      _customer = customer;
    }

    public void LoadAllFields()
    {
      Fields = _customer.GetType()
        .GetProperties(BindingFlags.Public
                       | BindingFlags.Instance
                       | BindingFlags.IgnoreCase)
        .Select(fi => new IndexableCustomerField(_customer, fi));
    }

    public IIndexableDataField GetFieldById(object fieldId)
    {
      return Fields.FirstOrDefault(x => x.Id.Equals(fieldId));
    }

    public IIndexableDataField GetFieldByName(string fieldName)
    {
      return Fields.FirstOrDefault(x => x.Name.Equals(fieldName));
    }

    public IIndexableId Id => new IndexableId<string>(_customer.Id.ToString());
    public IIndexableUniqueId UniqueId => new IndexableUniqueId<IIndexableId>(Id);
    public string DataSource => "Customer";
    public string AbsolutePath => "";
    public CultureInfo Culture => CultureInfo.CurrentCulture;
    public IEnumerable<IIndexableDataField> Fields { get; private set; }
  }

}

Create your Crawler class

This is just an example using a simple data provider with System.Data.SqlClient. Use whatever method you prefer. You could use an external API and index that data if it’s a viable way for your solution. That is up to you to figure out.

namespace MyProject.Foundation.Indexing.Crawlers
{
  public class MyCrawler: FlatDataCrawler<IndexableCustomer>
  {
    protected override IndexableCustomer GetIndexableAndCheckDeletes(IIndexableUniqueId indexableUniqueId)
    {
      return null;
    }

    protected override IndexableCustomer GetIndexable(IIndexableUniqueId indexableUniqueId)
    {
      return null;
    }

    protected override bool IndexUpdateNeedDelete(IndexableCustomer indexable)
    {
      return false;
    }

    protected override IEnumerable<IIndexableUniqueId> GetIndexablesToUpdateOnDelete(
      IIndexableUniqueId indexableUniqueId)
    {
      return null;
    }

    //If you get data from external api you could also save it to disk 
    //in a json file then return that list instead depending on the size.
    protected override IEnumerable<IndexableCustomer> GetItemsToIndex()
    {
      var customersToIndex = new List<IndexableCustomer>();

      string connectionString = "Data Source=(local);Initial Catalog=custom_Customer;User ID=<id>;Password=<password>";
      
       //Here i'm just using a simple Sql connection to showcase with some data. 
      //You would not really do this in a real case.
      using (SqlConnection connection = new SqlConnection(connectionString))
      {
        connection.Open();

        SqlCommand command = connection.CreateCommand();
        command.CommandText = "SELECT * FROM Customer_table";
        command.CommandTimeout = 15;
        command.CommandType = CommandType.Text;

        using (SqlDataReader reader = command.ExecuteReader())
        {
          while (reader.Read())
          {
            var customer = new Customer();

            customer.Id = reader.GetInt32(reader.GetOrdinal("Id"));
            customer.Name = reader.GetString(reader.GetOrdinal("Name"));
            customer.Age = reader.GetInt32(reader.GetOrdinal("Age"));
            customer.Email = reader.GetString(reader.GetOrdinal("Email"));

            customersToIndex.Add(new IndexableCustomer(customer));
          }
        }
        connection.Close();
      }
      return customersToIndex;
    }
  }
}

However you wish to execute this code is up to you. You could setup a schedule task that runs the code and add your data to the index. You’ll find your way and with real data you’ll probably have a more complex code.

4. Query Custom index

To query the custom index you need to extend the SearchResultItem with your own properties, for example

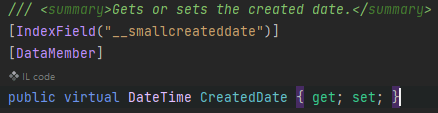
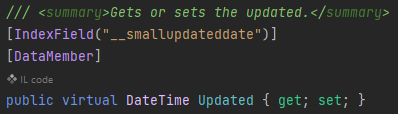
public class ExtendedSearchResultItem : SearchResultItem
  {
    [IndexField("name")]
    public string CustomerName { get; set; }
    [IndexField("age")]
    public int CustomerAge { get; set; }
    [IndexField("email")]
    public string CustomerEmail { get; set; }
  }

Then you just search against the index by creating a searchcontext that match your search result type.

public class SearchClass
  {
    public IEnumerable<ExtendedSearchResultItem> Search()
    {
      var searchContext = ContentSearchManager.GetIndex("scempty102_custom_index").CreateSearchContext();
      IQueryable<ExtendedSearchResultItem> queryable = searchContext.GetQueryable<ExtendedSearchResultItem>();

      queryable.Where(x => x.CustomerAge > 30); //insert your own predicate here.
      var searchResults = queryable.GetResults();
      return searchResults.Hits.Select(i => i.Document);
    }
  }

Publish-dates in Sitecore without itemextensions

I’ve read everywhere that you cannot get “first publish” and “last publish-date” from Sitecore out of the box and must write an extension for this. While true, I also believe you can use something else. Let me explain.

In my case I wanted to get “last publish-date” on an Article pagetype.
This page is indexed to the Sitecore_web_index when published.
And when being indexed Sitecore.ContentSearch sets __smallupdateddate field.

We can get this field in code from the ContentSearch API from the web_index and, voilà, we have the “last publish-date“.

In Sitecore.ContentSearch.SearchTypes.SearchResultItem we have the two properties

After your search just get the Updated property from your searchResult

result.Updated.ToString("yyyy-MM-dd", CultureInfo.CurrentCulture);

//output example
//2022-11-03


If an item is created and has not been published, it only exists in the master database.
You then edit the page and it might go through some iterations within your organization before approved workflow then publish.
It has now gone +4 days since you created it in master db.
Now if you publish the page/item it will now get a CreatedDate field in the Web database with the date at the publish.
This field will never change. So there you have your “first publish-date“.


This might not catch all scenarios but at least some. Hopefully you get use of it.

Solr Index issue – empty index periodically

If you have a working index and search result and you find that it starts to get empty all of the sudden on what seems to be an interval, Sitecore is probably rebuilding the entire index for you based on a job agent.

There is a default Threshold of 100k that tells Sitecore to trigger an index rebuild after publish:end event if you’re using that type of index strategy and if you’re using <CheckForThreshold>true<CheckForThreshold>.

When an index is being rebuilt, the index is empty during the rebuild. This will cause downtime on your search and is obviously not great user experience.

This is where you should use SwitchOnRebuildIndex (Sitecore docs here). It is a recommended practice to use SwitchOnRebuildIndex when CheckForThreshold is set to true. Go to <site>/sitecore/admin/showconfig.aspx to see what you’re using if you don’t know.
It’s located under

This can become an issue if you for instance have buckets with lots of items to index. So make sure that you switch to SwitchOnRebuildIndex on your index configuration.

Create rebuild core

You need to have a rebuild core for the index you want to use SwitchOnRebuildIndex on.

  1. Stop your Solr Service in Services or Task Manager -> service tab
  2. Go to <Solr_Folder>/solr-8.8.2/server/solr and create a copy of your desired indexfolder and and add _rebuild at the end like this.

  3. Go into the newly created copy folder and open core.properties file. Here you change the name of the core to match the folder name with _rebuild at the end.

  4. Now create a patch file for your index where you change the type and add the attribute for the new core
<configuration xmlns:patch="http://www.sitecore.net/xmlconfig/">
  <sitecore>
    <contentSearch>
      <configuration type="Sitecore.ContentSearch.ContentSearchConfiguration, Sitecore.ContentSearch">
        <indexes hint="list:AddIndex">
            <index id="custom_index" type="Sitecore.ContentSearch.SolrProvider.SolrSearchIndex, Sitecore.ContentSearch.SolrProvider">
                <patch:attribute name="type">Sitecore.ContentSearch.SolrProvider.SwitchOnRebuildSolrSearchIndex, Sitecore.ContentSearch.SolrProvider</patch:attribute>
                <param desc="core">custom_index</param>
                <param patch:after="*[@desc='core']" desc="rebuildcore">custom_index_rebuild</param>
            </index>
        </indexes>
      </configuration>
    </contentSearch>
  </sitecore>
</configuration>

Done

Start up your Solr service and open Sitecore.
Now your index should switch cores when being rebuilt. The core swap will happen automatically. You can verify this in your Solr instance admin UI and see that your index “custom_index” might now be located in the “custom_index_rebuild” folder. They will switch back and forth automatically and this is expected behavior.

Sitecore Scheduled Tasks – Database Agent

I just want to briefly explain how the database agent work because I’ve noticed a lot of confusion about it and why it behaves like it does.

– “Why aren’t my tasks running!?”
– “Is there something wrong with my interval?”

These are just some of many questions that might pop up as a new developer or if it’s a new feature for you to work on with Sitecore.

What is Scheduled Tasks?

It’s first and foremost a tool in Sitecore where you can run code within an interval.
Sitecore has an internal Database agent that runs on an interval based on your configuration. Default is 10 minutes.

So every 10 minutes Sitecore goes over all it’s schedule task items and checks the interval to see if it’s due to run or not.
Note: After an app pool recycle all tasks will run the first time your database agent runs if it’s a valid schedule that has correct From-date, To-date and days to run. i.e. 20200101|20990101|127|01:00:00.

You can always trigger Schedule tasks manually. For instance you can use Sitecore Powershell Extension to do this.
But for some reason, maybe extending the scheduler with custom code, you want to see how it behaves when run automatically through the database agent.

Master Database Agent

Master_Database_Agent is defined in the Sitecore.Processing.config. The interval can be patched to change the interval if you want in a patchconfig.

<configuration xmlns:patch="http://www.sitecore.net/xmlconfig/">
  <sitecore>
      <scheduling>
          <agent name="Master_Database_Agent" type="Sitecore.Tasks.DatabaseAgent">
              <patch:attribute name="interval">00:05:00</patch:attribute>
          </agent>
      </scheduling>
  </sitecore>
</configuration>

Tasks interval

Did you know that “Schedule” on a schedule item also is a link to an old Sitecore doc page explaining how to setup tasks? Link here

You can press the “Schedule” label to reach the url

This clearly explains how to setup intervals for running on specific days, From-dates, To-dates etc.
Always a helpful tool when working with schedule tasks.

Sitecore custom personalization rule

In this case i’m going to use personalization to check whether a visitor has logged in through our custom login portal or not. Based on this I want to show different datasources for let’s say our Hero banner. Check my previous post how to use rules and select datasources here.

1. Create custom rule

Step 1 – First we create a new Tag under “/sitecore/system/Settings/Rules/Definitions/Tags”

Step 2 – Then go and create a new Element under “/sitecore/system/Settings/Rules/Definitions/Elements/”

Step 3 – Insert new “Condition” under your Element. In my case I don’t want any other conditions than a bool check so i’ll just write the text like below.

  • Text = text displayed in the Edit Rule Box in Experience editor. This support complex conditions like
    "where the http request [ParameterName,,,name] parameter [OperatorId, StringOperator,,compares to] [Value,,,specific value]" Useful blogpost by pushpaganan explains more
  • Type = Your namespace and assembly to your custom code.

Step 4 – Now select the “Default” tag under “Tags” and select your custom tag

Step 5 – Lastly we need to add this tag to a conditional rendering at “/sitecore/system/Settings/Rules/Conditional Renderings/Tags/Default”


2. Create custom rule code

For a simple check in bool I setup following code which checks if the visitor is logged in and returns true or false. You’ll have to set your own code to verify if logged in depending on how your team is doing this.

public class CheckUserLoggedInRule<T> : WhenCondition<T> where T : RuleContext
{
    protected override bool Execute(T ruleContext)
    {
      Assert.ArgumentNotNull(ruleContext, "ruleContext");
      if(<your bool check if logged in>)
        return true;

      return false;
    }
}

3. Add the newly created rule on a component

Finally we can add the personalization rule in Experience Editor on our component. Press the + then add your new rule as a condition. Then select a different datasource and your ready to go.


You can preview what it will look like when switching between the new rule and the default in Experience Editor.

Installing Sitecore publishing service 6.0

I’m going to show you how to install Sitecore Publishing Service version 6.0 as the .NET Core runtime option.

1. Download all the essential packages & prerequisites.

  1. Start by downloading the package “Publishing Service .NET Core host” here.
  2. Download and install ASP.NET Core Runtime 3.1.17 Hosting bundle here. Make sure it’s the hosting bundle (see pic below)
Download hosting bundle

2. Install Publishing Service

  1. Extract the content of the package you downloaded in step 1 “Publishing Service .NET Core host” to desired location on disk. Preferably name it according to the site you will use it on.
  2. Copy in licensefile. In the root of your extracted folder create a new folder named “sitecoreruntime” and place your licensefile in it.
  3. Copy .dat files (If on Sitecore 10.1 and higher do this step. Otherwise skip to next step)

    – Create empty folders in publishing service root “<root>\items” and “<root>\items\sitecore“.
    – Go to your Sitecore CM Website and open the items folder (<website>\App_Data\items) and copy the master and web folders.
    – Paste the folders at <root>\items\sitecore.
  4. Create IIS website for Publishing service.

    – Add new website in IIS with same hostname as your publishing service root name.

  5. Setup app pool
    – set .NET CLR Version = Select No Managed Code
    – set Idle Time-out (minutes) = 0

3. Configure connectionstrings

  1. Open your command prompt and go to your publishing service root and set the core, master and web connectionstrings with the following command.
    You should run this 3 times, one for each database (replace the <database> with core, master & web).
    Replace *** to match your database connection and a User ID that has WRITE access.
    • .\Sitecore.Framework.Publishing.Host configuration setconnectionstring <database> Data Source=***;Initial Catalog=***;Integrated Security=False;User ID=***;Password=***;MultipleActiveResultSets=True;ConnectRetryCount=15;ConnectRetryInterval=1
  2. This creates a file under <root>\sitecoreruntime\Production\config named sc.publishing.xml.
    You can look inside it to confirm your connectionstrings for each database.

4. Upgrade database schema

Now it’s time to upgrade the database schema with the connectionstrings from step 3. As I wrote, you need write access on the user you put in the User ID. In command prompt go to your root of the publishing service. Execute following

.\Sitecore.Framework.Publishing.Host.exe schema upgrade --force

5. Check status

Go to your publishing service website in a browser http://<publishingservice&gt;/api/publishing/operations/status
If you see {“status”: 0 } you publishing service is up and running correctly.

6. Install the module

Download the module that match your Sitecore version here then install it in Sitecore with the installation wizard. https://dev.sitecore.net/Downloads/Sitecore_Publishing_Service_Module.aspx

7. Add sitecore setting in config file

Last step is to add the following setting in an appropriate config or create a new one.

<configuration xmlns:patch="http://www.sitecore.net/xmlconfig/"&gt;
	<sitecore>
		<settings>
            <!-- The HTTP endpoint for the service -->
            <setting name="PublishingService.UrlRoot" value="http://{Your Publishing Service Website URL Here}"></setting>
		</settings>
	</sitecore>
</configuration>

8. Done

Enter Sitecore and see the new interface and confirm that the publish works.

You can still patch the Sitecore.Task.PublishAgent agent to make publishing service run automatically in an interval. Check more here on scheduling https://joaoneto.blog/publishing-service-scheduled-publishing/

Thanks for reading and hope this help your installation proccess!

Resources

I had almost finished writing this post when I saw this similar and great post by Vivek. There is also a troubleshoot section at the bottom. Please check it out https://learnwithmemes.wordpress.com/2022/09/02/sitecore-publishing-service-feature-installation-guide/

Also another great post by Vincent explaining more about Publishing Service https://vincent-lui.medium.com/sitecore-publishing-service-the-good-the-bad-and-the-ugly-74a9c17c9e16

Get Sitecore environment in code

settings cogwheels

I wanted a rendering to spit out different HTML based on environment and I wanted to share one way to do this by using environment transformation configs and sitecore settings.

<configuration xmlns:xdt="http://schemas.microsoft.com/XML-Document-Transform">
   <sitecore>
        <settings>
            <setting name="Environment" value="Dev" 
    xdt:Transform="Replace" xdt:Locator="Match(name)" />
        </settings>
    </sitecore>
</configuration>

Here I would have a config for each environment with a different value for example:

  • EnvironmentSetting.Dev.config
  • EnvironmentSetting.Test.config
  • EnvironmentSetting.Production.config

Now I can get the environment value from this config in code and use it as a condition in an IF statement or Switch Case or whatever you prefer in my code like this:

var environment = Sitecore.Configuration.Settings.GetSetting("Environment", "");

if(environment == "Dev")...

switch(environment)
{ 
  case "Dev":
    <something>
    break;
   ... 

Let me know in the comments how you would use this functionality. Happy coding!

How to personalize content in Sitecore 9.3

I want to make a short post with the easy peasy version how to setup personalization in Sitecore 9.3. I will post links and resources at the bottom of the post for those who want to read the in depth guides and posts out there how it all works.
I will return with a second part for personalization with more advanced custom rules.

1.

Go to where you want to personalize in Experience Editor and press the personalization button

2.

Press the Add button to add a personalization rule.

There are a lot of predefined rules you can use, you can also set up custom rules and conditions (check for part 2).

Now you’ll get your new rule and you can edit the conditions by pressing “Edit rule”.

In this case I’ll set a condition that if it’s a certain month I want to show another text. So lets do that by selecting it in the list and then pressing the yellow text “month” to set what the value should be.

3.

Now we set what content should be shown instead by selecting another datasource for the same rendering by press “…”. Create one if you haven’t already and then select it. You can choose whether it will Show or Hide depending on the condition.

4.

Now you can select between the new condition and the default to see what the difference will be. In this simple case I’ve just set a new text value. If the condition of my first rule is met that specified content will show.

Default content:

Personalized content:

Resources:

Custom personalization: https://pushpaganan.home.blog/2020/01/06/sitecore-personalization-using-custom-personalization-rule/

https://ankitjoshi2409.wordpress.com/tag/personalization/

Sitecore & Solr “connection lost”

Search was not working and when I went to the Solr admin page it said “Connection lost”. The exact reason for why this happened in the first place i’m still investigating. But to fix the error first was to reset the Solr instance and recycle the App pool of the site.
You can do this by command line or from services window and locate your Solr service, right click -> restart.

Select the service and right-click -> restart

After this I confirmed my Solr was spinning correctly by visiting the admin page again, but it still didn’t work. I looked up the indexing manager in Sitecore configuration from the dashboard. This showed empty. No indexes.

Still confused, I found this post on StackExchange with the below answer:

  • Make sure your Sitecore configured properly for SOLR within \App_Config\Sitecore\ContentSearch
  • Check your connectionstrings for SOLR is configured properly or not
  • Access SOLR admin (with browser, make sure it’s https) to check whether it’s on or not
  • If it’s on, check again if your configured index matches with SOLR Core Admin
  • If everything’s ok, can try to recycle app pool for your site and wait a few minutes Check again from the control panel

The last point worked for me, I recycled the app pool and things started working properly again.

Hopefully this helps if you get similar problems.

Using influxDB with Sitecore Part 2

This is a continuation of Part 1 where I go over how to setup influxdb to monitor Solr. If you haven’t read it and are looking for installation guides for influx, check out part 1 here

In this PART 2 I want to setup some basic statistics for when visitors hit a 404 or a 500 page and showcase the influxDB C# client. We’ll see how we can present the data in InfluxDB at the end. To try and cut down this post a bit I’ll make some assumptions: That you can setup your own pipelines and processors to start the execution of your code at the correct place.

The influxDB C# client only supports .NET Core so you can setup a separate API service that your Sitecore application can use to Write and Get the data.

  1. I’ll show how we can write data to influxDB through code.
  2. We’ll look at getting data from influxDB through code.


1. Write data to InfluxDB

Here we can write some data to our influxDB bucket by code, keeping it simple:

using InfluxDB.Client;
using InfluxDB.Client.Api.Domain;
using InfluxDB.Client.Core;

...

const string token = "<TOKEN>";
const string bucket = "errorbucket";
const string org = "myOrg";

var client = InfluxDBClientFactory.Create("http://localhost:8086", token);

var 500error = new ErrorPage { Type = "500", Hit = 1, Time = DateTime.UtcNow };
var 404error = new ErrorPage { Type = "404", Hit = 1, Time = DateTime.UtcNow };

using (var writeApi = client.GetWriteApi())
{
   if(errorCause == 500)
      writeApi.WriteMeasurement(500error, WritePrecision.Ns, bucket, org);
    
   if(errorCause == 404)
      writeApi.WriteMeasurement(404error, WritePrecision.Ns, bucket, org);
}

[Measurement("error_page")]
public class ErrorPage
{
    [Column("type", IsTag = true)] public string Type { get; set; }
    [Column("hit")] public int? Hit { get; set; }
    [Column(IsTimestamp = true)] public DateTime Time { get; set; }
}

Now we got some data in InfluxDB that we can show in a dashboard ( see Part 1 on how to setup dashboard)

Sample data

2. Get – Query data

A simple method to get the hit count for 404 pages. This will simply return 31 if we go by the data from above. Change the “type” to 500 to get the count for that one etc.

public async Task<int> Get404Hits()
{
    var fluxQuery = "from(bucket: \"errorbucket\") " +
                    "|> range(start: -1d)" +
                    "|> filter(fn: (r) => r[\"_measurement\"] == \"error_page\")" +
                    "|> filter(fn: (r) => r[\"_field\"] == \"hit\")" +
                    "|> filter(fn: (r) => r[\"type\"] == \"404\")" +
                    "|> cumulativeSum(columns: [\"_value\"])";

    var result = await client.GetQueryApi().QueryAsync<int>(fluxQuery, org);

    return result.Count;
}

Now you can write and query data in C# with InfluxDB.
You can for example create your own graph to present inside Sitecore or use the dashboard in InfluxDB.

Thanks for reading and hope you get some usage with InfluxDB. I’m still learning and I see a lot of fun stuff ahead with this tool.