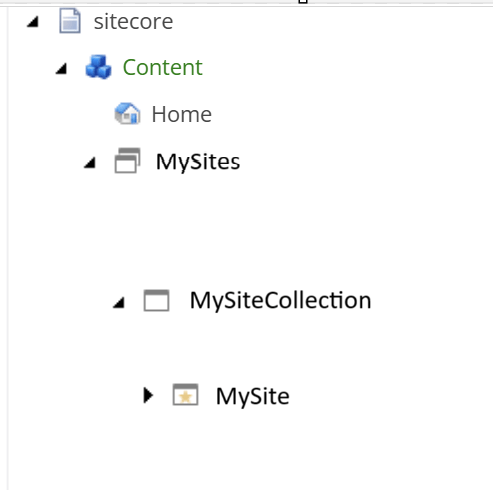
If you have multiple sites under a Site Collection and want to manage access per site or across the entire collection, it’s best to create custom roles. This gives you flexibility, for example, some editors can be Authors for the whole Site Collection, while others only have access to a specific Site.
If you only have one site or don’t need granular access, you can use the default Site Collection roles and Site roles in Sitecore. In that case, simply run the Setup Security script on your Site Collection and then on the Site.
Recommended Role Structure
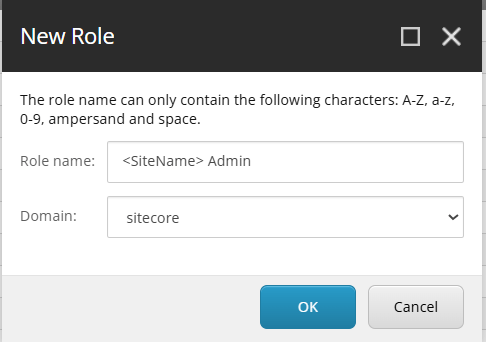
Create custom roles before running Setup Security. Preferably create 4 roles per Site Collection and 4 per Site. Use the Sitecore domain.
Site Collection Roles:
sitecore/MySiteCollection Admin
sitecore/MySiteCollection Author
sitecore/MySiteCollection Designer
sitecore/MySiteCollection Member

Site Roles:
sitecore/MySite Admin
sitecore/MySite Admin
sitecore/MySite Admin
sitecore/MySite Admin
Create your new custom roles for a new Site by creating 4 new roles. Create new roles in the Sitecore domain. Follow this pattern:
For the headless Site Collection, you create 4 new roles for that Site Collection aswell.
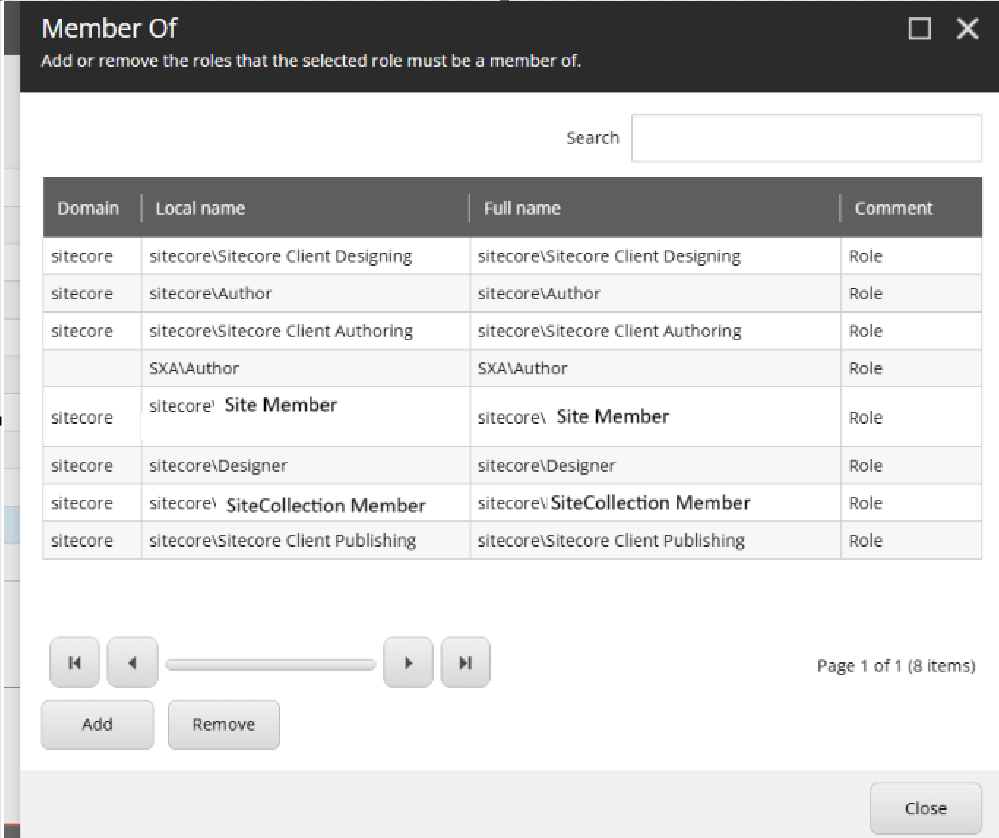
Role Membership Setup
In Role Manager, select the <Site> Author role, then click Member Of. Make it a member of:
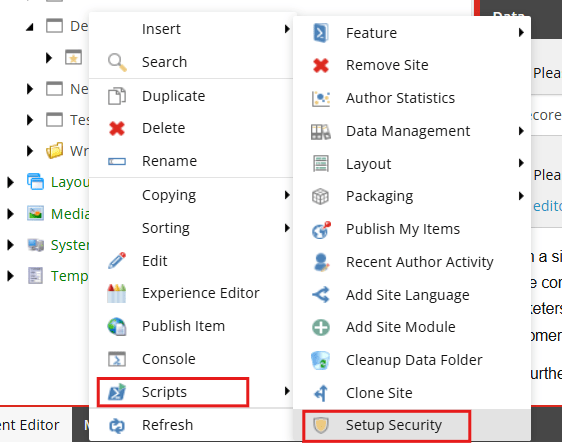
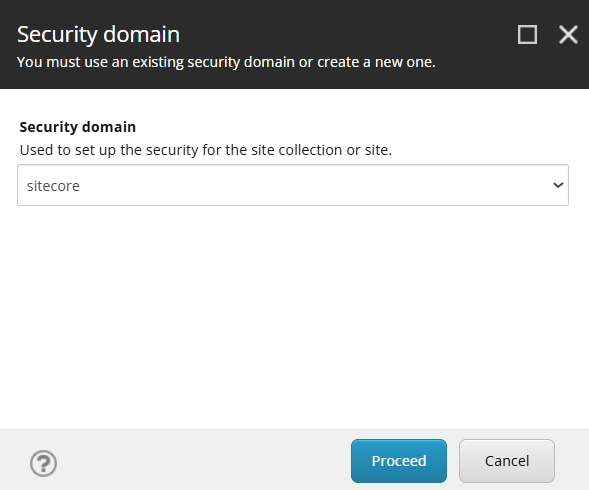
In Content Editor, right-click your Site Collection and run Scripts > Setup Security.
2. Choose sitecore as domain
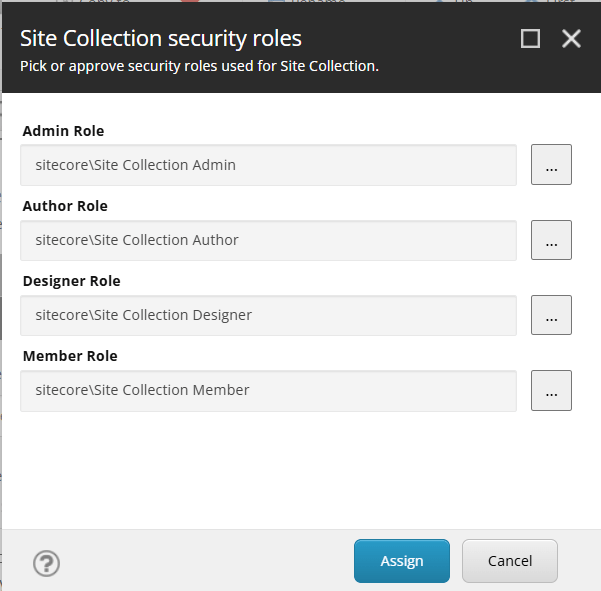
3. In the dialog, link the 4 custom roles to the appropriate fields before clicking Assign.
4. Then repeat for the Site.
You can now assign users to your new Author role and they should be ready for editing your site. Don’t forget to setup Workflows to make the editor experience as expected in Page builder!
Notes
If you only have 1 site or don’t see a reason to split the roles up in any way, there are default Site Collection roles and Site roles predefined in Sitecore that you could use instead and just run the Setup Security script on your Site Collection and Site. But for granular access rights I recommend setting up site specific roles.
The latest release of Sitecore XM Cloud introduces several exciting new features designed to enhance content management and optimization. Here’s a summary of the key updates:
Content authoring improvements
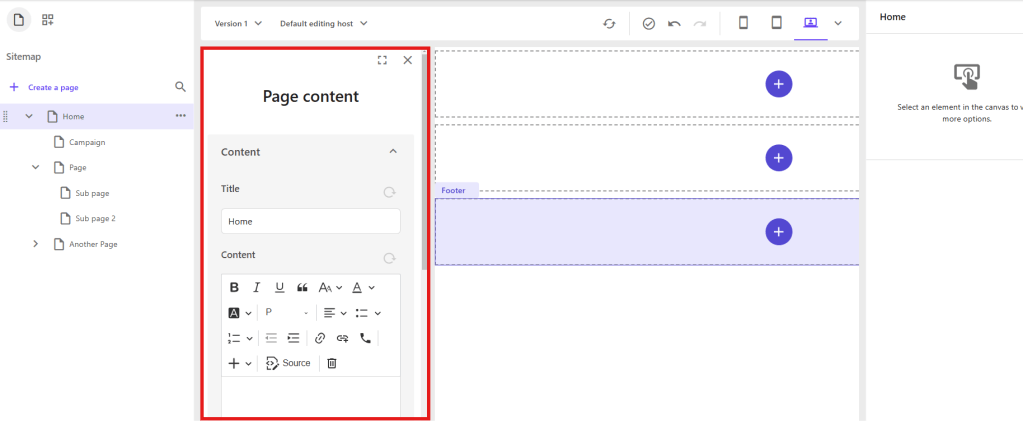
1. Direct Editing: You can now edit all written content on your page directly within the Page Builder. This includes content fields associated with the page itself, such as metadata, which can be edited in the Page Content pane. Maybe you have a Multilist Tag template on your page, then you can do those things from Page Editor now, which is great!
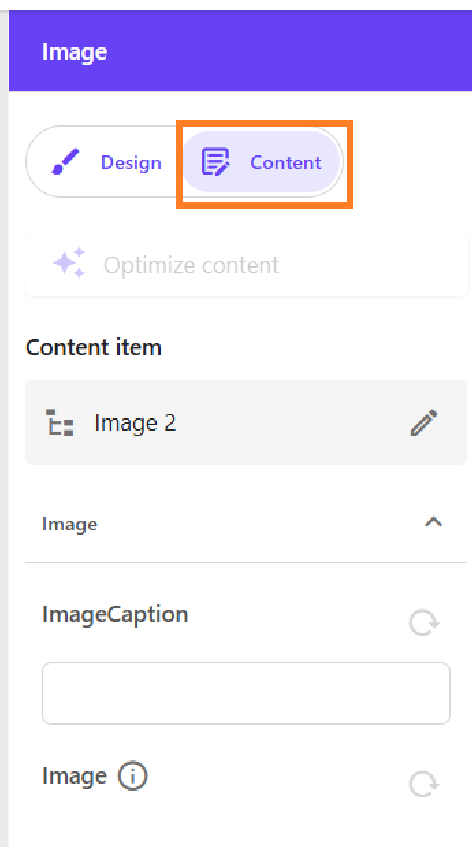
2. Component Editing: Edit content item fields included in a component by selecting the component and using the Content tab in the right-hand panel. Before we only had the Design tab. Useful for changing component data fields without going to Content Editor if it’s fields that aren’t visible or supported.
Enhanced Field Editing: The Page Builder now supports editing various field types, including File, Droplist, Droplink, Droptree, Taglist, Checklist, Multilist, Treelist, Multiroot Treelist, and Checkbox. General link fields also support email links. This has been a long requested feature as we want to move editors away from Content Editor and just use Page Editor as much as possible.
Automatic Saving: All content edits are automatically saved and immediately displayed. Undo and Redo buttons are available for as long as you remain on the edited page.
Sitecore Stream Integrations
This new Sitecore product surely deserves its own blog post. Sitecore’s new AI product is designed for marketers to boost productivity and assist with on-brand campaign ideas.
In XM Cloud, with a Sitecore Stream subscription, marketers can set up brand kits. These kits allow them to define rules for the AI, including
Logo
Visual Guidelines
Global Goals
Brand Context
Dos and Don’ts
Tone of Voice
Checklist
Grammar Guidelines
Image Style
These rules then enable the AI to help editors ensure that new content adheres to the brand guidelines. For example, the AI can generate a text prompt using the defined rules, creating a draft that editors can accept, regenerate, or modify.
I’m incredibly honored to receive the Sitecore Technology MVP Award for 2025! This is my second time receiving this recognition, yet it feels just as exciting and rewarding as the first.
Over the past year, I’ve had the privilege of meeting many amazing people in the Sitecore community and giving back through the mentorship program, an experience that has been truly fulfilling.
2024 was also a year of deepening my involvement with Sitecore’s evolving product ecosystem, particularly OrderCloud, Search, and XM Cloud. Exploring these innovations has given me valuable insights into how Sitecore continues to lead the way in composable digital experiences.
A huge thank you to the Sitecore MVP team for this recognition and for all the hard work you do to support the community.
Looking forward to another great year of learning, collaboration, and connecting with you all! 😊
We’re running a vercel site with Sitecore 10.3 and JSS. I was getting errors about CORS origin like this:
Access to XMLHttpRequest at ‘https://{host}/sitecore/api/jss/track/event?sc_apikey={key}’ from origin ‘https://{host}’ has been blocked by CORS policy: Response to preflight request doesn’t pass access control check: It does not have HTTP ok status
Finally I found that the error was thrown because Sitecore.JSS.TrackerServiceEnabled is disabled by default. By setting it to true with a patch config the error disappeared.
Webhooks are user-defined HTTP callbacks that enable real-time communication and interaction between OrderCloud and external systems or services. They help automate processes, validate and synchronize data, enhancing the efficiency and responsiveness of e-commerce operations.
There are two types of webhooks in OrderCloud. Pre-hook and Post-hook.
Pre-hook will happen before OrderCloud execute the endpoint given and Post-hook will execute after the given endpoint. Webhooks in Ordercloud only works with write API endpoints (POST, PUT, PATCH, DELETE).
Webhooks in Sitecore OrderCloud can be used for many different purposes like:
Inventory management: Webhooks can be used to automatically adjust inventory levels in external systems when an order is placed or updated. This ensures accurate inventory tracking and helps prevent stock discrepancies.
Validation: Pre-hook webhooks can be used to validate incoming requests, such as payment information or customer details, before processing an order. You can also use it to validate shipping addresses using external address validation services or other checkout information before an order is created.
Data synchronization and third-party integrations: If you need to update or send data to your CRM, ERP or other platforms you can also use webhooks to send that data.
Automation: Webhooks can be used to automate various e-commerce processes, such as generating invoices, updating shipping statuses, or sending marketing emails based on user behavior.
Webhooks in Sitecore OrderCloud play a crucial role in making your e-commerce solution a success by improving the efficiency and experience.
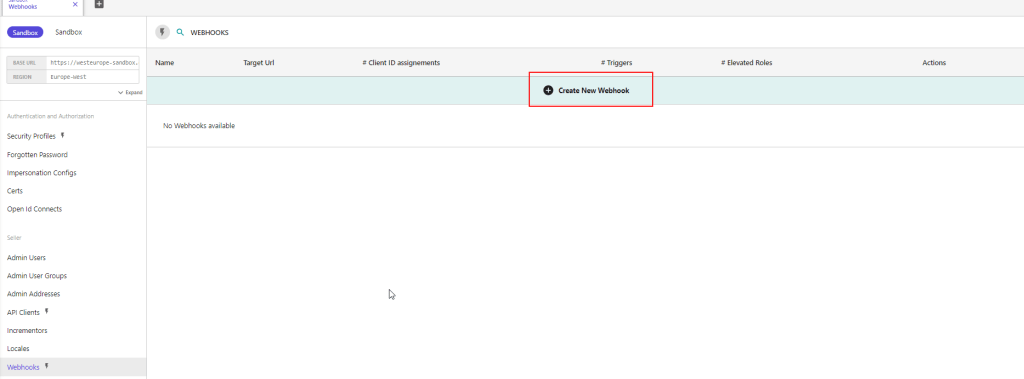
But let’s take a look anyway. Go into portal.ordercloud.io, API console and select your marketplace.
Go to Webhooks and create a new Webhook
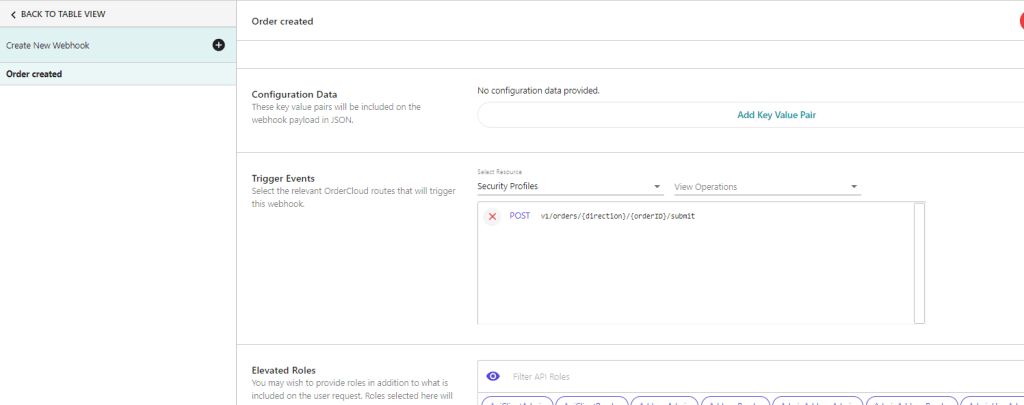
In the new interface setup a name, secret, payload url, etc.
Select the trigger events you want to trigger the webhook. For example when a order is submitted and you want to send data to another system. You can set the order submit as a trigger event. And check the pre-hook if you want it to execute something before OrderCloud.
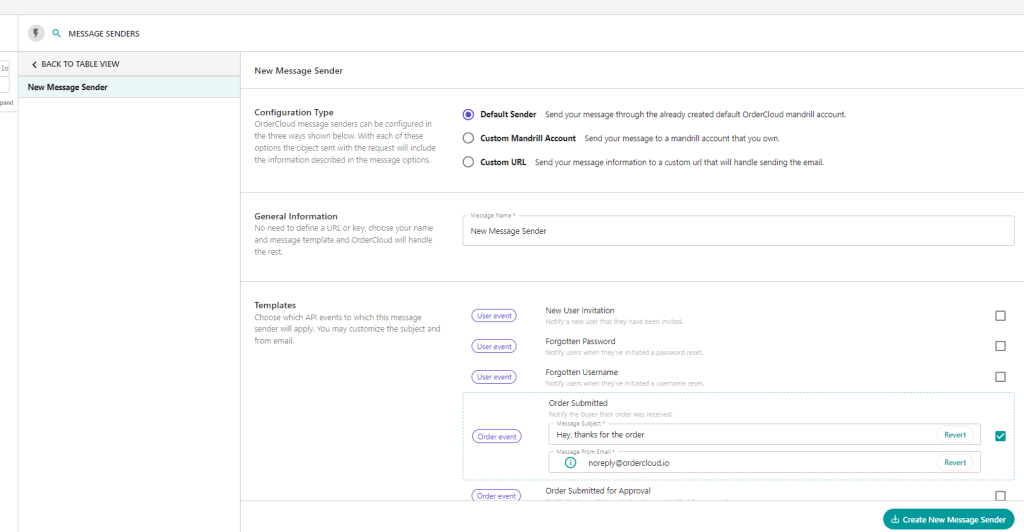
Message Senders
Message Senders are a feature designed to deliver event-driven notifications to users based on activities such as order submission, shipment, password resets, and more.
In comparison with Webhooks, which are also event-driven, Message Senders are more suitable for notification tasks because they automatically retrieve all the relevant information and send a web request for each message that should be sent. This simplifies the process compared to the steps you’d have to take with webhooks, which involve writing code for several more steps.
OrderCloud provides different types of Message Senders, each corresponding to a different commerce activity. Users must be active to receive messages, meaning not only that their personal accounts are active but also that the buyer or supplier organization they belong to is active.
There are three different configuration options for Message Senders: Default Sender, Custom Mandrill Account, and Custom URL. Each option provides a different level of control:
Default Sender: The easiest, no-code option. Uses OrderCloud’s Mandrill account and templates, providing minimal control over the email templates or the data sent.
Custom Mandrill Account: A low-code option that allows you to provide your own custom email templates. The actual sending of emails is still handled by OrderCloud.
Custom URL: The most flexible option that requires more work. You provide OrderCloud with the URL to your publicly available endpoint, which will receive the event payload and is responsible for formatting and sending the notification.
The system also provides a list of variables (Mandrill Variables) that you can use in your custom email templates if you’re using the Mandrill/Mailchimp integration.
Facets are used with the ContentSearch API to enable filtering and grouping of search results based on specific fields or properties. Facets help users to narrow down search results based on their preferences or criteria. Here’s a guide on how to use facets with ContentSearch in Sitecore
Define the facet field in your search index configuration:
First, ensure that the field you want to use as a facet is included in your search index configuration. For example, if you want to use the “Manufacturer” field as a facet, you should have it defined in your search index configuration.
Create a model class for your search result items:
Create a model class that inherits from SearchResultItem and includes the properties you want to use as facets. I would recommend putting the IndexField name in a constant file to reuse everywhere in your solution. Because if it’s every changed you only need to change on 1 place and it won’t break the code. For example:
public class CustomSearchResultItem : SearchResultItem
{
    [IndexField("manufacturer")] //Or use a constant in your foundation project
    public string Manufacturer{ get; set; }
}
Perform a faceted search:
To perform a faceted search, use the .FacetOn() method in your search query. This method tells the search provider to calculate the count of items for each unique value in the specified field.
Here’s an example of performing a faceted search on the “manufacturer” field:
using (var context = ContentSearchManager.GetIndex("sitecore_web_index").CreateSearchContext())
{
    // Create the base search query
    IQueryable<CustomSearchResultItem> query = context.GetQueryable<CustomSearchResultItem>()
        .Where(item => item.TemplateName == "YourTemplateName");

    // Add the facet to the query
    query = query.FacetOn(item => item.Manufacturer);

    // Execute the search and get the facets
    var searchResults = query.GetResults();
    var manufacturerFacetResults = searchResults.Facets.Categories.FirstOrDefault(x => x.Name == "manufacturer");
}
Process the facet results:
In the example above, the manufacturerFacetResults variable contains the facet results for the “manufacturer” field. You can now process these results to display the facet options to the users or apply further filtering based on user input.
Here’s an example of processing the facet results and displaying them as a list of options:
if (manufacturerFacetResults != null)
{
    foreach (var facetValue in manufacturerFacetResults.Values)
    {
        string manufacturer = facetValue.Name;
        int count = facetValue.AggregateCount;
    }
}
Apply facet filters to the search query:
Based on user input, you can apply facet filters to the search query to narrow down the search results. For example, if a user selects a specific manufacturer from the facet options, you can add a filter to the search query:
I began my Sitecore journey in 2016, never imagining the depth of engagement and connection I would find within a professional community. Today, I am honored to stand among my peers with my first MVP title, deeply grateful for the support and rich collaboration that defines our community.
Over the years, I’ve witnessed Sitecore evolve, expanding its product suite to groundbreaking solutions that are shaping the future of digital innovation. The growth of Sitecore’s offerings has mirrored my own journey of professional development, continually inspiring me to explore, innovate, and contribute.
Receiving the MVP title is not just a recognition of my contributions; it’s a powerful reminder of the strength found in collaboration and the endless possibilities that lie ahead. With Sitecore and this incredible community, I’ve never felt more confident in our collective path forward. Together, we are not just adapting to the digital future—we are creating it.
Sitecore OrderCloud is back with another great feature that has been highly anticipated – Product Bundles. It was recently released with API version 1.0.308. Aiming to provide ecommerce businesses with more flexibility, Product Bundles cater to a wide range of use cases to enhance customer experience.
Use case
A few examples on why it’s useful.
Suppose you’re buying a GoPro camera. There are probably hundreds of accessories for GoPro alone, and with Product Bundles you can setup and sell for instance “GoPro starter kit” or “GoPro battery kit”.
If you’re selling event tickets, you can also create a bundle like the “ticket + dinner package”.
The possibilities are only restricted by your imagination. This feature is an excellent opportunity for cross-selling. If customers typically purchase Product A alongside Product B, why not combine them into a bundle and offer a modest discount? It’s a common commerce feature, and it’s exciting to see it integrated into OrderCloud.
Bundles aren’t intended to replace individual products. Instead you create a bundle and assign specific products with it. New endpoints have been introduced regarding bundles, price schedules, catalogs etc. Let’s have look.
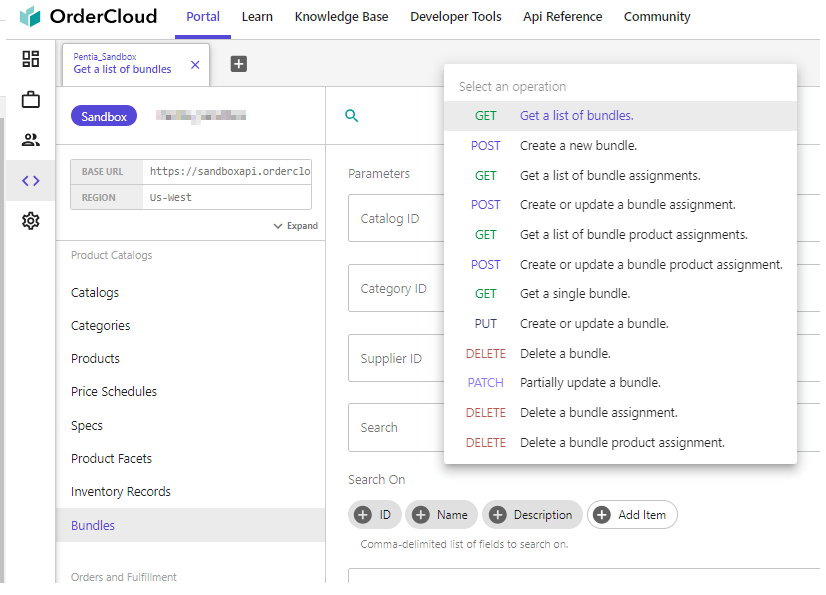
New endpoints
There are new /bundles endpoints under “Product Catalogs“, if you’re using the OrderCloud Portal. For a deeper overview, you can read up on all the endpoints at OrderClouds API reference for bundles.
Bundles follow the same visibility rules as products. They need to be active, present in a catalog, etc. Additionally, all products within a bundle must be visible to the user.
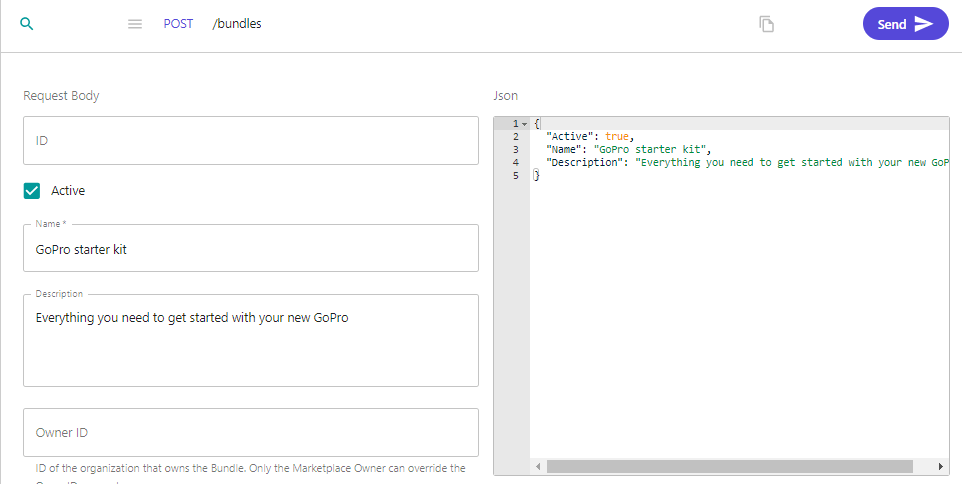
1. Use either the OrderCloud portal or make a POST /bundles with the below information.
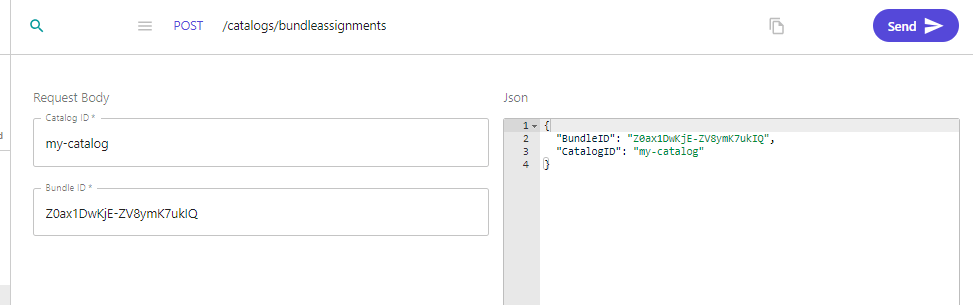
2. Create a catalog bundle assignment with POST /catalogs/bundleassignment or in the portal as below.
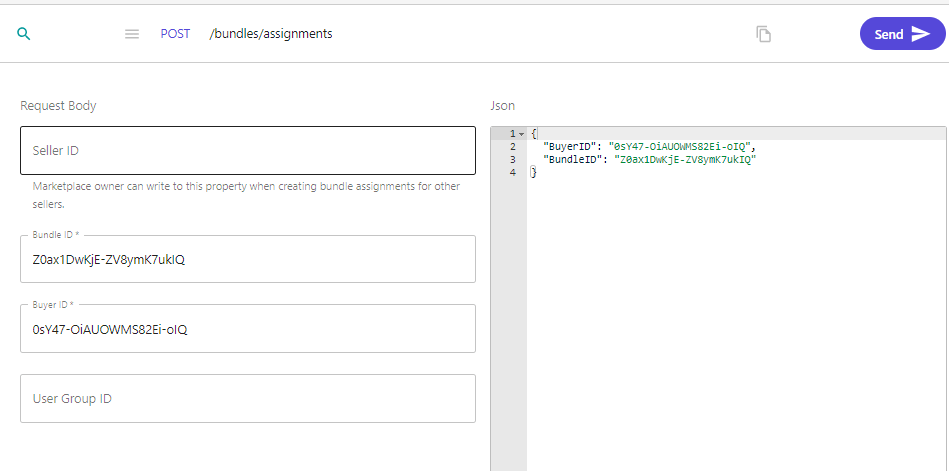
3. Create a bundle assignment for a buyer if you wish. POST /bundles/assignments
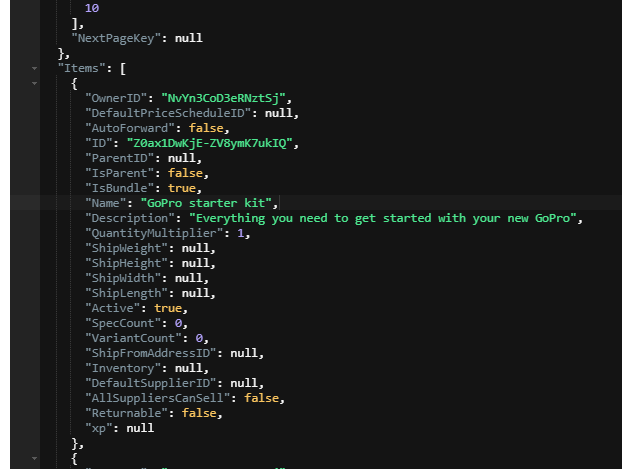
4. Now we can see our bundle is added to our list of products in our catalog if we make a request to /products?catalogID=my-catalog
Note the new property IsBundle. This makes it easy for you to customize your commerce experience by identifying your bundles.
Assign products to a bundle
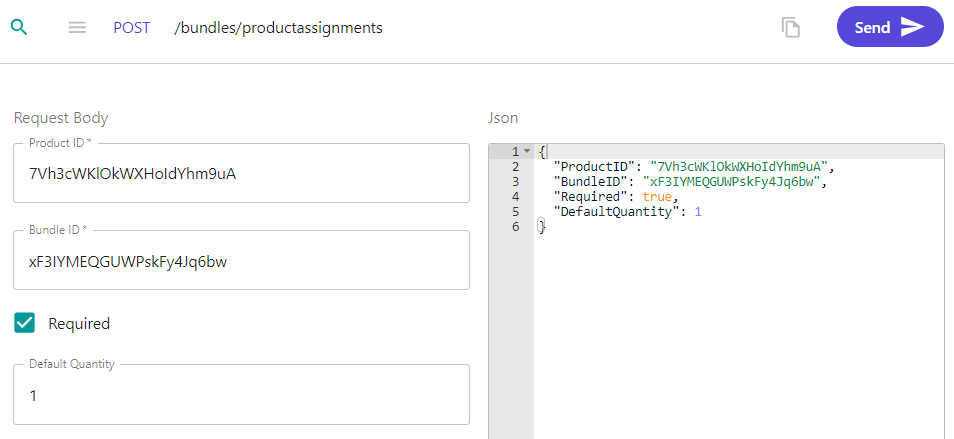
1. Use POST /bundles/productassignments. to assign products to a bundle. I’ve created 3 products for my “GoPro starter kit”, and now i’m assigning them using this endpoint.
GoPro
GoPro sleeve
GoPro tripod
If you want to automatically add these items to your cart when adding the bundle to your cart you need to set the Required field to true and set a Default Quantity. You can also pass them in to the cart as normal lineitems. In this case I prefer that this bundle add the product automatically and with a specific quantity so I set those fields.
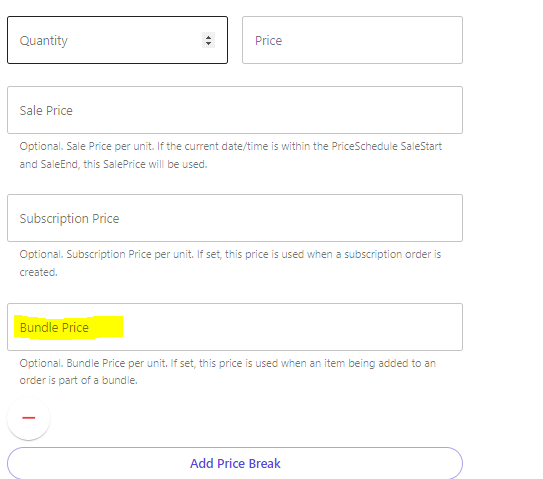
Price schedules
When creating a new price schedule, a “Bundle Price” option is now available. Once this price schedule is assigned to a product within a bundle and the bundle is added to the cart, the product will reflect the price set in that field.
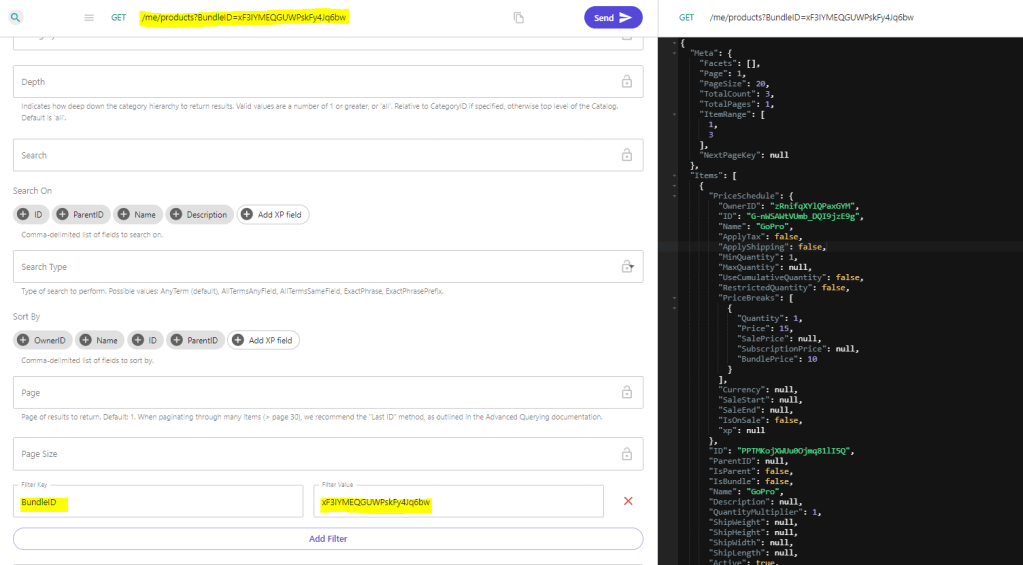
Results
Regular product searches remain unchanged. However, you can now utilize the new filter BundleID={id} to exclusively retrieve products linked to a specific bundle, given correct catalog and price schedule assignments.
GET /me/products?BundleID=xF3IYMEQGUWPskFy4Jq6bw
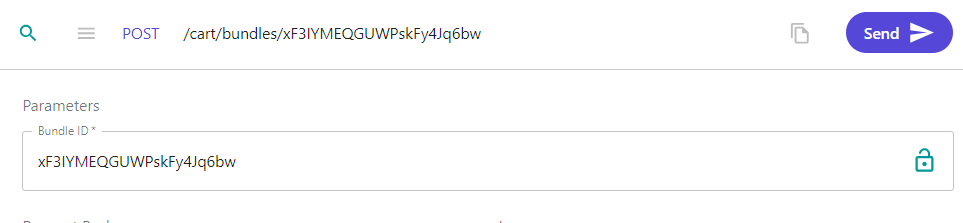
To add the bundle to your cart, use POST /cart/bundles/{bundleID}
Either execute a GET /cart or GET /cart/lineitems to access cart information. When fetching the line items we can see there are 4 line items: 1 is our bundle, and 3 are the products assigned to that bundle, each priced at their Bundle Price.
Notes
New Roles have been established, including BundleReader, BundleAdmin, and BundleAssignmentAdmin.
As mentioned, this was a highly wished for feature. The OrderCloud team is working on expanding the possibilites with Product Bundles. Coming soon are integrations for custom validation and price overrides. The just released new endpoints that supports adding bundles to subscriptions, or recurring bundles!
A noteworthy mention: Ensure the bundle xp schemas align with product xp schemas to avoid indexing issues.
With Product Bundles, Sitecore OrderCloud continues its journey in providing robust features, empowering businesses to tailor unique ecommerce solutions that resonate with their customers. Happy bundling! 🛍️🎉
In part 1 I want to introduce you to Sitecore OrderCloud and how to get going with Next.js JSS.
I started my OrderCloud journey this year and wanted to share with you what I’ve learned.
In this part I will share some insights I have about why to choose OrderCloud, who is it right for, both as developer and for your customers, what questions did I have and how did I come to a conclusion about them. In the upcoming parts I will show you how to setup a Next.js application with JSS and Sitecore and the OrderCloud SDKs, so follow me on social media or my blog to keep yourself updated on upcoming posts.
What is OrderCloud?
Let’s start with an introduction on Sitecore OrderCloud. What is OrderCloud? It’s an API-first, headless commerce platform that offers flexibility, scalability, and customization to help businesses build unique and innovative eCommerce experiences. Sitecore OrderCloud uses MACH architecture which stands for
Microservices: Microservices architecture breaks down applications into smaller, independent processes that communicate with each other. This allows each service to be updated or scaled independently, increasing the flexibility and resilience of the application.
API-first: Meaning it’s designed around the API being the model for the product.
Cloud-native SaaS: Cloud-native refers to applications that are built for the cloud, taking full advantage of cloud computing architectures. They can scale up or down as needed.
Headless: Headless architecture separates the frontend and backend of an application. This decoupling allows developers to make changes to either side without impacting the other. It also lets developers use the same backend for different frontends for example.
MACH architecture enables businesses to choose the best-of-breed tools and easily add, replace, or remove them in the future. This is often crucial for your customers success story and a leap away from the monolithic platform we’re used to and gives huge flexibility to the customers. If OrderCloud uses MACH you can be positive that they’ll always have a modern and up to date solution with the ever changing landscape of commerce.
Sitecore OrderCloud is a pure headless platform that makes it completely language agnostic, meaning you can use whatever programming framework or language you want. As long as you can handle HTTP requests you’re good to go
OrderCloud is:
Product visiblity – what the customer can purchase
Order distribution – capturing and fulfilling orders
User segmentation – managing customers
OrderCloud is NOT:
CRM
Warehouse management system
Tax calculator
Solution for shipping, payments, personalization, email marketing, and frontend
– so all of these things are integrations you need to add if needed. For instance payment integration when an order is placed. Or while OrderCloud supplies simple email on certain events, it’s still limited and you might want to integrate an email system like Sendgrid for example to fit your customers needs.
Is Sitecore OrderCloud right for you?
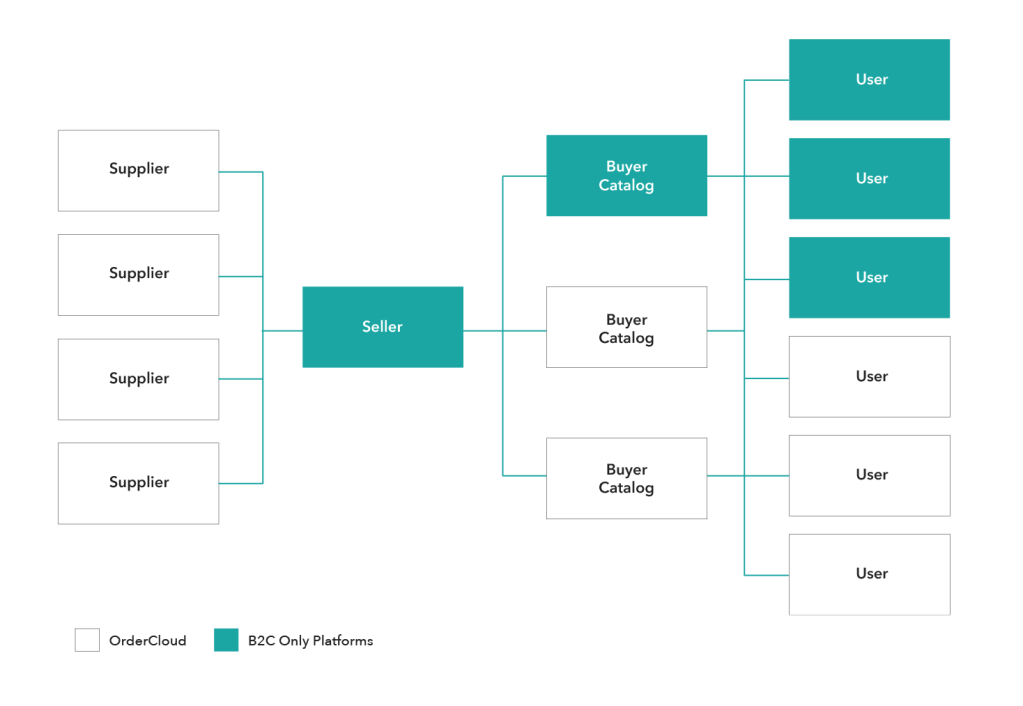
That’s a great question, and this is where OrderCloud shines in my opinion. It is designed to handle B2B, B2C and B2X commerce scenarios. They can be the most basic B2B setup or a complex solution with lots of customization that fits exactly the needs of your customers.
When I started looking into OrderCloud and got to know the platform you can see that it gives an enormous flexibility and can cover any cases that your customer needs. Because if there’s one thing we all know, it’s that each customer’s commerce solution always have their own way, their own third party systems that need integration and their own preferences for pretty much everything. And here OrderCloud gives you that ease of use with for example Integration events or Webhooks to run custom code or make requests to third party applications before or after API calls to OrderCloud. And there’s Connectors in Sitecore Connect to easily integrate with external systems.
With the pace at which technology is advancing, it’s crucial for businesses to choose platforms that aren’t just relevant now but will remain so in the foreseeable future.
It takes into account the unique needs of every business, ensuring that integrations, customizations, and operations run smoothly. So, if you’re thinking about which platform to choose, OrderCloud is certainly worth considering.
First, you start by creating an account on https://portal.ordercloud.io/. It’s free and you get a sandbox environment where you can play around with the API and test all the features, invite your team members without any limitations. You can create a new marketplace in five regions at the moment but when you have a case for OrderCloud just contact their team and they will help you setup one for your region.
It really helped us to have an open and free sandbox so every developer can get a feeling for the API and how it all connects and works. I really recommend you to make an account and try it out. It can also help spark new ideas.
Second, implement Headstart.
Headstart are solutions built on OrderCloud, by the OrderCloud team, to help you kick-start your commerce projects. It’s an opinionated solution and you need to build on this to fit your specific needs or your clients needs, but it will get you, as it’s name, a headstart with the project. There are 2 headstart projects, both on Github, the links are down below. One is a .NET and Angular and the other is a pure Next.js solution. In this part series we will take a look at how to do this with Next.js.
If you’re not familiar with Next.js, in short, It’s a popular React framework developed by Vercel that enables server-side rendering (SSR), static site generation (SSG), and other advanced web development features.
The Headstart solution in .NET and Angular has 3 main components:
The middleware: This is built on .NET 6, maybe they’ve now updated it to Net 7, i’m not sure, and gives you the project on how to integrate Sitecore OrderCloud with various third-party tools or applications to create a more comprehensive solution.
Buyer: The frontend buyer application, where customers visit to buy products, which is built on Angular. It gives a complete shopping experience from the perspective of the buyer user. This includes browsing products, adding them to the cart, checking out, manage account information etc.
Seller: The frontend admin application, which is also written in Angular. This is the backoffice, where sellers and suppliers can manage the products, customers, orders and other administrative tasks. This is not always required. Some customers already have a third-party system which they use to handle their products, like a ERP or PIM. In which case you would let the customers use that and you just handle those changes through your middleware to connect OrderCloud with those systems.
At the moment, you only get the Seller Admin application in the Next.js headstart. Sitecore has confirmed their focus will be on this project going forward, which might give some help determining what headstart to choose.
Both headstarts are available on github, you can download it and also contribute to it if you want.
Must I use Headstart?
No. It’s just as common to make your own project from scratch. It all comes down to what your customer needs and what fits your developer team.
I decided to use the Headstart as a base template that will be extended and built-upon for customization. So it’s basically a fork of the Next.js headstart and i’ll continuously merge changes as they come in to the master branch from Sitecore. So it’s important to only extend and not replace anything from the branch to not break anything down the line.
Do I have to use Sitecore XM/XP with OrderCloud?
Nope, yet again, the power of everything being headless is that you don’t need to. But Sitecore has obviously made it easier and give more features that works with their other products. Like Sitecore Send, Search, Discovery etc.
You can use Sitecore OrderCloud completely standalone.
If you have a customer which already has Sitecore XP, for instance, you can utilize that with JSS. So you can use data from Sitecore that is decoupled and with a Next.js storefront and a NET 6/7 in our middleware.
JSS, or it’s new name Sitecore Headless Services module, “..enables developers to decouple the data application from the rendering application”[1]. It allows for headless development with Sitecore and Javascript applications. Sitecore provides JSS SDKs for this also.
Next.js Headstart and JSS
Based on your client and their needs, imagine you decide to make a NextJS JSS app which uses the OrderCloud javascript SDK as your buyer application. The client already has a Sitecore XP and they have a relatively short time-to-market for the initial phase.
This approach lets you take advantage of various Sitecore features the client is already familiar with, such as Forms, components, data storage solutions, and the experience editor, among others. The headless nature of Sitecore may seem intimidating initially, but once set up, it offers a swift and user-friendly experience.
Now, think about the backoffice. Visualize using a base like the Headstart for NextJS, which employs the OrderCloud SDK. This can be tailored further based on the client’s unique requirements. You could fork the Headstart backoffice project to extend upon as you wish to get going faster.
You can easily deploy this all on Vercel and there are several guides and videos in the Sitecore community on how to get started with Vercel.
Lastly, think about middleware. Consider leveraging Azure functions or microservices to process requests to external systems. This can be for various purposes such as calculating tax, providing shipping and payment options, updating inventory, and more.
What are the challenges of using OrderCloud?
Ordercloud gives you an enormous option for customization and flexibility, but if you’re new to Ordercloud, there’s a lot of work to do yourself that isn’t provided by the platform. This means a steep learning curve, but a better reward in the end.
To cope with that, I was using the knowledge base and Learn path on the OrderCloud site. Next, I went to the courses on OrderCloud at learning.sitecore.com, and then doing the Certification was enough to get me going. So, all in all, I think it’s not that hard if you’re familiar with working with APIs and have a grasp of eCommerce. And obviously using the Headstart projects to your advantage.
As long as you’re familiar with the challenges you can weigh those against the pros of using it.
Stick around for part 2 where I’ll give a demo on how to setup a NextJS JSS app and the NextJS headstart project.
Sitecore OrderCloud has been a game-changer in the B2B eCommerce landscape. With its headless, API-first approach, businesses have the flexibility and scalability they need to meet their unique requirements. A significant feature in OrderCloud is the concept of Extended Properties, also known as XP.
What are XP Fields?
XP fields, short for Extended Properties, are a unique feature in OrderCloud’s API which are essentially extra fields in an OrderCloud resource, like Order, Product, PriceSchedule, etc. They allow developers to store custom data alongside the standard properties of an object. XP fields are basically a JSON object that can be added to most resources within the platform. These fields can be as complex or as deeply nested as you need, providing great flexibility in the kind of data you can store.
Benefits of XP Fields
The beauty of XP fields lies in the flexibility it provides. With XP fields, you can create a custom solution tailored to your specific needs. XP fields can store any key-value pair, including numbers, strings, booleans, arrays, and even other objects.
In addition, XP fields are also available for filtering, sorting, and searching on all list endpoints. This makes XP fields just as accessible as normal fields.
What to Store
What you choose to store in XP fields depends entirely on your specific use case. This might include custom user data, additional product information, or order details, for example. As we already know, XP fields are useful when you need to store data that does not fit into the standard OrderCloud data model.
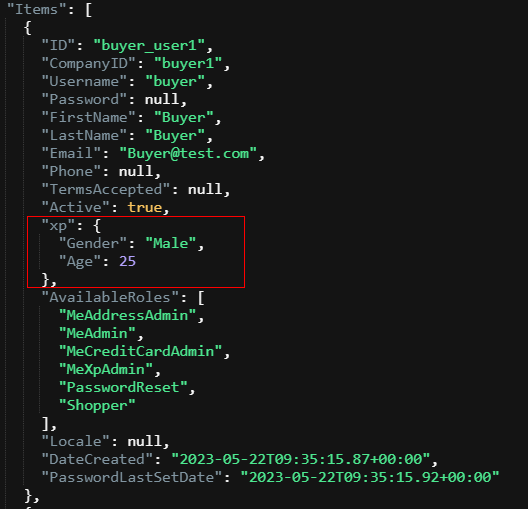
Consider, for instance, that you want to store additional details about users such as age, gender, or specific employment details. With XP fields, you can add this data directly to your user’s data model. The ability to nest objects within XP fields makes it possible to store more complex data structures.
What NOT to Store
While XP fields are incredibly flexible, it is important to note that they should not be used to store sensitive information such as credit card numbers, social security numbers, or passwords. This violates the rules of the platform. And obviously you shouldn’t store data that’s already taken care of by the standard OrderCloud data model.
Another crucial point to remember is that the entire XP object must be 8000 bytes or less, and each key in the XP should be consistently typed per object. This means that if you add a key with a specific type of value, all other entries with the same key should have values of the same type or be null. So you can’t use user.xp.Age = 25 as int on one user and user.xp.Age = “twenty-five” as string on another user. They need to be the same type.
How to Add XP Fields
Adding XP fields to a resource is a straightforward process. When creating or updating a resource, simply include an “xp” key in your JSON request body, with its value being the JSON object containing your custom properties.
Here’s a simple example of updating XP fields on a user: